任务一:
Exercise 1
由于JOS不像其他操作系统一样在内核添加磁盘驱动,然后提供系统调用。需要实现一个文件系统进程来作为磁盘驱动,实现访问磁盘的能力。
i386_init通过将类型ENV_TYPE_FS传递给环境创建函数env_create来标识文件系统环境。在env.c中修改env_create,以便它赋予文件系统environment I/O权限,但永远不要将该特权授予任何其他环境。 确保可以启动文件环境,而不会导致General Protection fault。make grade时应该通过fs i/o test。
在env_create()中多了一行注释:
// If this is the file server (type == ENV_TYPE_FS) give it I/O privileges.
文件系统进程的type是ENV_TYPE_FS,因为默认无I/O权限,如果遇到了type是ENV_TYPE_FS,需要授予I/O权限。
	if (type == ENV_TYPE_FS)
	{
		e->env_tf.tf_eflags |= FL_IOPL_MASK;
	}
make grade测试截图:

Exercise 2
在
fs/bc.c中实现bc_pgfault和flush_block函数。
bc_pgfault是一个页面错误处理程序,任务是从磁盘加载页面以响应页面错误。在编写此代码时,需要注意: (1)
addr可能不会与块边界对齐 (2)
ide_read操作扇区,而不是块 如果某页没有被映射或者不为脏,那么
flush_block不干任何事情。其中脏位(PTE_D)是由硬件进行设置的,并且保存在uvpt中。flush_block使用sys_page_map来清除PTE_D位。 使用
make grade测试代码,代码应该通过check_bc、check_super和check_bitmap。
bc_pgfault()
// Fault any disk block that is read in to memory by loading it from disk.
bc_pgfault()是FS进程缺页处理函数,负责将数据从磁盘读取到对应的内存。
在要实现的代码前有一小段注释:
	// Allocate a page in the disk map region, read the contents
	// of the block from the disk into that page.
	// Hint: first round addr to page boundary. fs/ide.c has code to read
要求将导致缺页的地址翻译为磁盘空间地址(注意addr对齐),申请页,然后使用 ide_read 从磁盘读入。fs/ide.c中有ide_read函数:
// secno对应IDE磁盘上的扇区编号
// dst为当前文件系统服务程序空间中的对应地址
// nsecs为读写的扇区数。
int ide_read(uint32_t secno, void *dst, size_t nsecs)
可以看到ide_read()操作的是扇区,而不是块,JOS中通过宏定义了块和扇区的关系。(块大小位4KB,扇区大小为512B,每次读写一个块,就需要读写4个扇区)
#define BLKSECTS (BLKSIZE / SECTSIZE) // sectors per block
补充代码:
	// 根据块大小对齐页面
	addr = ROUNDDOWN(addr, BLKSIZE);

	// 通过sys_page_alloc()系统调用来进行页面分配,如果分配页面失败,报错
	if ((r = sys_page_alloc(0, addr, PTE_U | PTE_P | PTE_W)) < 0)
		panic("bc_pgfault failed: sys_page_alloc: %e", r);

	// 通过ide_read()进行内容的读取,ide_read失败,报错
	if ((r = ide_read(blockno * BLKSECTS, addr, BLKSECTS)) < 0)
		panic("in_bc_pgfault failed: ide_read: %e", r);
flush_block()
该函数作用是将内存空间的内容写入磁盘。首先对齐地址,如果block不在内存或者block没有被写过,flush_block()不需要做任何操作(可以通过PTE的PTE_D位判断该block有没有被写过);否则,在写入磁盘后,利用sys_page_map将PTE_D位清除,避免多次进行flush,导致访问磁盘占用大量的时间。
// Flush the contents of the block containing VA out to disk if necessary, then clear the PTE_D bit using sys_page_map.
// If the block is not in the block cache or is not dirty, does nothing.
//
// Hint: Use va_is_mapped, va_is_dirty, and ide_write.
// Hint: Use the PTE_SYSCALL constant when calling sys_page_map.
// Hint: Don't forget to round addr down.
提示中提到了va_is_mapped,va_is_dirty, ide_write,PTE_SYSCALL,分别是:
// Is this virtual address mapped?
bool va_is_mapped(void *va)
{
	return (uvpd[PDX(va)] & PTE_P) && (uvpt[PGNUM(va)] & PTE_P);
}

// Is this virtual address dirty?
bool va_is_dirty(void *va)
{
	return (uvpt[PGNUM(va)] & PTE_D) != 0;
}

// 同ide_read,对扇区操作
int ide_write(uint32_t secno, const void *src, size_t nsecs)

// Flags in PTE_SYSCALL may be used in system calls.  (Others may not.)
#define PTE_SYSCALL	(PTE_AVAIL | PTE_P | PTE_W | PTE_U)
补充代码:
	// 对齐地址
	addr = ROUNDDOWN(addr, PGSIZE);
	int r;
	// 如果block不在内存或者block没有被写过,do nothing
	if (!va_is_mapped(addr) || !va_is_dirty(addr))
		return;

	// 写入磁盘
	if ((r = ide_write(blockno * BLKSECTS, addr, BLKSECTS)) < 0)
		panic("flush_block failed: ide_write(): %e", r);

	// 清空脏位
	if ((r = sys_page_map(0, addr, 0, addr, uvpt[PGNUM(addr)] & PTE_SYSCALL)) < 0)
		panic("in bc_pgfault failed: sys_page_map: %e", r);
make grade测试截图:

Exercise 3
使用
free_block作为在fs/fs.c中实现alloc_block的模型,它应该在bitmap中找到一个空闲的磁盘块,标记它被使用,并返回块号。当分配一个块时,应该立即用flush_block将已更改的bitmap块刷新到磁盘,以保持文件系统的一致性。 使用
make grade测试代码,代码应该通过alloc_block。
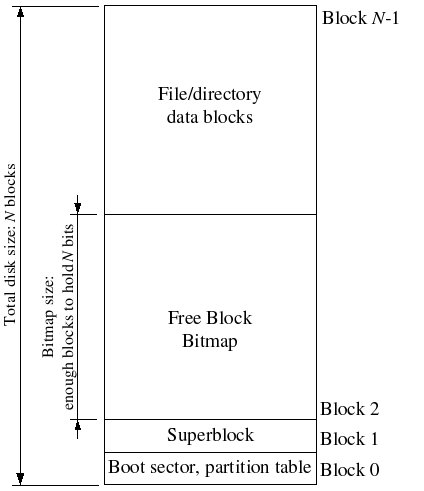
在fs_init()中已经初始化了bitmap指针,位图存放在2号块中。
	// Set "bitmap" to the beginning of the first bitmap block.
	bitmap = diskaddr(2);
alloc_block函数的注释,和要求中写的一样:在bitmap中遍历找到一个空闲块分配,标记为被使用并返回块号。当分配块时为了保持文件系统的一致性,需要立即用flush_block将已更改的bitmap块刷新到磁盘。
// Search the bitmap for a free block and allocate it.
// When you allocate a block, immediately flush the changed bitmap block to disk.
//
// Return block number allocated on success,
// -E_NO_DISK if we are out of blocks.
//
// Hint: use free_block as an example for manipulating the bitmap.
根据提示先去看free_block函数,可以发现bitmap的每一位代表一个block,1表示该block未被使用(空闲),0表示已被使用。
// Mark a block free in the bitmap
void free_block(uint32_t blockno)
{
	// Blockno zero is the null pointer of block numbers.
	if (blockno == 0)
		panic("attempt to free zero block");
	bitmap[blockno/32] |= 1<<(blockno%32);
}
网上找到了一张图比较清楚(https://www.cnblogs.com/luo-he/p/14013192.html):
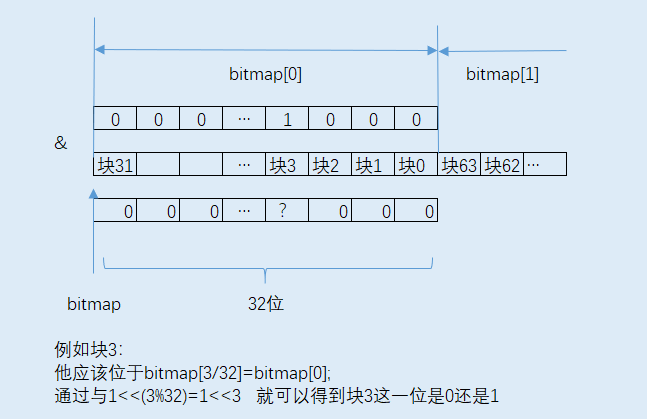
根据上述思路仿照完成alloc_block():
int alloc_block(void)
{
    // 这里注释提示磁盘中一共有super->s_nblocks个块
	// The bitmap consists of one or more blocks.
	// A single bitmap block contains the in-use bits for BLKBITSIZE blocks.
	// There are super->s_nblocks blocks in the disk altogether.

	// LAB 5: Your code here.
	// 块号
	uint32_t blockno;

    // 由于block 0被用来保存boot loader和分区表,block 1用来保存superblock
    // 所以这里从2号块开始检索,一直到super->s_nblocks
	for (blockno = 2; blockno < super->s_nblocks; blockno++)
	{
        // 如果找到了空闲块
		if (block_is_free(blockno))
		{
            // 将其标记为被使用:0
            // 原先是1,异或1后得0
			bitmap[blockno / 32] ^= 1 << (blockno % 32);
            // 更新位图块
			flush_block(bitmap);
            // 返回块号
			return blockno;
		}
	}
    // 若找不到空闲块,则返回-E_NO_DISK
	return -E_NO_DISK;
}
磁盘分布图:
make grade测试截图:

Exercise 4
实现
file_block_walk和file_get_block。
file_block_walk从文件中的块偏移量映射到struct File或间接块中该块的指针,类似pgdir_walk。file_get_block更进一步,映射到实际的磁盘块,如果需要的话分配一个新的。 使用
make grade测试代码,代码应该通过file_open,file_get_block,file_flush/file_truncated/file rewrite和testfile。
file_block_walk()
首先分析代码注释,file_block_walk函数的作用是:查找f指向文件结构的第filebno个block的存储地址,保存到ppdiskbno中。如果f->f_indirect还没有分配,且alloc为真,那么将分配一个新的block作为该文件的f->f_indirect。类比页表管理的pgdir_walk()。
// Find the disk block number slot for the 'filebno'th block in file 'f'.
// Set '*ppdiskbno' to point to that slot.
// The slot will be one of the f->f_direct[] entries, or an entry in the indirect block.
// When 'alloc' is set, this function will allocate an indirect block if necessary.
//
// Returns:
//	0 on success (but note that *ppdiskbno might equal 0).
//	-E_NOT_FOUND if the function needed to allocate an indirect block, but alloc was 0.
//	-E_NO_DISK if there's no space on the disk for an indirect block.
//	-E_INVAL if filebno is out of range (it's >= NDIRECT + NINDIRECT).
//
// Analogy: This is like pgdir_walk for files.
// Hint: Don't forget to clear any block you allocate.
static int file_block_walk(struct File *f, uint32_t filebno, uint32_t **ppdiskbno, bool alloc)
根据不同的执行情况产生不同的返回值:
-
成功,返回0
-
如果函数需要分配一个间接块,但
alloc是0,则返回-E_NOT_FOUND -
如果磁盘空间不足,分配失败,返回
-E_NO_DISK -
如果
filebno超出范围(超过NDIRECT + NINDIRECT),返回-E_INVAL// Number of block pointers in a File descriptor #define NDIRECT 10 // Number of direct block pointers in an indirect block #define NINDIRECT (BLKSIZE / 4)
实现函数:
static int file_block_walk(struct File *f, uint32_t filebno, uint32_t **ppdiskbno, bool alloc)
{
	// LAB 5: Your code here.
	int res;
	// filebno超出范围,返回-E_INVAL
	if (filebno >= NDIRECT + NINDIRECT)
		return -E_INVAL;
	// direct
	if (filebno < NDIRECT)
	{
		*ppdiskbno = (f->f_direct) + filebno;
		return 0;
	}
	// indirect
	else
	{
		// 需要分配间接块,且alloc不为0
		if (alloc && (f->f_indirect == 0))
		{
			// 分配失败
			if ((res = alloc_block()) < 0)
				return -E_NO_DISK;
			// 分配成功
            // alloc_block返回的是块号
			memset(diskaddr(res), 0, BLKSIZE);
			f->f_indirect = res;
            // flush_block清除分配的块
            flush_block(diskaddr(res));
		}
		// 需要分配,但alloc为0
		else if (f->f_indirect == 0)
		{
			return -E_NOT_FOUND;
		}
        // 通过diskaddr函数返回间接块的虚拟地址,f_indirect记录的是块号
		*ppdiskbno = ((uint32_t *)diskaddr(f->f_indirect)) + filebno - NDIRECT;
		return 0;
	}
}
file_get_block()
分析代码注释,file_get_block的函数的作用是:查找文件第filebno个block对应的虚拟地址addr,将其保存到blk地址处。
// Set *blk to the address in memory where the filebno'th block of file 'f' would be mapped.
//
// Returns 0 on success, < 0 on error.  Errors are:
//	-E_NO_DISK if a block needed to be allocated but the disk is full.
//	-E_INVAL if filebno is out of range.
//
// Hint: Use file_block_walk and alloc_block.
同样根据不同的执行情况产生不同的返回值:
- 成功,返回0
- 当磁盘空间不足以分配新块时,返回
-E_NO_DISK - 当
filebno超出范围时,返回E_INVAL
所以实现函数的思路是:通过file_block_walk()找到对应的pdiskbno,如果为0,则进行分配,否则,同样通过diskaddr()转换成虚拟地址。
具体代码:
int file_get_block(struct File *f, uint32_t filebno, char **blk)
{
	// LAB 5: Your code here.
	// 函数通过一级指针就能实现
	uint32_t *pdiskbno;
	int res;
	// res<0说明file_block_walk有报错
	if ((res = file_block_walk(f, filebno, &pdiskbno, true)) < 0)
		return res;
	// 分配空间
	if (*pdiskbno == 0)
	{
		if ((res = alloc_block()) < 0)
			return -E_NO_DISK;
		*pdiskbno = res;
		memset(diskaddr(res), 0, BLKSIZE);
		flush_block(diskaddr(res));
	}
	*blk = diskaddr(*pdiskbno);
	return 0;
}
make grade测试截图:

Exercise 5
在
fs/serv.c中实现serve_read。
serve_read的繁重工作将由fs/fs.c中已经实现的file_read来完成(反过来,这只是对file_get_block的一堆调用)。只需要为文件读取提供RPC接口。请查看serve_set_size中的注释和代码,以了解应该如何构造server函数。 使用
make grade测试代码,代码应该通过serve_open/file_stat/file_close和file_read。
根据提示去看了serve_set_size的代码和注释:
// 将req->req_fileid的大小设置为req->req_size字节,根据需要截断或扩展文件。
// Set the size of req->req_fileid to req->req_size bytes, truncating or extending the file as necessary.
int serve_set_size(envid_t envid, struct Fsreq_set_size *req)
{
	struct OpenFile *o;
	int r;

	if (debug)
		cprintf("serve_set_size %08x %08x %08x\n", envid, req->req_fileid, req->req_size);

	// Every file system IPC call has the same general structure.每个文件系统IPC调用都有相同的通用结构。
	// Here's how it goes.

	// First, use openfile_lookup to find the relevant open file.首先通过openfile_lookup查找相关的打开文件。
	// On failure, return the error code to the client with ipc_send.如果失败,通过ipc_send将错误代码返回给客户端。
	if ((r = openfile_lookup(envid, req->req_fileid, &o)) < 0)
		return r;

	// Second, call the relevant file system function (from fs/fs.c).然后调用相关的文件系统函数(fs/fs.c)。
	// On failure, return the error code to the client.如果失败,将错误代码返回给客户端。
	return file_set_size(o->o_file, req->req_size);
}
其中OpenFile结构如下:
struct OpenFile
{
	uint32_t o_fileid;	 // file id 文件ID
	struct File *o_file; // mapped descriptor for open file
	int o_mode;			 // open mode 打开方式
	struct Fd *o_fd;	 // Fd page
};
OpenFile链接了另外两个结构体struct File和struct Fd,并对文件服务器保持私有。服务器维护一个所有打开文件的数组,用文件ID(file ID)进行索引。(最多可以同时打开MAXOPEN文件)。客户端使用文件id与服务器通信。文件id很像内核中的环境id。使用openfile_lookup可将文件id转换为OpenFile结构。
然后分析需要完成的函数serve_read的注释:
// 从ipc->read.req_fileid中的当前查找位置最多读ipc->read.req_n个字节。
// 将从文件读取的字节返回给ipc->readRet中的调用者,然后更新查找位置。
// 返回成功读取的字节数,如果发生错误则返回<0。
// Read at most ipc->read.req_n bytes from the current seek position in ipc->read.req_fileid.
// Return the bytes read from the file to the caller in ipc->readRet, then update the seek position.
// Returns the number of bytes successfully read, or < 0 on error.
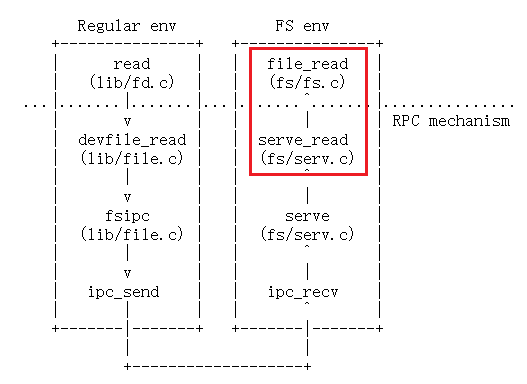
serve_read函数实际上是对于file_read()的一层封装,仿照serve_set_size的流程:
-
首先通过
openfile_lookup()找到对应的文件 -
然后调用
file_read()进行读入,之后调整文件的指针,并返回读入的大小(如果失败做相应的处理)其中,
file_read()函数如下:// Read count bytes from f into buf, starting from seek position offset. // This meant to mimic the standard pread function. // Returns the number of bytes read, < 0 on error. // 从文件f中的offset字节处读取count字节到buf处。 ssize_t file_read(struct File *f, void *buf, size_t count, off_t offset) { int r, bn; off_t pos; char *blk; if (offset >= f->f_size) return 0; count = MIN(count, f->f_size - offset); for (pos = offset; pos < offset + count;) { if ((r = file_get_block(f, pos / BLKSIZE, &blk)) < 0) return r; bn = MIN(BLKSIZE - pos % BLKSIZE, offset + count - pos); memmove(buf, blk + pos % BLKSIZE, bn); pos += bn; buf += bn; } return count; }
所以,serve_read函数的实现如下:
int serve_read(envid_t envid, union Fsipc *ipc)
{
	struct Fsreq_read *req = &ipc->read;
	struct Fsret_read *ret = &ipc->readRet;

	if (debug)
		cprintf("serve_read %08x %08x %08x\n", envid, req->req_fileid, req->req_n);

	// Lab 5: Your code here:
	struct OpenFile *o;
	int r;
    // 通过openfile_lookup()找到对应的文件
    // 如果失败,通过ipc_send将错误代码返回给客户端。
	if ((r = openfile_lookup(envid, req->req_fileid, &o)) < 0)
		return r;
    // 调用file_read()进行读入
	if ((r = file_read(o->o_file, ret->ret_buf, req->req_n, o->o_fd->fd_offset)) < 0)
		return r;
    // 调整文件的指针,并返回读入的大小
    // file_read即为读入大小
	o->o_fd->fd_offset += r;
	return r;
}
make grade测试截图:

Exercise 6
在
fs/serv.c中实现serve_write,在lib/file.c中实现devfile_write。 使用
make grade测试代码,代码应该通过file_write,file_read after file_write,open和large file。
serve_write
serve_write的实现框架和serve_set_size、serve_read都相同,也是对file_write的封装。file_write:将buf处的count字节写到文件f的offset开始的位置。
// Write count bytes from buf into f, starting at seek position offset.
// This is meant to mimic the standard pwrite function.
// Extends the file if necessary.
// Returns the number of bytes written, < 0 on error.
int file_write(struct File *f, const void *buf, size_t count, off_t offset)
{
	int r, bn;
	off_t pos;
	char *blk;

	// Extend file if necessary
	if (offset + count > f->f_size)
		if ((r = file_set_size(f, offset + count)) < 0)
			return r;

	for (pos = offset; pos < offset + count;)
	{
		if ((r = file_get_block(f, pos / BLKSIZE, &blk)) < 0)
			return r;
		bn = MIN(BLKSIZE - pos % BLKSIZE, offset + count - pos);
		memmove(blk + pos % BLKSIZE, buf, bn);
		pos += bn;
		buf += bn;
	}

	return count;
}
查看serve_write的注释:
// 从当前查找位置开始,从req->req_buf将req->req_n字节写入req_fileid,并相应地更新查找位置。
// 必要时扩展文件。
// 返回写入的字节数,或在出错时返回<0。
// Write req->req_n bytes from req->req_buf to req_fileid,
// starting at the current seek position, and update the seek position accordingly.
// Extend the file if necessary.
// Returns the number of bytes written, or < 0 on error.
仿照serve_read实现函数serve_write:
int serve_write(envid_t envid, struct Fsreq_write *req)
{
	if (debug)
		cprintf("serve_write %08x %08x %08x\n", envid, req->req_fileid, req->req_n);

	// LAB 5: Your code here.
	struct OpenFile *o;
	int r;
	if ((r = openfile_lookup(envid, req->req_fileid, &o)) < 0)
		return r;
	if ((r = file_write(o->o_file, req->req_buf, req->req_n, o->o_fd->fd_offset)) < 0)
		return r;
	o->o_fd->fd_offset += r;
	return r;
}
devfile_write
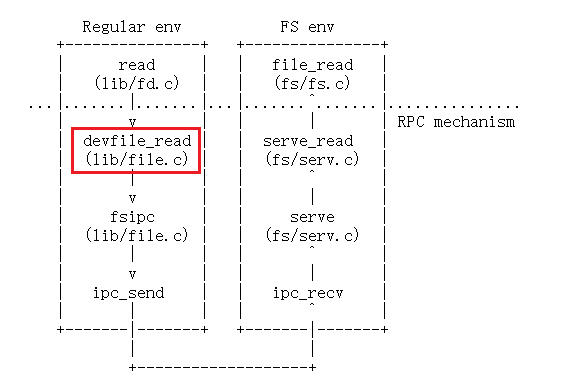
devfile_write可以仿照devfile_read实现,首先查看devfile_read函数:
// Read at most 'n' bytes from 'fd' at the current position into 'buf'.
static ssize_t devfile_read(struct Fd *fd, void *buf, size_t n)
{
    // 在用请求参数填充fsipcbuf.read后,向文件系统服务器发出一个FSREQ_READ请求。
    // 读取的字节将被文件系统服务器写回fsipcbuf。
	// Make an FSREQ_READ request to the file system server after filling fsipcbuf.read with the request arguments.
	// The bytes read will be written back to fsipcbuf by the file system server.
	int r;

	fsipcbuf.read.req_fileid = fd->fd_file.id;
	fsipcbuf.read.req_n = n;
	if ((r = fsipc(FSREQ_READ, NULL)) < 0)
		return r;
	assert(r <= n);
	assert(r <= PGSIZE);
	memmove(buf, fsipcbuf.readRet.ret_buf, r);
	return r;
}
分析devfile_write的注释:
// 在当前查找位置,最多从buf写入n字节到fd。
// Write at most 'n' bytes from 'buf' to 'fd' at the current seek position.
//
// Returns:
//	 The number of bytes successfully written.
//	 < 0 on error.
	// 向文件系统服务器发出FSREQ_WRITE请求。
	// Make an FSREQ_WRITE request to the file system server.
	// Be careful: fsipcbuf.write.req_buf is only so large, but remember that write is always allowed to write *fewer*
	// bytes than requested. write总是允许写比要求的更少的字节。
所以devfile_write同样需要调用fsipc,向文件服务器发送FSREQ_WRITE请求并等待回复。请求体保存在fsipcbuf中,回复部分也应该写回到fsipcbuf中。
参考devfile_read实现代码:
static ssize_t devfile_write(struct Fd *fd, const void *buf, size_t n)
{
	// LAB 5: Your code here
	int r;
	fsipcbuf.write.req_fileid = fd->fd_file.id;
	fsipcbuf.write.req_n = n;
	memmove(fsipcbuf.write.req_buf, buf, n);
	if ((r = fsipc(FSREQ_WRITE, NULL)) < 0)
		return r;
	assert(r <= n);
	assert(r <= PGSIZE);
	return r;
}
make grade测试截图:

Exercise 9
在
kern/trap.c中,调用kbd_intr来处理trapIRQ_offset+IRQ_kbd和调用serial_intr来处理trapIRQ_offset+IRQ_serial
首先找到kbd_intr和serial_intr。在cons_getc()中有调用过kbd_intr和serial_intr,实现了在monitor模式下(禁止中断)正常获取用户输入。
// return the next input character from the console, or 0 if none waiting
int cons_getc(void)
{
	int c;

	// poll for any pending input characters,
	// so that this function works even when interrupts are disabled
	// (e.g., when called from the kernel monitor).
	serial_intr();
	kbd_intr();

	// .....
}
在trap_dispatch中添加相应的入口:
	// Handle keyboard and serial interrupts.
	// LAB 5: Your code here.
	if (tf->tf_trapno == IRQ_OFFSET + IRQ_KBD)
	{
		kbd_intr();
		return;
	}

	if (tf->tf_trapno == IRQ_OFFSET + IRQ_SERIAL)
	{
		serial_intr();
		return;
	}
通过make run-testkbd 进行测试:
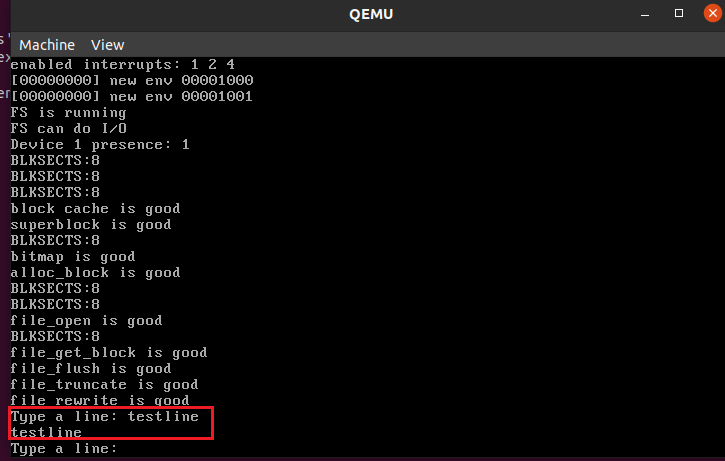
Exercise 10
shell不支持I/O重定向。最好运行
sh <script,而不是手工输入脚本中的所有命令。将<的I/O重定向添加到user/sh.c。
首先找到user/sh.c中runcmd()里的注释:
// Open 't' for reading as file descriptor 0 (which environments use as standard input).
// We can't open a file onto a particular descriptor, so open the file as 'fd', then check whether 'fd' is 0.
// If not, dup 'fd' onto file descriptor 0,then close the original 'fd'.
按照注释的思路实现代码:
-
打开t作为文件描述符0去读文件(标准输入)
-
因为不能在特定的描述符上打开文件,所以以
fd打开文件,检查fd是否为0(fd只需为读权限即可) -
如果不是0,通过
dup函数,dup fd到文件描述符0,关闭原来的fd。dup()的作用:将文件描述符newfdnum复制为文件描述符oldfdnum。int dup(int oldfdnum, int newfdnum);
可以模仿后面的输出重定向,runcmd()函数实现如下:
			// LAB 5: Your code here.
			if ((fd = open(t, O_RDONLY)) < 0)
			{
				cprintf("runcmd:open file %s failed. \n", t);
				exit();
			}
			if (fd != 0)
			{
				dup(fd, 0);
				close(fd);
			}
			break;
(lab里说可以通过运行 make Run-testshell来测试shell,但是试下来会报错【下图】,搜了一下好像是makefile里面的文件依赖关系有问题,但是不怎么会改,而且make grade可以跑过就不管这个问题了)

make grade测试截图:
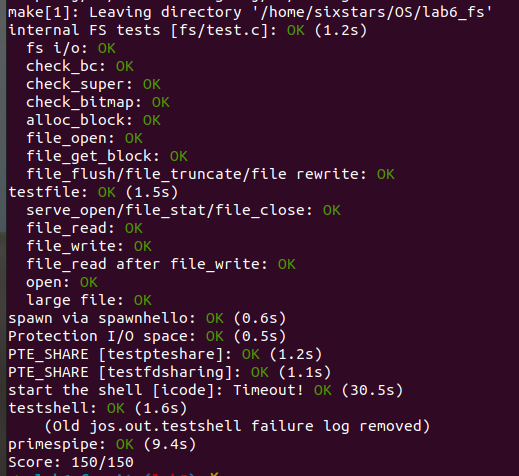
任务二:
阅读相关代码和文档,回答下列问题:
Question 1
回答MIT JOS LAB5 的 Question 1。
Do you have to do anything else to ensure that this I/O privilege setting is saved and restored properly when you subsequently switch from one environment to another? Why?
当随后从一个环境切换到另一个环境时,是否还需要执行其他操作以确保正确保存和恢复这个 I/O 权限设置?为什么?
A:不需要。在创建文件系统环境时,通过e->env_tf.tf_eflags |= FL_IOPL_MASK;设置了eflags,之后进程切换时会在栈上保存eflags,之后还原时会调用env_pop_tf(),在iret指令中恢复了eip,cs,eflags等寄存器。所以不需要额外的操作。
Question 2
在
fs/bc.c的bc_pgfault函数中,为什么要把block_is_free的检查放在读入block之后?
A:如果把block_is_free的检查放在读入block之前会产生下图中的报错(make qemu):
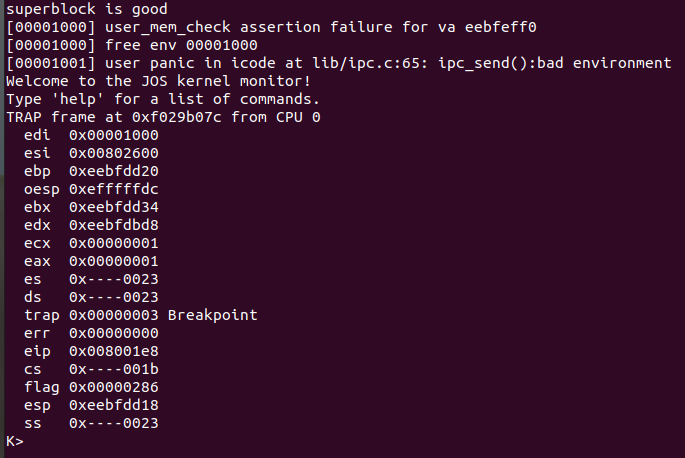
在bc_pgfault函数中换一下顺序并打印地址和块号:


make qemu结果:
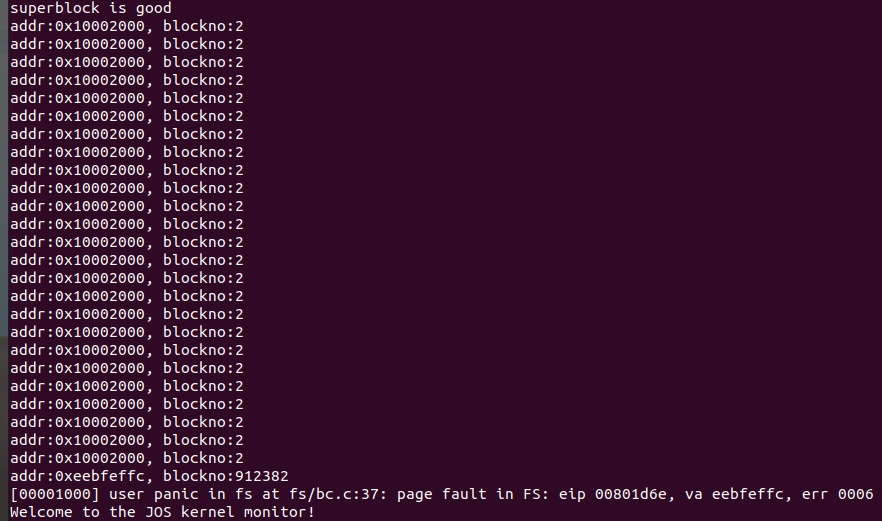
可以发现check_super()函数成功运行,问题出在了执行check_bitmap()的过程中。在fs_init中调用了这两个check函数:
// Initialize the file system
void fs_init(void)
{
	static_assert(sizeof(struct File) == 256);

	// Find a JOS disk.  Use the second IDE disk (number 1) if available
	if (ide_probe_disk1())
		ide_set_disk(1);
	else
		ide_set_disk(0);
	bc_init();

	// Set "super" to point to the super block.
	super = diskaddr(1);
	check_super();

	// Set "bitmap" to the beginning of the first bitmap block.
	bitmap = diskaddr(2);
	check_bitmap();
}
在check_bitmap中会遍历bitmap检查是否都被标记为in-use,从block_is_free(2)开始检查:
// Validate the file system bitmap.
//
// Check that all reserved blocks -- 0, 1, and the bitmap blocks themselves --
// are all marked as in-use.
void check_bitmap(void)
{
	uint32_t i;

	// Make sure all bitmap blocks are marked in-use
	for (i = 0; i * BLKBITSIZE < super->s_nblocks; i++)
		assert(!block_is_free(2 + i));

	// Make sure the reserved and root blocks are marked in-use.
	assert(!block_is_free(0));
	assert(!block_is_free(1));

	cprintf("bitmap is good\n");
}
具体看一下block_is_free函数,这时Superblock已经设置好,super不为0,不会进入第一个if。进入第二个if时需要读取bitmap[blockno/32],但是这时bitmap对应块还没有从磁盘读取并映射好,会产生缺页故障,调用bc_pgfault函数。(JOS采用的是demand paging,即访问对应的磁盘块发生了页错误时才分配物理页)
// Check to see if the block bitmap indicates that block 'blockno' is free.
// Return 1 if the block is free, 0 if not.
bool block_is_free(uint32_t blockno)
{
	if (super == 0 || blockno >= super->s_nblocks)
		return 0;
	if (bitmap[blockno / 32] & (1 << (blockno % 32)))
		return 1;
	return 0;
}
但是调换顺序后的bc_pgfault,会在读入block之前检查block_is_free:

所以又会去访问bitmap,然后又发生了缺页故障,再次执行bc_pgfault(),就这样陷入死循环,所以在打印出的结果中会发现一直在访问2号块。所以要把block_is_free的检查放在读入block之后。(但是不太了解为什么最后会突然访问一个特别大的地址,导致要访问的地址超过了block cache region,产生panic,我以为会一直死循环执行下去)

接下来是正常情况下打印的结果,作为对比,可以看到只访问了一次2号块:

Question 3
请详细描述JOS中文件存储在磁盘中的结构。在读取或写入文件时,
superblock,bitmap以及block cache分别在什么时候被使用,它们分别有什么作用?
A:
详细描述JOS中文件存储在磁盘中的结构
由于JOS文件系统不支持硬链接,所以不使用inode,只是将一个文件的(或子目录的)元数据存储在描述该文件的(唯一的)目录条目中。
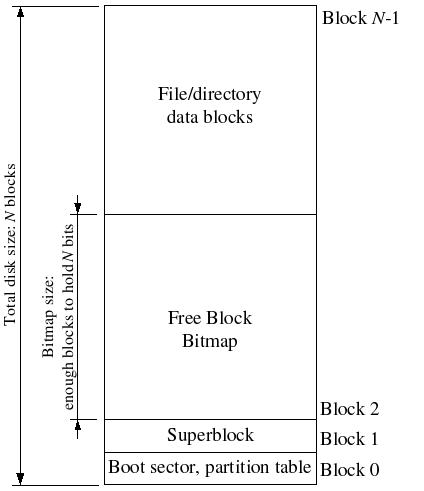
在逻辑上,文件和目录都由一系列blocks组成,这些blocks分散在磁盘中,文件系统屏蔽了blocks分布的细节,提供了一个可以顺序读写文件的接口。JOS文件系统允许用户环境直接读取目录元数据。
文件系统使用superblock保存文件系统属性元数据,比如block size, disk size, 根目录位置等。JOS的superblock位于磁盘的block 1。block 0被用来保存boot loader和分区表。
Super结构:
struct Super {
	uint32_t s_magic;		// Magic number: FS_MAGIC
	uint32_t s_nblocks;		// Total number of blocks on disk
	struct File s_root;		// Root directory node
};
磁盘布局图:
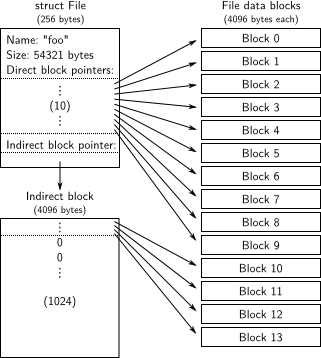
JOS文件系统使用struct File结构描述文件,该结构包含文件名,大小,类型,保存文件内容的block号。File结构既能代表文件也能代表目录,由f_type字段区分,文件系统以相同的方式管理文件和目录,只是目录文件的内容是一系列File结构,这些File结构描述了在该目录下的文件或者子目录。
File结构:
// Number of block pointers in a File descriptor
#define NDIRECT		10

struct File {
	char f_name[MAXNAMELEN];	// filename
	off_t f_size;			// file size in bytes
	uint32_t f_type;		// file type

	// Block pointers.
	// A block is allocated iff its value is != 0.
	uint32_t f_direct[NDIRECT];	// direct blocks
	uint32_t f_indirect;		// indirect block

	// Pad out to 256 bytes; must do arithmetic in case we're compiling
	// fsformat on a 64-bit machine.
	uint8_t f_pad[256 - MAXNAMELEN - 8 - 4*NDIRECT - 4];
} __attribute__((packed));	// required only on some 64-bit machines
struct File中f_direct数组保存前NDIRECT个block号,这样对于$10*4096=40KB$的文件不需要额外的空间来记录内容block号。对于更大的文件,需要分配一个额外的block来保存来保存文件的其余块编号,称为文件的间接块,可以保存额外的$4096/4=1024$个块号。所以JOS文件系统允许文件最多拥有$1024+10=1034$个block。
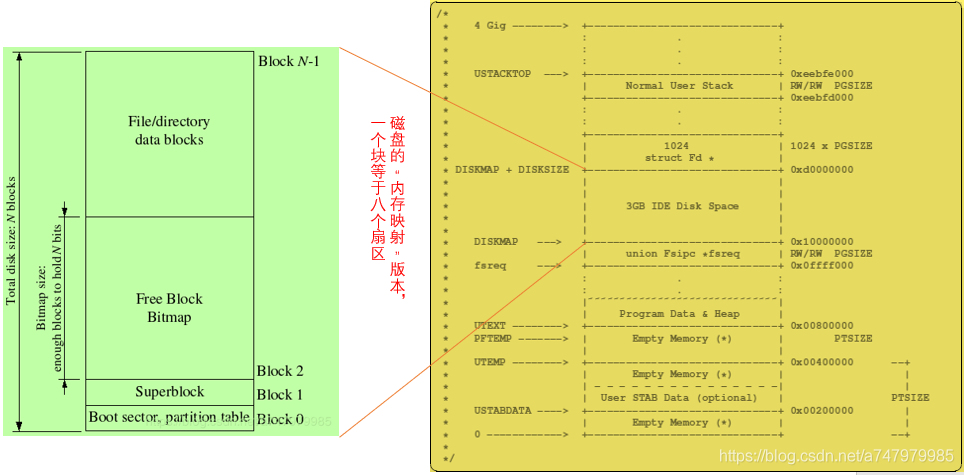
JOS文件系统最大支持3GB,文件系统进程保留从0x10000000 (DISKMAP)-0xD0000000 (DISKMAP+DISKMAX)固定3GB的内存空间作为磁盘的缓存(block cache)。比如block 0被映射到虚拟地址0x10000000,block 1被映射到虚拟地址0x10001000以此类推。
// Initialize the file system
void fs_init(void)
{
	static_assert(sizeof(struct File) == 256);

	// Find a JOS disk.  Use the second IDE disk (number 1) if available
	if (ide_probe_disk1())
		ide_set_disk(1);
	else
		ide_set_disk(0);
	bc_init();

	// Set "super" to point to the super block.
	super = diskaddr(1);
	check_super();

	// Set "bitmap" to the beginning of the first bitmap block.
	bitmap = diskaddr(2);
	check_bitmap();
}
fs/fs.c中的fs_init()会初始化super和bitmap全局指针变量(bitmap放在block 2)。bitmap是一个位数组,每个块占据一位,通过 block_is_free检查bitmap中的对应块是否空闲,为1表示空闲,为0已经使用。
至此如下图所示,对于文件系统进程只要访问虚拟内存[DISKMAP, DISKMAP+DISKMAX]范围中的地址addr,就会访问到磁盘((uint32_t)addr - DISKMAP) / BLKSIZE block中的数据。如果缺页,会调用bc_pgfault进行映射。(图源:https://blog.csdn.net/a747979985/article/details/99712515)
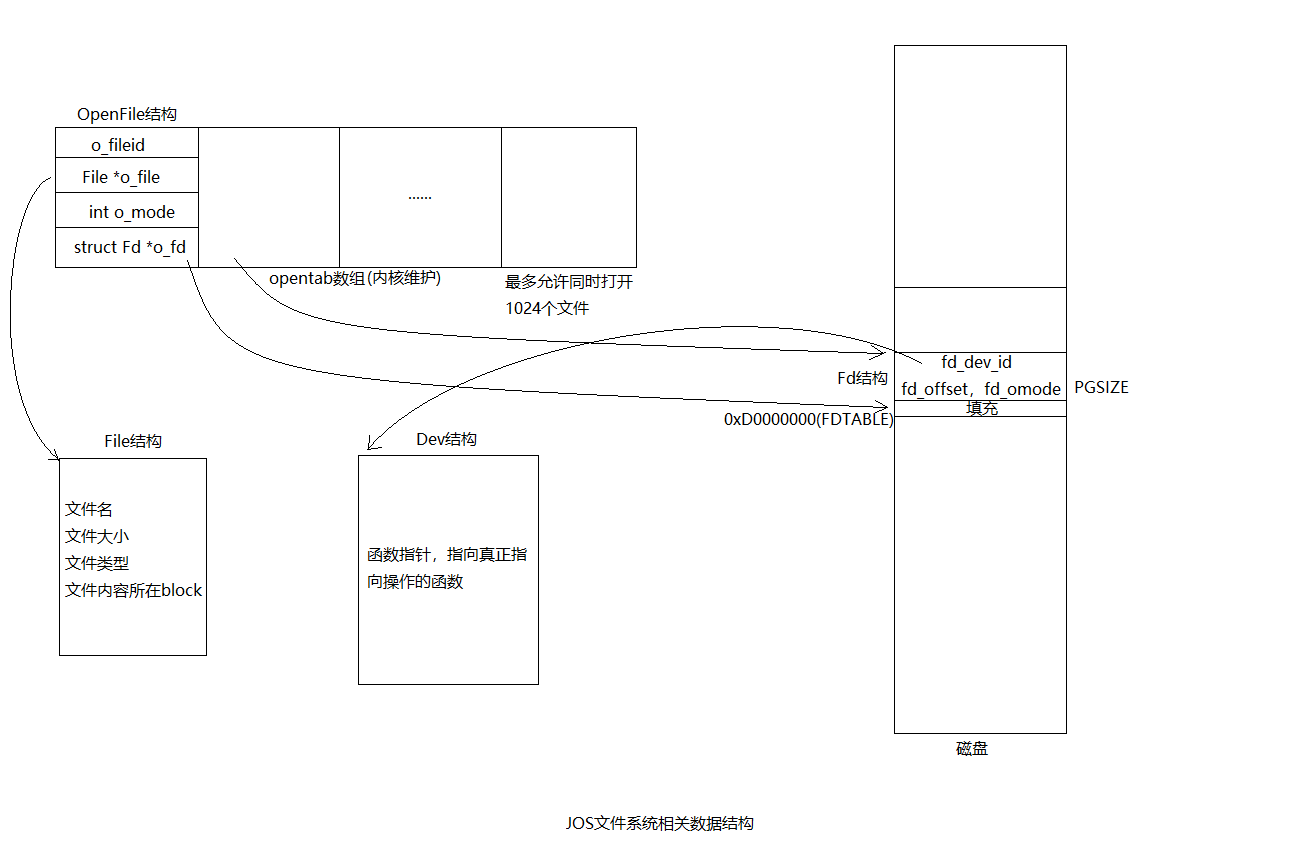
JOS文件系统服务器为每个打开的文件维护3个结构。:
-
磁盘上的
struct File映射到映射磁盘的内存部分,用于存储文件元数据(上面有提到过)。 -
struct Fd类似unix文件描述符,保存如文件ID,文件打开模式,文件偏移等。一个进程同时最多打开MAXFD(32)个文件。struct Fd保存在内存中的自己的页面中,并与任何打开该文件的环境共享。如上图0xd0000000以上的空间所示,只是JOS最多只能放32个文件描述符,基地址记为FDTABLE,对应地址范围是0xd0000000-0xd0020000。// Maximum number of file descriptors a program may hold open concurrently #define MAXFD 32 // Bottom of file descriptor area #define FDTABLE 0xD0000000 // Bottom of file data area. // We reserve one data page for each FD, which devices can use if they choose. #define FILEDATA (FDTABLE + MAXFD*PGSIZE) struct Fd { int fd_dev_id; off_t fd_offset; int fd_omode; union { // File server files struct FdFile fd_file; }; }; -
文件系统进程还维护了一个打开文件的描述符表,即
opentab数组,数组元素为struct OpenFile。OpenFile结构体用于存储打开文件信息,包括文件ID,struct File以及struct Fd。JOS同时打开的文件数一共为MAXOPEN(1024)个。(之前做Exercise 5的时候有用到)struct OpenFile { uint32_t o_fileid; // file id struct File *o_file; // mapped descriptor for open file int o_mode; // open mode struct Fd *o_fd; // Fd page }; // Max number of open files in the file system at once #define MAXOPEN 1024 // initialize to force into data section struct OpenFile opentab[MAXOPEN] = { {0, 0, 1, 0}};
这些结构之间的关系如下图所示(图源:https://www.cnblogs.com/gatsby123/p/9950705.html):
在读取或写入文件时,superblock,bitmap以及block cache分别在什么时候被使用,它们分别有什么作用?
直接看一下写入文件的过程:(因为下一问问的也是写入文件,读取文件同理)
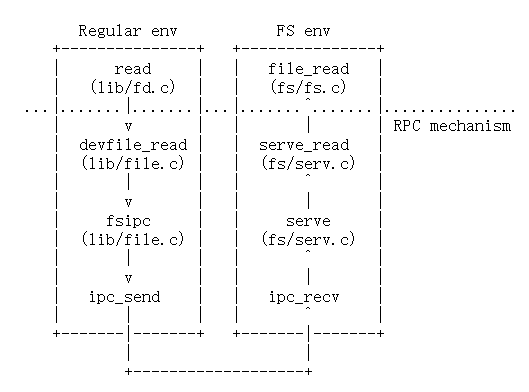
首先通过lib/file.c的函数devfile_write向文件系统发送写的请求(Exercise 6实现),即fsipc,进入文件系统环境。
static ssize_t devfile_write(struct Fd *fd, const void *buf, size_t n)
{
	// LAB 5: Your code here
	int r;
	fsipcbuf.write.req_fileid = fd->fd_file.id;
	fsipcbuf.write.req_n = n;
	memmove(fsipcbuf.write.req_buf, buf, n);
	if ((r = fsipc(FSREQ_WRITE, NULL)) < 0)		//fsipc
		return r;
	assert(r <= n);
	assert(r <= PGSIZE);
	return r;
}
文件系统通过ipc_recv接收fsipc请求,然后传给serve函数处理。serve函数根据fspic请求类型,调用 serve_write 处理请求。(Exercise 6实现)
int serve_write(envid_t envid, struct Fsreq_write *req)
{
	if (debug)
		cprintf("serve_write %08x %08x %08x\n", envid, req->req_fileid, req->req_n);

	// LAB 5: Your code here.
	struct OpenFile *o;
	int r;
	if ((r = openfile_lookup(envid, req->req_fileid, &o)) < 0)
		return r;
	if ((r = file_write(o->o_file, req->req_buf, req->req_n, o->o_fd->fd_offset)) < 0)
		return r;
	o->o_fd->fd_offset += r;
	return r;
}
可以看到这里声明了一个变量 struct OpenFile *o,通过openfile_lookup查找相关的打开文件。
然后serve_write调用下层的file_write进行文件写入,将buf处的count字节写到文件f的offset开始的位置,实际上每次将块通过file_get_block函数读入内存(Exercise 4实现的函数),然后完成写操作,返回写入字节数。其中调用了函数memmove(blk + pos % BLKSIZE, buf, bn);,把buf中的字节写入blk + pos % BLKSIZE,而blk + pos % BLKSIZE就是block cache中的地址。
int file_write(struct File *f, const void *buf, size_t count, off_t offset)
{
	int r, bn;
	off_t pos;
	char *blk;

	// Extend file if necessary
	if (offset + count > f->f_size)
		if ((r = file_set_size(f, offset + count)) < 0)
			return r;

	for (pos = offset; pos < offset + count;)
	{
		if ((r = file_get_block(f, pos / BLKSIZE, &blk)) < 0)	// file_get_block
			return r;
		bn = MIN(BLKSIZE - pos % BLKSIZE, offset + count - pos);
		// cprintf("file_write:blk:%p\n", blk + pos % BLKSIZE);
		memmove(blk + pos % BLKSIZE, buf, bn);	// block cache
		pos += bn;
		buf += bn;
	}

	return count;
}
file_read中同理,调用了memmove(buf, blk + pos % BLKSIZE, bn);,把block cache中blk + pos % BLKSIZE的地址移动到buf中,在函数中增加cprintf打印地址:(block cache范围:0x10000000 (DISKMAP)-0xD0000000 (DISKMAP+DISKMAX))
		cprintf("file_read:src addr:%p\n", blk + pos % BLKSIZE);
		memmove(buf, blk + pos % BLKSIZE, bn);
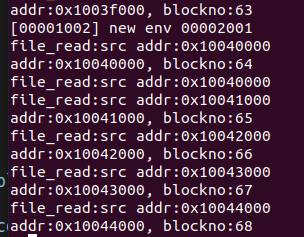
file_get_block函数查找文件第filebno个block对应的虚拟地址addr,将其保存到blk地址处,其中调用了file_block_walk查找f指向文件结构的第filebno个block的存储地址。其中的memset(diskaddr(res), 0, BLKSIZE);是在块号res对应的虚拟地址上进行memset,也是在block cache上进行操作。(file_block_walk中也有memset(diskaddr(res), 0, BLKSIZE);)
int file_get_block(struct File *f, uint32_t filebno, char **blk)
{
	// LAB 5: Your code here.
	uint32_t *pdiskbno;
	int res;
	// res<0说明file_block_walk有报错
	if ((res = file_block_walk(f, filebno, &pdiskbno, true)) < 0)
		return res;
	// 分配空间
	if (*pdiskbno == 0)
	{
		if ((res = alloc_block()) < 0)
			return -E_NO_DISK;
		*pdiskbno = res;
		memset(diskaddr(res), 0, BLKSIZE);	//block cache
		flush_block(diskaddr(res));
	}
	*blk = diskaddr(*pdiskbno);
	return 0;
}
file_get_block和file_block_walk中,当需要新分配块时都会调用alloc_block,该函数会通过block_is_free遍历找到可用块:
int alloc_block(void)
{
	// LAB 5: Your code here.
	uint32_t blockno;

	for (blockno = 3; blockno < super->s_nblocks; blockno++)
	{
		if (block_is_free(blockno))	// block_is_free
		{
			bitmap[blockno / 32] ^= 1 << (blockno % 32);	//bitmap
			flush_block(bitmap);	// flush_block
			return blockno;
		}
	}
	return -E_NO_DISK;
}
block_is_free中的第一个if用到了superblock,查询superblock是否被初始化,并且查询磁盘上的块总数。
然后第二个if用到bitmap,由于bitmap每一位代表一个block,通过这个值查询块是否空闲,如果找到了空闲块,在alloc_block中会把bitmap中对应块号的位置为0,表示被使用。
bool block_is_free(uint32_t blockno)
{
	if (super == 0 || blockno >= super->s_nblocks)
		return 0;
	if (bitmap[blockno / 32] & (1 << (blockno % 32)))
		return 1;
	return 0;
}
此外file_get_block,file_block_walk和alloc_block都会调用flush_block(),也会使用到block cache。首先判断虚拟地址是否在block cache的范围内;并且判断block是否在内存和block是否被写过,如果写过则需要先写入磁盘再清空脏位。
void flush_block(void *addr)
{
	uint32_t blockno = ((uint32_t)addr - DISKMAP) / BLKSIZE;

	if (addr < (void *)DISKMAP || addr >= (void *)(DISKMAP + DISKSIZE))
		panic("flush_block of bad va %08x", addr);

	// LAB 5: Your code here.
	addr = ROUNDDOWN(addr, PGSIZE);
	int r;
	if (!va_is_mapped(addr) || !va_is_dirty(addr))
		return;

	// 写入磁盘
	if ((r = ide_write(blockno * BLKSECTS, addr, BLKSECTS)) < 0)
		panic("flush_block failed: ide_write(): %e", r);

	// 清空脏位
	if ((r = sys_page_map(0, addr, 0, addr, uvpt[PGNUM(addr)] & PTE_SYSCALL)) < 0)
		panic("in bc_pgfault failed: sys_page_map: %e", r);
}
做一下总结,写入文件的过程中主要涉及以下这些函数:
devfile_write->serve_write->file_write->file_get_block->file_block_walk->alloc_block->block_is_free (flush_block)
其中,file_write,file_get_block和file_block_walk使用了block cache;alloc_block和block_is_free中使用了bitmap;block_is_free使用了superblock。
Question 4
请详细描述一个Regular进程将120KB的数据写入空文件的整个IPC流程。写入后的文件,在磁盘中是如何存储的?120KB的数据总共经历了几次拷贝?
A:
同样是这张图:(流程上一回答中也有提到部分)
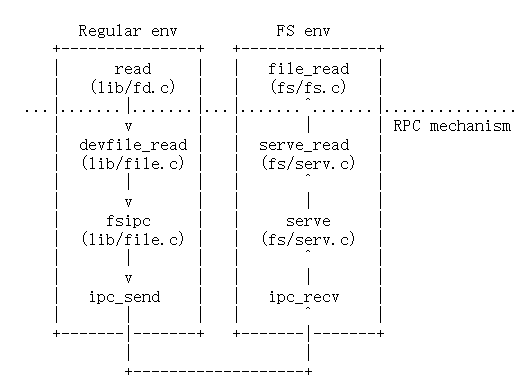
Regular进程先要写文件,首先调用lib/fd.c中的write函数,其中会通过fd_lookup根据fdnum找到文件描述符(第3问中有提到基地址记为FDTABLE,对应地址范围是0xd0000000-0xd0020000),然后根据fd的内容,选择对应的设备,进入dev下的响应处理函数。
ssize_t write(int fdnum, const void *buf, size_t n)
{
	int r;
	struct Dev *dev;
	struct Fd *fd;

	if ((r = fd_lookup(fdnum, &fd)) < 0 || (r = dev_lookup(fd->fd_dev_id, &dev)) < 0)
		return r;
	if ((fd->fd_omode & O_ACCMODE) == O_RDONLY)
	{
		cprintf("[%08x] write %d -- bad mode\n", thisenv->env_id, fdnum);
		return -E_INVAL;
	}
	if (debug)
		cprintf("write %d %p %d via dev %s\n",
				fdnum, buf, n, dev->dev_name);
	if (!dev->dev_write)
		return -E_NOT_SUPP;
	return (*dev->dev_write)(fd, buf, n);
}
然后通过lib/file.c的函数devfile_write设置fsipcbuf.write.req_fileid和fsipcbuf.write.req_n,再向文件系统发送写的请求,即fsipc,找到一个文件系统环境fsenv,向fsenv发送type和fsipcbuf:ipc_send(fsenv, type, &fsipcbuf, PTE_P | PTE_W | PTE_U);。
文件系统环境fsenv接收到请求之后,通过serve函数及进行处理。serve函数根据fspic请求类型,这里就调用了 serve_write 处理请求。然后serve_write调用下层的file_write进行文件写入,将buf处的count字节写到文件f的offset开始的位置,实际上每次将块通过file_get_block函数读入内存,然后完成写操作,返回写入字节数给serve(),返回值保存在变量r中。
serve通过调用ipc_send(whom, r, pg, perm);把处理结果(刚才的返回值)发给regular环境,再通过sys_page_unmap(0, fsreq);将处理结果又写入到共享页面fsreq。
regular进程通过fsipc()中的ipc_recv(NULL, dstva, NULL);接收结果,即完成了一次写入文件。
由于file_write中的操作,写入后的文件存储在block cache中。
		bn = MIN(BLKSIZE - pos % BLKSIZE, offset + count - pos);
		memmove(blk + pos % BLKSIZE, buf, bn);	// blk + pos % BLKSIZE的地址在block cache范围中,上一问有打印
又由于写入的文件大小是120KB,在devfile_write中有以下代码,设置了写的buf大小:
	fsipcbuf.write.req_n = n;
	//cprintf("devfile:req_n:%d\n", n);
	memmove(fsipcbuf.write.req_buf, buf, n);

n最大为PGSIZE - (sizeof(int) + sizeof(size_t)),即4088,所以$120KB\div 4088B≈31$。
将120KB的数据写入空文件,从步骤上说,一共需要3次拷贝,分别是:
-
在
devfile_write中把buf拷贝到fsipcbuf.write.req_buf中,每次最多拷贝n个字节:// devfile_write() memmove(fsipcbuf.write.req_buf, buf, n); -
在
file_write()中,把buf拷贝到block cache中,每次最多拷贝bn个字节,这里bn的计算结果应该等于上面的n:// file_write() bn = MIN(BLKSIZE - pos % BLKSIZE, offset + count - pos); memmove(blk + pos % BLKSIZE, buf, bn); -
从block cache写入磁盘,但是我没有找到是在哪里执行写入的,我找到了几个和刷新相关的函数,比如
serve_flush和file_flush底层都是调用了flush_block,所以写入磁盘应该也是一块块写的
所以一共需要拷贝$31\times3=93$次。
Question 5
请阅读
user/sh.c代码,并使用make run-icode或者make run-icode-nox启动QEMU,然后运行命令:cat lorem |num。请尝试解释shell是如何执行这行命令的,请简述启动的进程以及他们的运行流程,详细说明数据在进程间的传递过程。
A:
运行make run-icode,将会执行user/icode,user/icode又会执行init,将控制台设置为文件描述符0和1(标准输入和标准输出),然后会spawn sh,然后就能运行cat lorem |num。
shell其实就是一个用户程序,作用是不断循环,每次将"$"之后回车之前输入的内容读到buf,然后fork()一个子进程去调用runcmd(buf)。而runcmd会把buf中每个token提取出来,如果是word就存入argv[]数组,如果是操作符完成相应操作,然后spawn一个名为argv[0]的子程序去执行命令。
从user/sh.c中的umain()开始看,比较关键的是其中的while循环:
	while (1)
	{
		char *buf;
		// readline调用getchar()获取终端输入
		buf = readline(interactive ? "$ " : NULL);
		if (buf == NULL)
		{
			if (debug)
				cprintf("EXITING\n");
			exit(); // end of file
		}
		if (debug)
			cprintf("LINE: %s\n", buf);
		if (buf[0] == '#')
			continue;
		if (echocmds)
			printf("# %s\n", buf);
		if (debug)
			cprintf("BEFORE FORK\n");
        // fork出子进程
		if ((r = fork()) < 0)
			panic("fork: %e", r);
		if (debug)
			cprintf("FORK: %d\n", r);
        // 子进程运行runcmd后退出
		if (r == 0)
		{
			runcmd(buf);
			exit();
		}
		else // 父进程等待子进程的回收
			wait(r);
	}
子进程开始执行runcmd(char *s),runcmd的作用是:从字符串s解析一个shell命令并执行它。
首先,gettoken(s, 0);,gettoken函数中有4个静态变量:np1, np2,c, nc,这里gettoken(s, 0);是取第一个token给np1,剩下的给np2,nc可以是0 < > |
w,代表token的类型。(gettoken负责解析命令行参数,使用 np1,np2 两个指针分别记录 token 所在区间的索引) |
然后进入while(1)循环,switch ((c = gettoken(0, &t))),这里t就等于前一个token,c代表t的类型,np1会是下一个token,np2则是剩下部分,
-
case 'w':代表t是word,保存到argv[argc++] -
case '<':输入重定向,再次gettoken(0,&t),通过dup()将标准输入由0变成名为t的文件(Exercise 10实现) -
case '>':输出重定向,再次gettoken(0,&t),将标准输出由1变成名为t的文件 -
case '|':管道-
r = pipe(p),父进程创建管道,管道的作用如下图,这里分配分配两个文件描述符作为管道输入输出端,并为两个文件描述符分配数据页,对应的数据页部分映射到了同样的物理页,只是设置的文件描述符的权限不同,pipe[0]对应的文件描述符为只读,而pipe[1]可写。
-
r = fork()// 将子进程的标准输入设成p[0]后,goto again,再次进入while(1)循环,重新读取输入运行管道右边的命令 if (r == 0) { if (p[0] != 0) { dup(p[0], 0); close(p[0]); } close(p[1]); goto again; } else // 将父进程的标准输出设成p[1]后,goto runit { pipe_child = r; if (p[1] != 1) { dup(p[1], 1); close(p[1]); } close(p[0]); goto runit; }
-
-
case 0:s中token已经全部取完,goto runit
进入runit后,运行spawn,spawn用于创建一个子进程,然后从磁盘中加载一个程序代码镜像并在子进程运行加载的程序。这里管道的父进程先spawn运行左边命令,输出会重定向到标准输出,即pipe[1]这个fd。而此时子进程还在while(1)循环中接着从标准输入读取输入,也就是从pipe[0]这个fd读取输入,然后输出结果。
	// Spawn the command!
	if ((r = spawn(argv[0], (const char **)argv)) < 0)
		cprintf("spawn %s: %e\n", argv[0], r);
再进入每一个case的时候cprint显示一下方便判断,运行之后如下图所示,可以发现新建了四个进程:
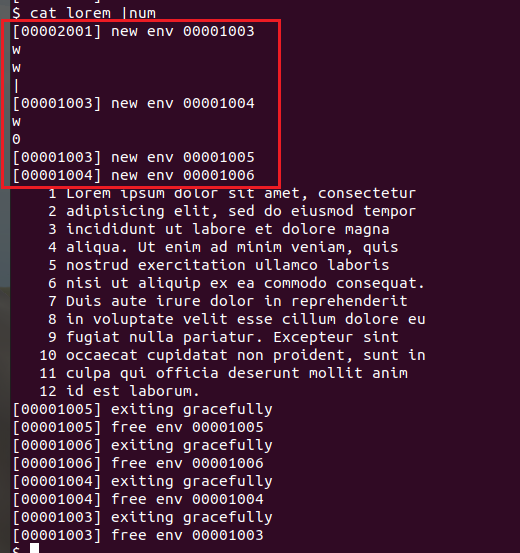
所以当运行 cat lorem |num时,
- 首先,进入两次
case 'w'(因为cat和lorem),把得到的t保存到argv[argc++] - 然后进入
case |,fork出一个子进程- 这时父进程的标准输出设成p[1]后,
goto runit,spawn出一个进程运行cat lorem,此时lorem输出重定向到 pipe[1] - 子进程
goto again,进入while(1)循环重新读取输入运行管道右边的命令num,先进入case 'w',再进入case 0,goto runit,spawn一个进程运行num,它从pipe[0]读取输入,而因为 pipe[0] 和 pipe[1] 映射的是同样的物理页面,所以可以读取到pipe[1]中的内容,从而实现了管道功能。
- 这时父进程的标准输出设成p[1]后,
画了一下进入管道之后的图:
