注意:以下部分任务点可能涉及到具体内存管理的代码细节,本次实验不做要求,但关于mmio等宏观设计概念,需要大家在报告中体现出来。
因为涉及到内存管理,inc/memlayout.h有一张虚拟内存分布图对做实验很有帮助:
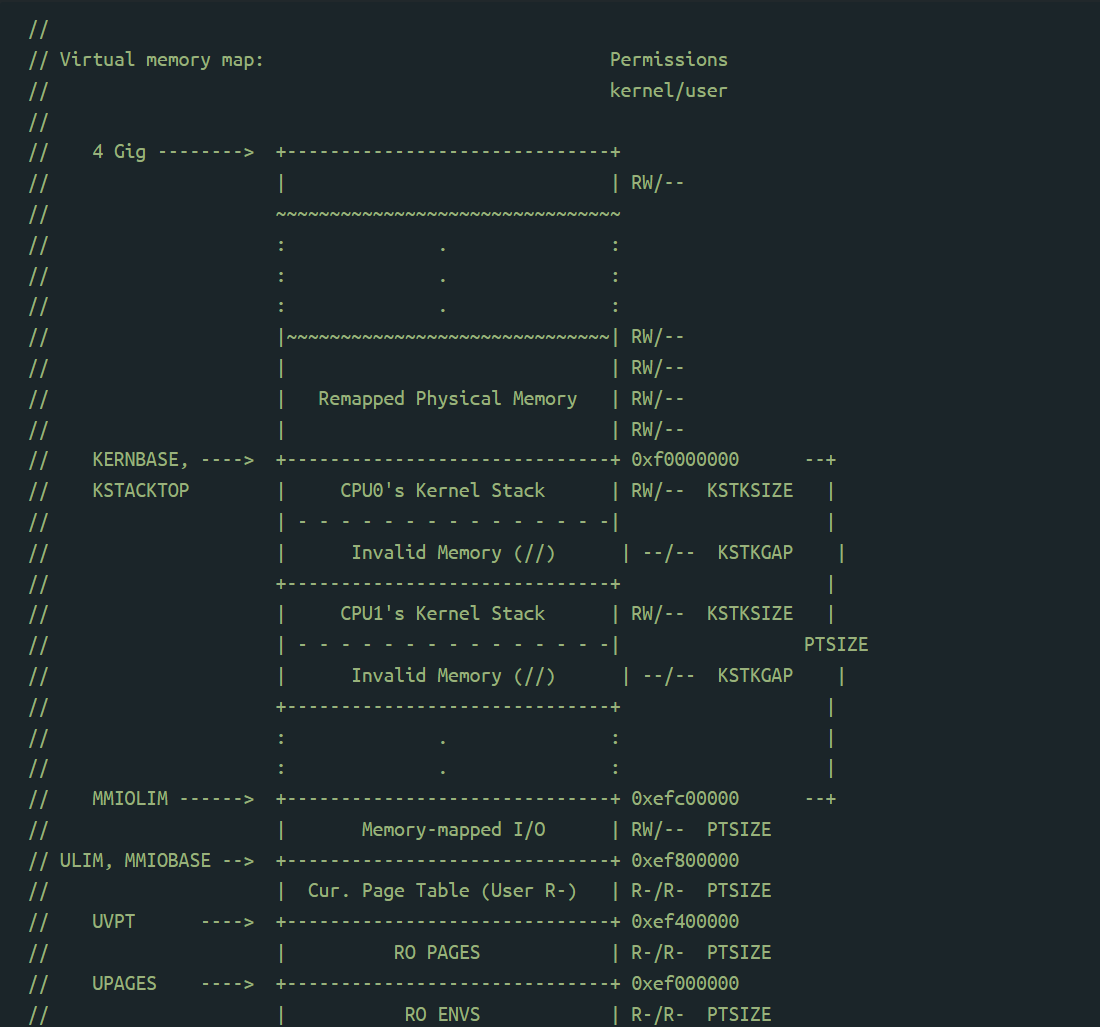
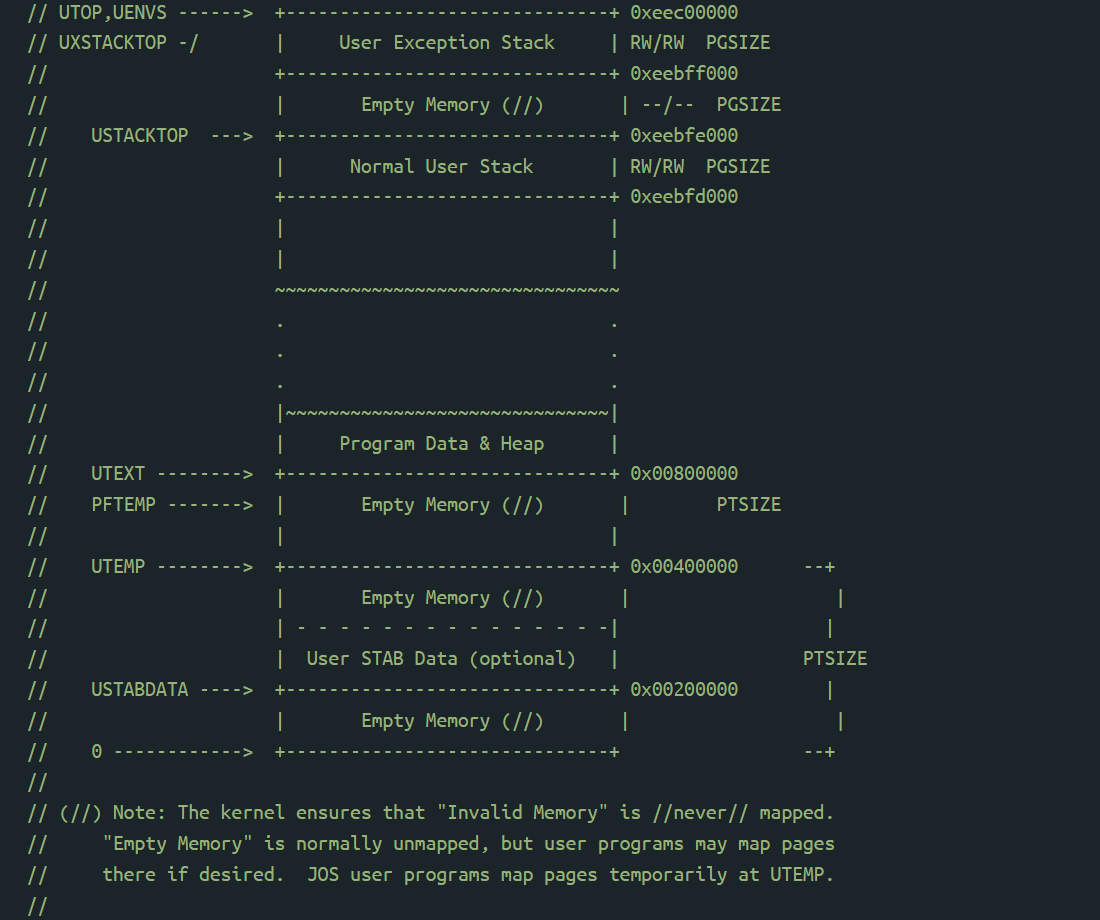
任务一:
基于MIT JOS LAB4 Exercise 1,(关于pmap.c 的代码要求助教已实现基本功能),要求:阅读
kern/pmap.c关于mmio_map_region的实现,理解mmio_map的具体原理,包括boot_map_region的原理。在实验报告中详细写明。
Lab4的一开始要实现Multiprocessor Support ,即拓展jos使其运行在多处理器系统上,然后实现jos内核一些系统功能调用以支持用户级环境去创建新环境。
要使JOS 支持对称多处理器(symmetric multiprocessing,SMP),即要实现所有的CPU都有着对系统资源(内存、I/O总线)的平等使用权。对内存而言,是指所有处理器都共享同样的内存地址空间,访问相同的内存地址;对I/O而言,是指所有处理器共享相同的IO子系统(包括IO端口和中断控制器),任一处理器可以接收任何源的中断。
在启动阶段,SMP系统的处理器分为两种:
- 引导处理器(BSP):负责初始化系统和引导操作系统
- 应用程序处理器(AP):在操作系统启动并运行后,被BSP激活
当系统引导结束后,就不分两种处理器了,所有的处理器都是AP处理器。
在SMP系统中,每个CPU都有一个伴随的本地APIC(LAPIC)单元。LAPIC单元负责在整个系统中提供中断和为其连接的CPU提供唯一标识符。
在本实验中,使用LAPIC单元的以下基本功能(在kern/lapic.c中):
- 根据LAPIC识别码(
APIC ID)区别我们的代码运行在哪个CPU上。(cpunum()) - 从BSP向APs发送
STARTUP处理器间中断(IPI,interprocessor interrupts)去唤醒其他的CPU。(lapic_startap()) - 在Part C,我们编写LAPIC的内置定时器来触发时钟中断,以支持抢占式多任务(
pic_init())。
mmio_map的具体原理
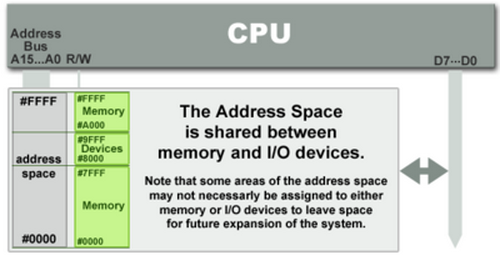
处理器使用内存映射 I/O (MMIO)访问其 LAPIC。MMIO(Memory mapping I/O)即内存映射I/O,如图所示,在MMIO中,内存和I/O设备共享同一个地址空间。它使用相同的地址总线来处理内存和I/O设备,I/O设备的内存和寄存器被映射到与之相关联的地址。当CPU访问某个内存地址时,可能是物理内存,也可能是某个I/O设备的内存,因此用于访问内存的CPU指令也可来访问I/O设备。
LAPIC的 hole 开始于物理地址0xFE000000,但是这地址太高,无法直接映射。JOS虚拟地址映射预留了4MB空间在MMIOBASE处,需要写函数mmio_map_region()来分配该区域的空间并将设备内存映射到该区域。

在lapic_init()中调用了mmio_map_region(),如上面说的,需要把物理地址lapicaddr映射到预留的4MB空间中。
void
lapic_init(void){
	// lapicaddr is the physical address of the LAPIC's 4K MMIO
	// region.  Map it in to virtual memory so we can access it.
	lapic = mmio_map_region(lapicaddr, 4096);
}
根据mmio_map_region()的注释,该函数的作用是:在MMIO区域预留size大小的区域,并在此位置映射[pa,pa+size],返回预留区域的基地址。
// Reserve size bytes in the MMIO region and map [pa,pa+size) at this
// location.  Return the base of the reserved region.  size does *not*
// have to be multiple of PGSIZE.
mmio_map_region()详细解释见代码中中文注释。
void *
mmio_map_region(physaddr_t pa, size_t size)
{
	// Where to start the next region.  Initially, this is the beginning of the MMIO region.
	// Because this is static, its value will be preserved between calls to mmio_map_region (just like nextfree in boot_alloc).
    // MMIO区域的基地址
	static uintptr_t base = MMIOBASE;

	// 从基地址起保留size大小的虚拟内存,并把物理内存[pa,pa+size)映射到虚拟内存[base,base+size)
	// Reserve size bytes of virtual memory starting at base and map physical pages [pa,pa+size) to virtual addresses [base,base+size).
	// Since this is device memory and not regular DRAM, you'll have to tell the CPU that it isn't safe to cache access to this memory.
	// Luckily, the page tables provide bits for this purpose; simply create the mapping with PTE_PCD|PTE_PWT (cache-disable and write-through) in addition to PTE_W.  (If you're interested in more details on this, see section 10.5 of IA32 volume 3A.)
	//
	// Be sure to round size up to a multiple of PGSIZE and to handle if this reservation would overflow MMIOLIM (it's okay to simply panic if this happens).
	//
	// Hint: The staff solution uses boot_map_region.
	//
	// Your code here:

	// 得到对应的物理页,传入的物理地址和size不一定正好是一页
    // 为了使得物理页地址对齐,只有对齐了地址才能使用boot_map_region()函数进行映射
	size = ROUNDUP(pa + size, PGSIZE);	//物理页起始
	pa = ROUNDDOWN(pa, PGSIZE);		//物理页结束
	size -= pa;	//物理页大小
    // 不能overflow MMIOLIM,如果超过了[MMIOBASE, MMIOBASE+4M),直接panic报错
	if (base + size >= MMIOLIM)
		panic("not enough memory");
    // 将一段虚拟内存[base, base+size)映射到同样长度的物理内存[pa, pa+size)
	boot_map_region(kern_pgdir, base, size, pa, PTE_PCD | PTE_PWT | PTE_W);
    // 更改可用的MMIO区域的基地址,因为base是static,需要维护
	base += size;
	return (void *)(base - size);	//返回一开始MMIO区域的基地址,即如今lapic的起始地址
}
boot_map_region的原理
其中用到了boot_map_region()【Lab2实现】,该函数的主要作用是将一段虚拟内存[va, va+size)映射到同样长度的物理内存[pa, pa+size),其中size为page的倍数,即映射是以页面为单位,且va、pa都经过页面对齐:
//
// Map [va, va+size) of virtual address space to physical [pa, pa+size) in the page table rooted at pgdir.
// Size is a multiple of PGSIZE, and va and pa are both page-aligned.
// Use permission bits perm|PTE_P for the entries.
//
// This function is only intended to set up the ``static'' mappings above UTOP.
// As such, it should *not* change the pp_ref field on the mapped pages.
//
// Hint: the TA solution uses pgdir_walk
static void
boot_map_region(pde_t *pgdir, uintptr_t va, size_t size, physaddr_t pa, int perm)
{
	// Fill this function in
	size_t pgs = size / PGSIZE;
	if (size % PGSIZE != 0)
	{
		pgs++;
	}
	for (int i = 0; i < pgs; i++)
	{
         // pgdir_walk()的作用是根据pgdir和va返回对应的page table entry的指针
		pte_t *pte = pgdir_walk(pgdir, (void *)va, 1);
		if (pte == NULL)
		{
			panic("boot_map_region(): out of memory\n");
		}
         // 更新pte信息,因为pa已经对齐,所以pa低12位为0
         // 入口指向物理地址
		*pte = pa | PTE_P | perm;
		pa += PGSIZE;
		va += PGSIZE;
	}
}
任务二:
回答问题 Exercise 2 Question 1。在实验报告中详细写明,涉及到的关键代码最好使用图片或其他形式嵌入到报告中予以解释。
在激活AP之前,BSP首先需要收集多处理器系统的信息,比如总CPU数,CPU的APIC ID以及LAPIC的内存映射地址等。kern/mpconfig.c中的mp_init()函数通过读取BIOS内存中的MP配置表来获取相关信息,该函数会在进入内核后被i386_init()调用。
kern/init.c中的boot_aps()函数驱动了AP的引导过程。AP以实模式启动,类似于 bootloader 在boot/boot.S中启动的方式。因此boot_aps()从kern/mpentry.S中拷贝了一份AP入口代码(entry code)到一个实方式下可以寻址的内存位置。与bootloader不同,可以控制 AP 从哪里开始执行代码:将AP entry代码拷贝到 0x7000(MPENTRY_PADDR)【或者640KB之下的任何未使用的按页对齐的物理地址】。
之后,boot_aps()函数通过发送STARTUP的IPI(处理器间中断)信号到AP的 LAPIC 单元依次激活AP,使用AP的entry code初始化其CS:IP地址(MPENTRY_PADDR)。在kern/mpentry.S中的入口代码跟boot/boot.S中的代码类似。在设置后,AP将进入开启分页机制的保护模式,调用mp_main()。boot_aps() 等待AP在其结构CpuInfo的cpu_status字段中发出CPU_STARTED标志信号,然后再唤醒下一个AP。
Exercise 2中要求阅读kern/init.c中的boot_aps()和mp_main(),以及kern/mpentry.S汇编代码,确保理解AP的bootstrap过程中的control flow transfer。然后修改kern/pmap.c中page_init()的实现,避免将MPENTRY_PADDR的区域也添加到page_free_list中,这样才可以安全地在该物理地址处拷贝以及运行AP的引导代码。
首先要理解AP的bootstrap过程中的control flow transfer:
//mpentry.S中的注释,解释了control flow transfer:
# Each non-boot CPU ("AP") is started up in response to a STARTUP

# IPI from the boot CPU.  Section B.4.2 of the Multi-Processor

# Specification says that the AP will start in real mode with CS:IP

# set to XY00:0000, where XY is an 8-bit value sent with the

# STARTUP. Thus this code must start at a 4096-byte boundary.

#

# Because this code sets DS to zero, it must run from an address in

# the low 2^16 bytes of physical memory.

#

# boot_aps() (in init.c) copies this code to MPENTRY_PADDR (which

# satisfies the above restrictions).  Then, for each AP, it stores the

# address of the pre-allocated per-core stack in mpentry_kstack, sends

# the STARTUP IPI, and waits for this code to acknowledge that it has

# started (which happens in mp_main in init.c).
-
i386_init()调用boot_aps(),即在BSP中引导其他CPU开始运行; -
boot_aps调用memmove将每个CPU的boot代码(从mpentry.S中的.globl mpentry_start标签处开始的入口代码直到.globl mpentry_end结束)加载到固定位置MPENTRY_PADDR对应的内核虚拟地址;//static void boot_aps(void) // Write entry code to unused memory at MPENTRY_PADDR code = KADDR(MPENTRY_PADDR); memmove(code, mpentry_start, mpentry_end - mpentry_start); -
然后
boot_aps()根据每一个CPU的栈配置percpu_kstacks[]来为每一个AP设置栈地址mpentry_stack;// Tell mpentry.S what stack to use mpentry_kstack = percpu_kstacks[c - cpus] + KSTKSIZE; -
再调用
lapic_startup()函数来启动AP,并等待AP的状态变为CPU_STARTED以切换到下一个AP的配置;// Start the CPU at mpentry_start lapic_startap(c->cpu_id, PADDR(code)); // Wait for the CPU to finish some basic setup in mp_main() while(c->cpu_status != CPU_STARTED) ; -
AP启动后,执行从
mpentry.S中复制的入口代码。
回答问题 Exercise 2 Question 1
比较
kern/mpentry.S和boot/boot.S,kern/mpentry.S被编译、链接并运行在KERNBASE之上,那么宏MPBOOTPHYS的目的是什么? 为什么在kern/mpentry.S是必要的,但是在boot/boot.S中不是?换句话说,如果在kern/mpentry.S中省略了什么可能会出错?提示:回忆链接地址与加载地址的区别【Lab1】。
A:
为了了解链接地址与加载地址的区别,去看了【Lab1】Part 3 :The Kernel。
在运行boot loader时,boot loader中的链接地址和加载地址是一样的,但是当进入到内核程序后,这两种地址就不再相同了。操作系统内核通常被链接到非常高的虚拟地址(例如0xf0100000)下运行,以便留下处理器虚拟地址空间的低地址部分供用户程序使用。但是许多机器在地址范围无法达到0xf0100000,所以将使用处理器的内存管理硬件将虚拟地址0xf0100000(内核代码期望运行的链接地址)映射到物理地址0x00100000(引导加载程序将内核加载到物理内存中)。那么当用户程序想访问一个操作系统内核的指令时,首先给出的是一个高的虚拟地址,然后再把这个虚拟地址映射为真实的物理地址,这种机制通常是通过分段管理,分页管理来实现的。
再了解了实模式相关的知识:
- 实模式的地址空间一共有20位(1MB)
- 实模式下不支持内存分页机制
宏MPBOOTPHYS的作用:
//宏MPBOOTPHYS
#define MPBOOTPHYS(s) ((s) - mpentry_start + MPENTRY_PADDR)
宏MPBOOTPHYS的作用是计算变量s的物理地址。因为把mpentry_start移动到MPENTRY_PADDR上,所以该宏就相当于在计算:当前的代码位置-起点 + 真正的起始地址=真正的物理地址,即内核的mpentry.S中的数据被复制到低地址MPENTRY_PADDR后对应的地址。
在boot/boot.S中,尚没有启用分页机制。查看obj/boot/boot.asm,这时链接地址和加载地址相同,都是0x7c00。本来就已经被链接到了低地址,是实模式可以寻址的区域,所以不需要进行转换。
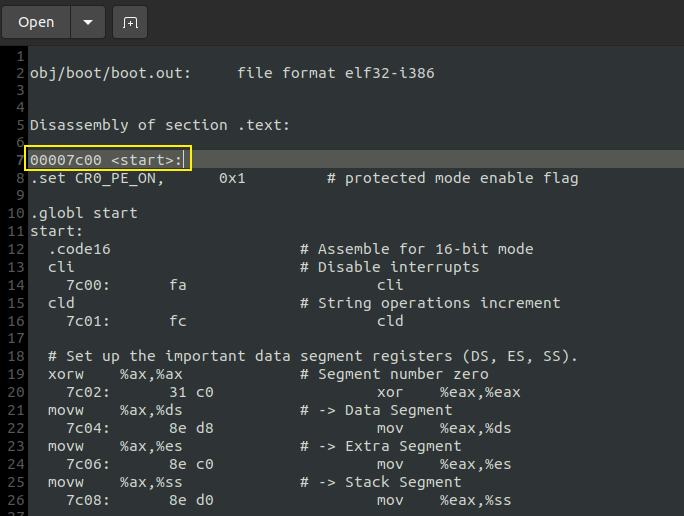
boot/boot.S中的注释也是这么说的:
# Start the CPU: switch to 32-bit protected mode, jump into C.

# The BIOS loads this code from the first sector of the hard disk into

# memory at physical address 0x7c00 and starts executing in real mode

# with %cs=0 %ip=7c00.
但kern/mpentry.S 是运行在 KERNBASE 之上的,与其他的内核代码一样,都运行在高地址。且mpentry.S初期是在实模式下工作的,实模式的地址空间只有20位,无法访问到高的虚拟地址,因此宏MPBOOTPHYS将这些标号的虚拟地址(高地址)转换成对应的物理地址(低地址),使mpentry.S能够正常访存。
如果省略了这一步高地址转换成低地址,则实模式下的AP无法访问高地址,运行失败。
// kern/mpentry.S中的注释
# This code is similar to boot/boot.S except that

#    - it does not need to enable A20

#    - it uses MPBOOTPHYS to calculate absolute addresses of its

#      symbols, rather than relying on the linker to fill them
任务三:
阅读Exercise 4 中
trap_init_percpu()函数(助教已经实现),理解是如何在多个cpu上运行的。并在实验报告中解释说明。
当编写多核操作系统的时候,区分每一个CPU的私有状态以及整个系统共享的全局状态是非常重要的。kern/cpu.h中定义了绝大部分CPU的状态:
// kern/cpu.h
// Maximum number of CPUs
#define NCPU  8

// Values of status in struct Cpu
enum {
	CPU_UNUSED = 0,
	CPU_STARTED,
	CPU_HALTED,
};

// Per-CPU state
struct CpuInfo {
	uint8_t cpu_id;                 // Local APIC ID; index into cpus[] below
	volatile unsigned cpu_status;   // The status of the CPU
    // Per-CPU的当前环境指针
    // 每个CPU都能同步地执行不同的用户环境。
    // curenv=thiscpu->cpu_env,指向当前CPU(运行代码的CPU)上正在执行的环境。
	struct Env *cpu_env;            // The currently-running environment.

    // Per-CPU的TSS和TSS描述符
    // 每个CPU的任务状态段TSS同样需要指明其对应的内核栈位置
    // 每个CPU的TSS存放在CpuInfo中的cpu_ts域中,对应的描述符在GDT表项的gdt[(GD_TSS0 >> 3)+i]中
	struct Taskstate cpu_ts;        // Used by x86 to find stack for interrupt
};

// Initialized in mpconfig.c
extern struct CpuInfo cpus[NCPU];
extern int ncpu;                    // Total number of CPUs in the system
extern struct CpuInfo *bootcpu;     // The boot-strap processor (BSP)
extern physaddr_t lapicaddr;        // Physical MMIO address of the local APIC

// Per-CPU kernel stacks
// 多CPU可能同时陷入内核,所以需要为每个CPU设置独立的内核栈来避免相干扰
// percpu_kstacks[NCPU][KSTKSIZE]为NCPU个内核栈预留了空间
// CPU 0的内核栈从KSTACKTOP开始向下增长,之后第n个CPU的内核栈从KSTACKTOP - n*KSTKGAP处开始向下增长。如inc/memlayout.h中所示
extern unsigned char percpu_kstacks[NCPU][KSTKSIZE];

//cpunum()返回调用它的CPU ID,能用来做cpus[]数组的索引
int cpunum(void);

//宏thiscpu是当前CPU的struct CpuInfo的简写
#define thiscpu (&cpus[cpunum()])
另外,还有Per-CPU系统寄存器。因为包括系统寄存器在内的所有寄存器都属于CPU私有。初始化寄存器的指令如lcr3, ltr, lgdt等,必须在每个CPU上都被执行。函数env_init_percpu()和trap_init_percpu的功能就在于此。
理解trap_init_percpu()
kern/trap.c中的trap_init_percpu()初始化了BSP的TSS和TSS描述符(本来在Lab3中可以正常工作,但是在本实验运行在其他CPU时不能正常工作),需要修改代码以使其支持所有CPU。
对比Lab3和Lab4的trap_init_percpu():

trap_init_percpu的作用是:初始化处理器的Task State Segment【TSS,任务状态段,指在操作系统进程管理的过程中,任务(进程)切换时的任务现场信息】和中断描述符表IDT。
	// Hints:
	//   - The macro "thiscpu" always refers to the current CPU's
	//     struct CpuInfo;
	//   - The ID of the current CPU is given by cpunum() or
	//     thiscpu->cpu_id;
	//   - Use "thiscpu->cpu_ts" as the TSS for the current CPU,
	//     rather than the global "ts" variable;
	//   - Use gdt[(GD_TSS0 >> 3) + i] for CPU i's TSS descriptor;
	//   - You mapped the per-CPU kernel stacks in mem_init_mp()
	//   - Initialize cpu_ts.ts_iomb to prevent unauthorized environments
	//     from doing IO (0 is not the correct value!)
代码段中有给出一些提示,比如说因为不能再使用全局变量ts指向当前CPU的TSS,用thiscpu->cpu_ts替代。(这里助教好像没有实现cpu_ts.ts_iomb,应该要增加thiscpu->cpu_ts.ts_iomb = sizeof(struct Taskstate);)
理解代码:
// Initialize and load the per-CPU TSS and IDT
void trap_init_percpu(void)
{
	// The example code here sets up the Task State Segment (TSS) and
	// the TSS descriptor for CPU 0. But it is incorrect if we are
	// running on other CPUs because each CPU has its own kernel stack.
	// Fix the code so that it works for all CPUs.
	//
	// ltr sets a 'busy' flag in the TSS selector, so if you
	// accidentally load the same TSS on more than one CPU, you'll
	// get a triple fault.  If you set up an individual CPU's TSS
	// wrong, you may not get a fault until you try to return from
	// user space on that CPU.
	//
	// LAB 4: Your code here:
	int cid = thiscpu->cpu_id;
	// Setup a TSS so that we get the right stack
	// when we trap to the kernel.
    // esp0: 当前 CPU 的 stack 的起始位置
    // 根据cpu.h中可知:
    // CPU 0的内核栈从KSTACKTOP开始向下增长,之后第n个CPU的内核栈从KSTACKTOP - n*KSTKGAP处开始向下增长
	thiscpu->cpu_ts.ts_esp0 = KSTACKTOP - cid * (KSTKSIZE + KSTKGAP);
    // ts_ss0 = GD_KD 表示 esp0 这个位置存储的是kernel的data.ts_iomb: I/O map base address field
	thiscpu->cpu_ts.ts_ss0 = GD_KD;
    //设置I/O操作权限
	thiscpu->cpu_ts.ts_iomb = sizeof(struct Taskstate);

	// Initialize the TSS slot of the gdt.
    // 把TSS装载进GDT
	gdt[(GD_TSS0 >> 3) + cid] = SEG16(STS_T32A, (uint32_t)(&(thiscpu->cpu_ts)),
									  sizeof(struct Taskstate)-1, 0);
	gdt[(GD_TSS0 >> 3) + cid].sd_s = 0;

	// Load the TSS selector (like other segment selectors, the
	// bottom three bits are special; we leave them 0)
	ltr(GD_TSS0 + 8 * cid);

	// Load the IDT
	lidt(&idt_pd);
}
回顾gdt表的结构:[GD_TSS0 >> 3]指的就是TSS。
struct Segdesc gdt[] =
	{
		// 0x0 - unused (always faults -- for trapping NULL far pointers)
		SEG_NULL,
		// 0x8 - kernel code segment
		[GD_KT >> 3] = SEG(STA_X | STA_R, 0x0, 0xffffffff, 0),
		// 0x10 - kernel data segment
		[GD_KD >> 3] = SEG(STA_W, 0x0, 0xffffffff, 0),
		// 0x18 - user code segment
		[GD_UT >> 3] = SEG(STA_X | STA_R, 0x0, 0xffffffff, 3),
		// 0x20 - user data segment
		[GD_UD >> 3] = SEG(STA_W, 0x0, 0xffffffff, 3),
		// 0x28 - tss, initialized in trap_init_percpu()
		[GD_TSS0 >> 3] = SEG_NULL};
而对每个cpu而言,因为tss要指向它们各自的内核栈,gdt表中只有tss描述符是不一样的。tss描述符是gdt的最后一项,因此gdt[(GD_TSS0 >> 3) + cid] 根据其id顺序累加写入gdt表。
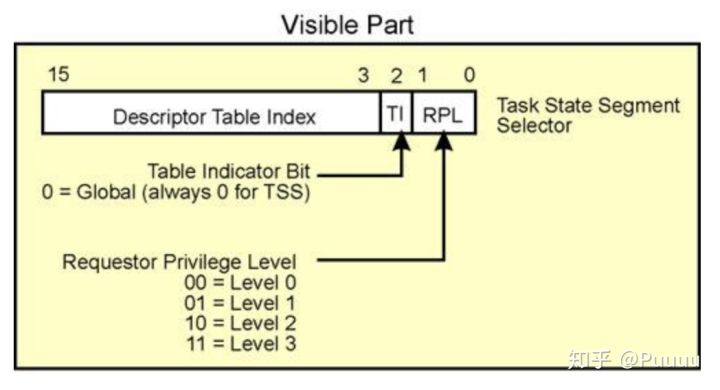
对于ltr(GD_TSS0 + 8 * cid);,作用是:loads a segment selector (source operand) into the task register that points to a TSS descriptor in the GDT 。下图是task register 中的visible part,ltr 的参数也是这个。因为参数的末3位是 flag 位,前13bit是descriptor table index,所以代码需要根据对应的 CPU ID 来改变 ltr的参数。
任务四:
回答 Question 2, 并且理解 Challenge Challenge! The big kernel lock is simple and easy to use… 的相关实现,将理解在实验报告中写明。
当前代码会在mp_main()初始化完成所有AP之后陷入自旋(spin)。在让这些AP做出下一步操作之前,需要解决多个CPU同时执行内核代码的竞争条件。
最简单的方式就是使用一个大内核锁(big kernel lock)。这个大内核锁是一个单一的全局锁,当一个环境进入内核模式的时候就可以被获取,然后返回到用户态的时候被释放。在这种模型下,用户模式的环境可以在任意多个CPU下并发运行(concurrently),但是只有一个环境能处于内核态,其余环境进入内核态需要强制等待。
kern/spinlock.h中声明了这个大内核锁的实现函数kernel_lock()。同时它提供了lock_kernel()和unlock_kernel()两个函数用于上锁和解锁,需要在以下四个场景使用大内核锁:
i386_init():在BSP唤醒其它CPU之前进行获取锁mp_main():初始化AP之后进行上锁,然后调用sched_yield()在当前AP上运行环境trap():从用户模式陷入内核时上锁。通过TF_CS寄存器的低位来判断trap是发生在用户模式还是内核模式下env_run():在切换回用户态之前进行解锁。释放地太早或太晚会导致竞争或死锁
回答Question 2
It seems that using the big kernel lock guarantees that only one CPU can run the kernel code at a time. Why do we still need separate kernel stacks for each CPU? Describe a scenario in which using a shared kernel stack will go wrong, even with the protection of the big kernel lock.
看起来大内核锁机制保证了同时只能有一个CPU在内核态运行。那为什么我们还需要将每个CPU的内核栈分开?请描述一个场景,即使有大内核锁的保护,还是因为共享的内核栈而导致错误。
A:
因为不同的内核栈上会保存着不同的信息。
比如:根据Lab3中所说,内核栈中保存了trapframe,以便于内核处理结束后返回用户程序继续执行。如果内核栈共享,假设CPU0因中断陷入内核并在内核栈中保留了CPU0的trapframe,之后CPU1也发生了中断陷入内核,因为是共享内核栈,CPU1的trapframe就会覆盖CP0的信息,产生错误。并且因为大内核锁是加在trap()函数中的,在中断触发、进入中断处理程序入口到trap()之间没有锁,所以大内核锁无法预防这个问题。
相关的信息当多个程序都完成保存现场操作同时要求陷入内核时,就可能会破坏未能获得大内核锁的用户程序的trapframe,导致无法正确返回。
理解大内核锁
(助教在群里说这里只要写对大内核锁的理解就可以,所以小标题写了这个)
锁的定义:
// spinlock.h
// Mutual exclusion lock.
struct spinlock {
	unsigned locked;       // Is the lock held?
};
加锁、解锁操作:
static inline void
lock_kernel(void)
{
	spin_lock(&kernel_lock);
}

static inline void
unlock_kernel(void)
{
	spin_unlock(&kernel_lock);

	// Normally we wouldn't need to do this, but QEMU only runs
	// one CPU at a time and has a long time-slice.  Without the
	// pause, this CPU is likely to reacquire the lock before
	// another CPU has even been given a chance to acquire it.
	asm volatile("pause");
}

// Acquire the lock.
// Loops (spins) until the lock is acquired.
// Holding a lock for a long time may cause
// other CPUs to waste time spinning to acquire it.
void
spin_lock(struct spinlock *lk)
{
	// The xchg is atomic.
	// It also serializes, so that reads after acquire are not
	// reordered before it.
	while (xchg(&lk->locked, 1) != 0)			//原理见:https://pdos.csail.mit.edu/6.828/2018/xv6/book-rev11.pdf  chapter 4
		asm volatile ("pause");
}

// Release the lock.
void
spin_unlock(struct spinlock *lk)
{
	// The xchg instruction is atomic (i.e. uses the "lock" prefix) with
	// respect to any other instruction which references the same memory.
	// x86 CPUs will not reorder loads/stores across locked instructions
	// (vol 3, 8.2.2). Because xchg() is implemented using asm volatile,
	// gcc will not reorder C statements across the xchg.
	xchg(&lk->locked, 0);
}
使用大内核锁的主要核心原因是:JOS中每次只能有一个CPU能执行内核代码。大内核锁分别在i386_init()、mp_main()、trap()、env_run()中使用。
// init.c
void
i386_init(void)
{
	//省略了其他内容……
	// Acquire the big kernel lock before waking up APs
	// Your code here:
    // 在BSP唤醒其它CPU之前,BSP获取内核锁,防止唤醒的AP启动进程
    // 这时启动的AP在等待锁的释放,阻塞在sched_yield()
	lock_kernel();
	// Starting non-boot CPUs
	boot_aps();
}
// init.c
// Setup code for APs
void
mp_main(void)
{
	// ……
	// Now that we have finished some basic setup, call sched_yield() to start running processes on this CPU.
 	// But make sure that only one CPU can enter the scheduler at a time!
	// Your code here:
    // 初始化AP后,在调度之前上锁
    // 因为调用调度函数会进入内核临界区
	lock_kernel();
	sched_yield();
}
// trap.c
void trap(struct Trapframe *tf)
{
	// ……
	// Re-acqurie the big kernel lock if we were halted in sched_yield()
	if (xchg(&thiscpu->cpu_status, CPU_STARTED) == CPU_HALTED)
		lock_kernel();
	// Check that interrupts are disabled.  If this assertion
	// fails, DO NOT be tempted to fix it by inserting a "cli" in
	// the interrupt path.
	assert(!(read_eflags() & FL_IF));

	if ((tf->tf_cs & 3) == 3)
	{
		// Trapped from user mode.
		// Acquire the big kernel lock before doing any serious kernel work.
		// LAB 4: Your code here.
  		// 这里要从用户态进入到内核态
		assert(curenv);
		lock_kernel();

		// ……
}
// env.c
void
env_run(struct Env *e)
{
	if (curenv != NULL && curenv->env_status == ENV_RUNNING) {
		curenv->env_status = ENV_RUNNABLE;
	}
	curenv = e;
	e->env_status = ENV_RUNNING;
	e->env_runs++;
	lcr3(PADDR(e->env_pgdir));
    // 释放锁
    // 因为在env_pop_tf执行结束之后回到用户态,所以要在env_pop_tf()之前释放
	unlock_kernel();
	env_pop_tf(&e->env_tf);
}
梳理一下流程:
在BSP唤醒其它CPU之前,BSP获取内核锁,防止唤醒的AP启动进程。这时启动的AP都在等待锁的释放,在 mp_main 执行调度sched_yield()之前阻塞。
当BSP唤醒所有AP后,仍处于内核态,大内核锁仍然在BSP手中,BSP继续执行i386_init()中的代码,创建环境,执行调度sched_yield(),从刚创建的进程中调度一个进程执行,知道这时才释放大内核锁。
其中一个等待的AP申请到大内核锁,执行调度sched_yield()选择一个进程执行。其他AP继续等待。当该AP在env_run中释放大内核锁后,又有一个等待的AP申请到大内核锁,执行上述步骤。
期间,如果发生了从用户模式的trap:(tf->tf_cs & 3) == 3,由于要进入内核态,也需要加锁,和其他AP一起竞争释放的大内核锁。
任务五:
回答 Question3 和 Qestion4 ,其中涉及到的代码助教已经实现,请将理解以及相关关键代码在实验报告中写明。
这一步要改变jos内核,实现对用户环境的轮询调度(round-robin):
kern/sched.c中的sched_yield()负责从用户环境中选择一个新环境执行。该函数按照顺序循环遍历envs[]数组,从上一次运行的环境开始(或者当之前没有运行环境时,从这个数组的第一项开始),找到第一个ENV_RUNNABLE的环境然后调用env_run()跳转到执行那个环境。sched_yield()一定不能在两个CPU上同时运行相同的环境,可以通过环境的状态是否为ENV_RUNNING来判断这个环境是否正运行在某个CPU上。- 用户环境可以通系统调用
sys_yield()唤醒内核函数sched_yield(),主动放弃CPU给另一个环境。
// sched.c
// Choose a user environment to run and run it.
// 当env[i]进程来调用sched_yield()函数的时候,表示进程i要让出CPU了
void sched_yield(void)
{
	struct Env *idle;
	// Implement simple round-robin scheduling.
	//
	// Search through 'envs' for an ENV_RUNNABLE environment in circular fashion starting just after the env this CPU was last running.  Switch to the first such environment found.
	//
	// If no envs are runnable, but the environment previously running on this CPU is still ENV_RUNNING, it's okay to choose that environment.
	//
	// Never choose an environment that's currently running on another CPU (env_status == ENV_RUNNING). If there are no runnable environments, simply drop through to the code below to halt the cpu.
	// LAB 4: Your code here.

	int start = 0;
	int j;

    // 如果有curenv
	if (curenv)
	{
		start = ENVX(curenv->env_id) + 1; //start为当前进程的下一个进程(env_id)
	}
	for (int i = 0; i < NENV ; i++)
	{
		j = (start + i) % NENV; //循环遍历
		if (envs[j].env_status == ENV_RUNNABLE ) //找到就调用新进程
		{
			env_run(&envs[j]);
		}
	}
    // 如果没有找到ENV_RUNNABLE的进程,且当前进程还在跑,仍然执行当前进程
	if (curenv && curenv->env_status == ENV_RUNNING)
	{
		env_run(curenv);
	}
    // 当CPU没有环境可执行时,就会进入sched_halted()里被halted
	sched_halt();
}
回答 Question3
In your implementation of env_run() you should have called lcr3(). Before and after the call to lcr3(), your code makes references (at least it should) to the variable e, the argument to env_run. Upon loading the %cr3 register, the addressing context used by the MMU is instantly changed. But a virtual address (namely e) has meaning relative to a given address context–the address context specifies the physical address to which the virtual address maps. Why can the pointer e be dereferenced both before and after the addressing switch?
在
env_run()的实现中调用了lcr3()。在这个函数的调用之前以及调用之后,代码对env_run()的参数e进行了引用。在加载%cr3寄存器之后,MMU的寻址上下文就改变了。但是虚拟地址(e)相对于给定的地址上下文具有意义——地址上下文指定虚拟地址映射到的物理地址。为什么在寻址改变前后都可以对e进行解引用?
A:
void
env_run(struct Env *e)
{
	if (curenv != NULL && curenv->env_status == ENV_RUNNING) {
		curenv->env_status = ENV_RUNNABLE;
	}
	curenv = e;
	e->env_status = ENV_RUNNING;
	e->env_runs++;
    // 题目说的是这里
	lcr3(PADDR(e->env_pgdir));
	unlock_kernel();
	env_pop_tf(&e->env_tf);
}
这里涉及到对进程环境e虚拟内存的初始化:env_setup_vm(struct Env *e):
static int env_setup_vm(struct Env *e)
{
	int i;
	struct PageInfo *p = NULL;

	// Allocate a page for the page directory
	if (!(p = page_alloc(ALLOC_ZERO)))
		return -E_NO_MEM;

	// Now, set e->env_pgdir and initialize the page directory.
	p->pp_ref++;
	e->env_pgdir = (pde_t *)page2kva(p);
    // env_pgdir基于kern_pgdir产生
	memcpy(e->env_pgdir, kern_pgdir, PGSIZE);

	// UVPT maps the env's own page table read-only.
	// Permissions: kernel R, user R
	e->env_pgdir[PDX(UVPT)] = PADDR(e->env_pgdir) | PTE_P | PTE_U;

	return 0;
}
根据注释中的提示:The VA space of all envs is identical above UTOP(except at UVPT, which we've set below),env在虚拟内存的地址如下图所示:

因为env_pgdir基于kern_pgdir产生,e位于UTOP之上,对于UTOP上的地址映射关系在两个页表中是一样的,即e的地址在两个地址空间中映射到了同一个物理地址。虽然在加载%cr3寄存器之后,MMU的寻址上下文就改变了,但是curenv的地址没变,映射也没变,仍然可以对e解引用。
回答 Question4
Whenever the kernel switches from one environment to another, it must ensure the old environment’s registers are saved so they can be restored properly later. Why? Where does this happen?
当内核进行用户环境切换的时候,必须要保证之前的环境的寄存器值被保存,以便之后恢复。为什么?这个过程是在哪里发生的?
A:
因为寄存器是只有一组,只能存储一个env的上下文。当执行系统调用或者发生中断时会发生进程上下文切换,但是当执行结束中断处理程序或者其他进程后,可能还会回来继续执行该进程。所以需要保存执行环境,否则就无法正确地恢复到原来的环境。
因为进程切换一定会导致模式切换。进程通过系统调用陷入内核态,经历中断触发,在trapentry.S中保存寄存器,调用trap(),把旧环境的寄存器值放在旧环境的e->env_tf中。当要恢复环境时,通过调用env_pop_tf()恢复旧环境的e->env_tf。
保存寄存器:
# trapentry.S
_alltraps:
    pushl %ds
    pushl %es
    pushal
    movw $GD_KD, %ax
    movw %ax, %ds
    movw %ax, %es
    pushl %esp
    call trap
恢复寄存器:
// kern/env.c
void env_pop_tf(struct Trapframe *tf)
{
	// Record the CPU we are running on for user-space debugging
	curenv->env_cpunum = cpunum();

	asm volatile(
		"\tmovl %0,%%esp\n"
		"\tpopal\n"
		"\tpopl %%es\n"
		"\tpopl %%ds\n"
		"\taddl $0x8,%%esp\n" /* skip tf_trapno and tf_errcode */
		"\tiret\n"
		:
		: "g"(tf)
		: "memory");
	panic("iret failed"); /* mostly to placate the compiler */
}