A.代码实现
Exercise 2
1、env_init()
初始化envs数组中的所有Env结构,将env_id 置零,env_status 置为 ENV_FREE,并将它们用头插法添加到env_free_list中。(根据代码中的注释填充)
调用env_init_percpu,它为特权级别0(内核)和特权级别3(用户)配置分段硬件。
// Mark all environments in 'envs' as free, set their env_ids to 0,
// and insert them into the env_free_list.
// Make sure the environments are in the free list in the same order
// they are in the envs array (i.e., so that the first call to
// env_alloc() returns envs[0]).

void env_init(void)
{
	// Set up envs array
	// LAB 3: Your code here.
    for (int i = NENV-1; i >= 0; --i){
        envs[i].env_link = env_free_list;
        envs[i].env_id = 0;
        envs[i].env_status = ENV_FREE;
        env_free_list = &envs[i];
    }
	// Per-CPU part of the initialization
	env_init_percpu();
}
2、env_create()
利用env_alloc函数分配一个env,利用load_icode函数把 ELF二进制文件读入用户地址空间中,并且设置env_type。(根据代码中的注释填充)
由于env_alloc函数若运行成功,返回值为0,若返回值<0则说明分配失败,报错。
// Allocates a new env with env_alloc, loads the named elf
// binary into it with load_icode, and sets its env_type.
// This function is ONLY called during kernel initialization,
// before running the first user-mode environment.
// The new env's parent ID is set to 0.

void env_create(uint8_t *binary, enum EnvType type)
{
	// LAB 3: Your code here.
	struct Env *e = NULL;
    if (env_alloc(&e, 0) < 0) //env_alloc失败,报错
          panic("env_create failed.\n");
    load_icode(e, binary);
    e->env_type = type;
}
3、env_run()
在用户模式下,开始运行一个用户环境,涉及到上下文的切换。(根据代码中的注释分步骤填充)
// Context switch from curenv to env e.
// Note: if this is the first call to env_run, curenv is NULL.
//
// This function does not return.

void env_run(struct Env *e)
{
	// Step 1: If this is a context switch (a new environment is running):
	//	   1. Set the current environment (if any) back to
	//	      ENV_RUNNABLE if it is ENV_RUNNING (think about
	//	      what other states it can be in),
	//	   2. Set 'curenv' to the new environment,
	//	   3. Set its status to ENV_RUNNING,
	//	   4. Update its 'env_runs' counter,
	//	   5. Use lcr3() to switch to its address space.
	// Step 2: Use env_pop_tf() to restore the environment's
	//	   registers and drop into user mode in the
	//	   environment.

	// Hint: This function loads the new environment's state from
	//	e->env_tf.  Go back through the code you wrote above
	//	and make sure you have set the relevant parts of
	//	e->env_tf to sensible values.

	// LAB 3: Your code here.
    if(curenv && curenv->env_status == ENV_RUNNING)
        curenv->env_status = ENV_RUNNABLE; //step 1.1

    curenv = e; //step 1.2
    curenv->env_status = ENV_RUNNING; //step 1.3
    curenv->env_runs++; //step 1.4
    lcr3(PADDR(curenv->env_pgdir)); //step 1.5 PADDR宏去除内核的虚拟起始地址,env_pgdir维护环境的页目录的内核虚拟地址
    env_pop_tf(&curenv->env_tf); //step 2 env_tf当环境不在运行状态时为用户环境保存寄存器的值
运行截图
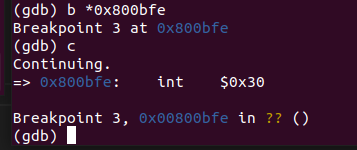
0x800bfe是hello.asm中int $0x30的地址,可以成功跑到这一步,说明Exercise 2的代码成功执行。
Exercise 4
编辑trapentry.S 和 trap.c 文件实现功能。
-trapentry.S中的 TRAPHANDLER和 TRAPHANDLER _ noec以及inc/trap.h中定义的t _ *会有帮助。
-需要使用这些宏在 trapentry.S 中为 inc/trap.h 中定义的每个trap添加entry point ,并且提供TRAPHANDLER宏所指的 _alltraps。
-需要修改 trap_init ()来初始化 idt,以指向 trapentry.S 中定义的每个入口点,这里使用 SETGATE 宏会很有帮助。
_alltraps需要完成:
-
数据压栈,使得栈的结构看上去像
struct Trapframe -
将
GD_KD加载到%ds和%es寄存器 -
用
pushl %esp将一个指向 Trapframe 的指针作为一个参数传递给trap () -
call trap()调用函数
1、trapentry.S
提示中提到了trapentry.S中的两个宏:TRAPHANDLER 和 TRAPHANDLER_NOEC,参数都是name(定义一个名称为name的全局处理函数)和num(异常号)。他们都会把传入的异常号入栈,再跳转到__alltraps中。区别是TRAPHANDLERcpu会自动把error code入栈,但是TRAPHANDLER_NOEC要手动入栈0当作错误码。
/* TRAPHANDLER defines a globally-visible function for handling a trap.
 * It pushes a trap number onto the stack, then jumps to _alltraps.
 * Use TRAPHANDLER for traps where the CPU automatically pushes an error code.
 *
 * You shouldn't call a TRAPHANDLER function from C, but you may
 * need to _declare_ one in C (for instance, to get a function pointer
 * during IDT setup).  You can declare the function with
 *   void NAME();
 * where NAME is the argument passed to TRAPHANDLER.
 */
#define TRAPHANDLER(name, num)						\
	.globl name;		/* define global symbol for 'name' */	\
	.type name, @function;	/* symbol type is function */		\
	.align 2;		/* align function definition */		\
	name:			/* function starts here */		\
	pushl $(num);							\
	jmp _alltraps

/* Use TRAPHANDLER_NOEC for traps where the CPU doesn't push an error code.
 * It pushes a 0 in place of the error code, so the trap frame has the same
 * format in either case.
 */
#define TRAPHANDLER_NOEC(name, num)					\
	.globl name;							\
	.type name, @function;						\
	.align 2;							\
	name:								\
	pushl $0;							\
	pushl $(num);							\
	jmp _alltraps
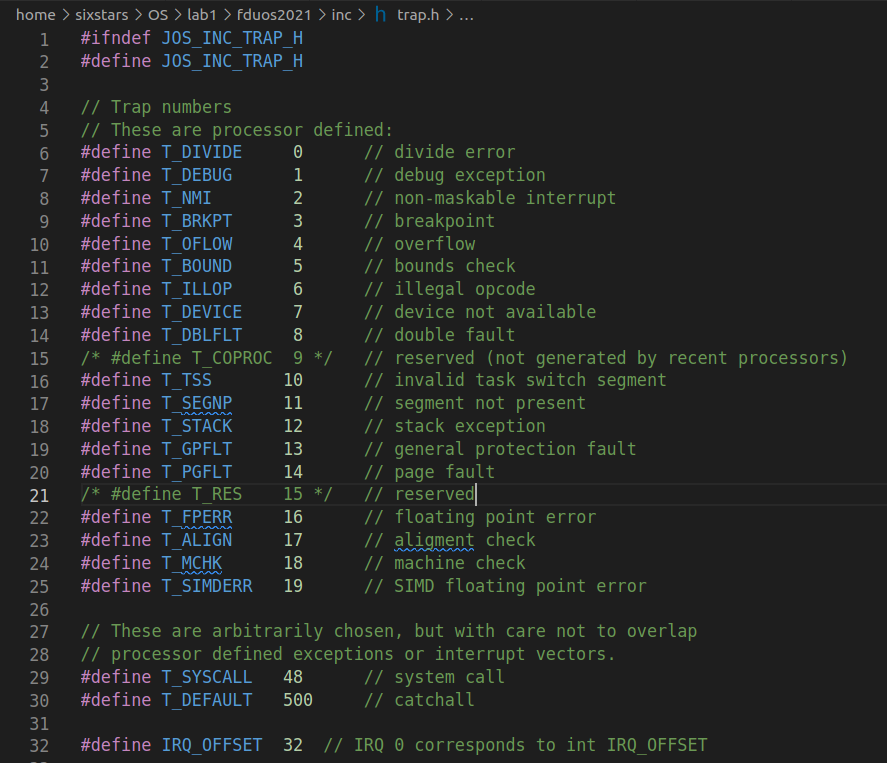
首先参照inc/trap.h中的异常号,在trapentry.S中定义相应的异常处理函数,初始化所有trap和对应的entry point:
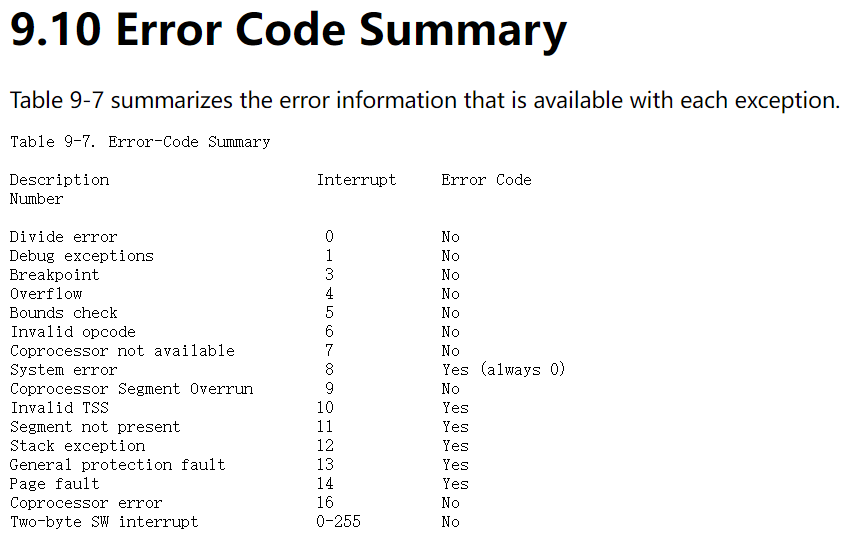
根据参考手册9.10 Error Code Summary表格中的Error Code一栏判断是否需要push error code。
/*
 * Lab 3: Your code here for generating entry points for the different traps.
 */

TRAPHANDLER_NOEC(divide_handler, T_DIVIDE);
TRAPHANDLER_NOEC(debug_handler, T_DEBUG);
TRAPHANDLER_NOEC(nmi_handler, T_NMI);
TRAPHANDLER_NOEC(brkpt_handler, T_BRKPT);
TRAPHANDLER_NOEC(overflow_handler, T_OFLOW);
TRAPHANDLER_NOEC(bounds_handler, T_BOUND);
TRAPHANDLER_NOEC(illegalop_handler, T_ILLOP);
TRAPHANDLER_NOEC(device_handler, T_DEVICE);

TRAPHANDLER(double_handler, T_DBLFLT);
TRAPHANDLER(taskswitch_handler, T_TSS);
TRAPHANDLER(segment_handler, T_SEGNP);
TRAPHANDLER(stack_handler, T_STACK);
TRAPHANDLER(protection_handler, T_GPFLT);
TRAPHANDLER(page_handler, T_PGFLT);

TRAPHANDLER_NOEC(floating_handler, T_FPERR);
TRAPHANDLER_NOEC(aligment_handler, T_ALIGN);
TRAPHANDLER_NOEC(machine_handler, T_MCHK);
TRAPHANDLER_NOEC(simd_handler, T_SIMDERR);
TRAPHANDLER_NOEC(syscall_handler, T_SYSCALL);
TRAPHANDLER_NOEC(default_handler, T_DEFAULT);
再根据提示完成_alltraps。
_alltraps的目的是正确地向trap函数传参。根据要求,要使栈的结构看上去像struct Trapframe,首先在inc/trap.h中看到Trapframe的结构:
struct Trapframe {
	struct PushRegs tf_regs;
	uint16_t tf_es;
	uint16_t tf_padding1;
	uint16_t tf_ds;
	uint16_t tf_padding2;
	uint32_t tf_trapno;
	/* below here defined by x86 hardware */
	uint32_t tf_err;
	uintptr_t tf_eip;
	uint16_t tf_cs;
	uint16_t tf_padding3;
	uint32_t tf_eflags;
	/* below here only when crossing rings, such as from user to kernel */
	uintptr_t tf_esp;
	uint16_t tf_ss;
	uint16_t tf_padding4;
} __attribute__((packed));
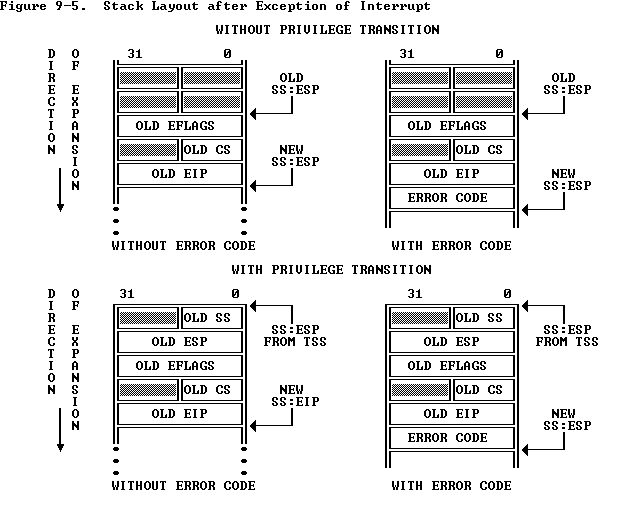
根据异常和中断介绍的内容,当中断产生时,处理器已经自动把%ss寄存器到tf_eip的内容压入栈,还有tf_ds, tf_es, tf_regs需要处理。
pushl %ds,pushl %es,pushal对应的就是把%ds,%es和所有寄存器压栈,顺序也和Trapframe中声明的顺序一致。
之后再把将GD_KD的值赋值给寄存器%ds,%es。用pushl %esp将一个指向 Trapframe 的指针作为一个参数传递给trap ()并调用。
/*
 * Lab 3: Your code here for _alltraps
 */

 .global _alltraps
_alltraps:
	pushl %ds
	pushl %es
	pushal
	movw $GD_KD, %ax
	movw %ax, %ds
	movw %ax, %es
	pushl %esp
	call trap
2、trap.c
根据提示,首先去看SETGATE宏(在irc/mmu.h中)。
// Set up a normal interrupt/trap gate descriptor.
// - istrap: 1 for a trap (= exception) gate, 0 for an interrupt gate.
    //   see section 9.6.1.3 of the i386 reference: "The difference between
    //   an interrupt gate and a trap gate is in the effect on IF (the
    //   interrupt-enable flag). An interrupt that vectors through an
    //   interrupt gate resets IF, thereby preventing other interrupts from
    //   interfering with the current interrupt handler. A subsequent IRET
    //   instruction restores IF to the value in the EFLAGS image on the
    //   stack. An interrupt through a trap gate does not change IF."
// - sel: Code segment selector for interrupt/trap handler
// - off: Offset in code segment for interrupt/trap handler
// - dpl: Descriptor Privilege Level -
//	  the privilege level required for software to invoke
//	  this interrupt/trap gate explicitly using an int instruction.

//gate:异常在IDT中的描述符
//istrap:用于区分异常和中断,异常则为1,中断为0
//sel:处理异常函数的数据段,这里都选择内核代码段GD_KT
//off:异常处理函数的入口偏移
//dpl:描述符的优先级
#define SETGATE(gate, istrap, sel, off, dpl)			\
{								\
	(gate).gd_off_15_0 = (uint32_t) (off) & 0xffff;		\ //存储偏移值的低16位
	(gate).gd_sel = (sel);					\
	(gate).gd_args = 0;					\
	(gate).gd_rsv1 = 0;					\
	(gate).gd_type = (istrap) ? STS_TG32 : STS_IG32;	\
	(gate).gd_s = 0;					\
	(gate).gd_dpl = (dpl);					\
	(gate).gd_p = 1;					\
	(gate).gd_off_31_16 = (uint32_t) (off) >> 16;		\ //存储偏移值的高16位
}
SETGATE宏的作用是设置中断描述符的函数入口地址,需要修改trap_init ()来初始化 IDT,让其每个表项都指向trapentry.S中定义的相应函数入口点。
//先声明定义的函数
void divide_handler();
void debug_handler();
void nmi_handler();
void brkpt_handler();
void overflow_handler();
void bounds_handler();
void illegalop_handler();
void device_handler();

void double_handler();
void taskswitch_handler();
void segment_handler();
void stack_handler();
void protection_handler();
void page_handler();

void floating_handler();
void aligment_handler();
void machine_handler();
void simd_handler();
void syscall_handler();
void default_handler();

void trap_init(void)
{
	extern struct Segdesc gdt[];

	// LAB 3: Your code here.
	SETGATE(idt[T_DIVIDE],0,GD_KT,divide_handler,0);
	SETGATE(idt[T_DEBUG],0,GD_KT,debug_handler,0);
	SETGATE(idt[T_NMI],0, GD_KT,nmi_handler,0);
	SETGATE(idt[T_BRKPT],0,GD_KT,brkpt_handler,3);
	SETGATE(idt[T_OFLOW],0,GD_KT,overflow_handler,0);
	SETGATE(idt[T_BOUND],0,GD_KT,bounds_handler,0);
	SETGATE(idt[T_ILLOP],0,GD_KT,illegalop_handler,0);
	SETGATE(idt[T_DEVICE],0,GD_KT,device_handler,0);
	SETGATE(idt[T_DBLFLT],0,GD_KT,double_handler,0);
	SETGATE(idt[T_TSS],0,GD_KT,taskswitch_handler,0);
	SETGATE(idt[T_SEGNP],0,GD_KT,segment_handler,0);
	SETGATE(idt[T_STACK],0,GD_KT,stack_handler,0);
	SETGATE(idt[T_GPFLT],0,GD_KT,protection_handler,0);
	SETGATE(idt[T_PGFLT],0,GD_KT,page_handler,0);
	SETGATE(idt[T_FPERR],0,GD_KT,floating_handler,0);
	SETGATE(idt[T_ALIGN],0,GD_KT,aligment_handler,0);
	SETGATE(idt[T_MCHK],0,GD_KT,machine_handler,0);
	SETGATE(idt[T_SIMDERR],0,GD_KT,simd_handler,0);
	SETGATE(idt[T_SYSCALL],0,GD_KT,syscall_handler,3);
	SETGATE(idt[T_DEFAULT],0,GD_KT,default_handler,0);

	// Per-CPU setup
	trap_init_percpu();
}
由于Exercise6中要求再用户态下也能处理Breakpoint Exception,所以通过SETGATE(idt[T_BRKPT],0,GD_KT,brkpt_handler,3);把优先级设为3。
运行截图

Exercise 5&6
-修改 trap_dispatch 函数,使得在发生缺页时能够调度page_fault_handler()函数来处理异常。
-修改trap_dispatch()函数,实现内核监视器中的断点异常。

首先找到trap_dispatch()是被kern/trap.c中的trap()函数调用,目的是将不同类型的trap分发。根据之前看到的Trapframe 结构体,其中 tf_trapno 成员代表中断的中断码,可以通过这个判断是否为缺页中断(T_PGFLT),如果是,则执行 page_fault_handler 函数。
同理,如果tf_trapno == T_BRKPT,则是断点异常,调用kern/monitor.c中的monitor()。
static void
trap_dispatch(struct Trapframe *tf)
{
	// Handle processor exceptions.
	// LAB 3: Your code here.
	if (tf->tf_trapno == T_PGFLT){
		page_fault_handler(tf);
		return;
	}
	if (tf->tf_trapno == T_BRKPT){
		monitor(tf);
		return;
	}
	// Unexpected trap: The user process or the kernel has a bug.
	print_trapframe(tf);
	if (tf->tf_cs == GD_KT)
		panic("unhandled trap in kernel");
	else
	{
		env_destroy(curenv);
		return;
	}
}
运行截图

Exercise 7
-为中断号T_SYSCALL添加一个中断处理函数。
-编辑kern/trapentry.S和kern/trap.c中的trap_init()函数。
-修改trap_dispatch(),使其能够以正确参数调用syscall()(在kern/syscall.c中定义),并将返回结果存放在%eax中返回给用户。
-完成kern/syscall.c下的syscall(),使得当调用号无效的时候返回-E_INVAL。阅读lib/syscall.c,尤其是其中的内联汇编代码,通过系统调用函数处理inc/syscall.h中的所有系统调用。
1、trapentry.S & trap.c
(在Exercise 4中已完成)

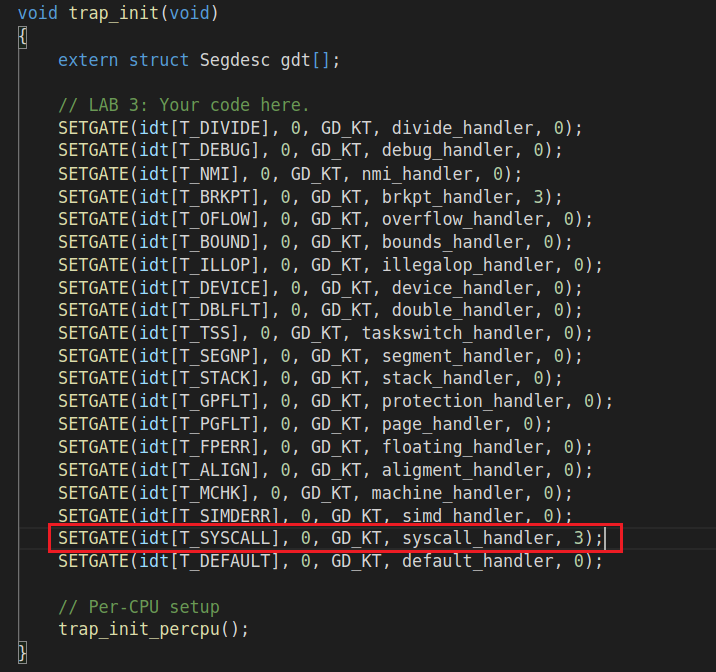
2、trap_dispatch()
根据实验说明文档中提示的:在系统调用发生的过程中,用户程序将在寄存器中传递系统调用号和系统调用参数。这样,内核无需在用户环境的堆栈或指令流中操作。系统调用号在 %eax 中,参数(最多五个)将分别在 %edx,%ecx,%ebx,%edi和%esi中。
再结合kern/syscall.c中syscall()的参数分别对应 %eax, %edx,%ecx,%ebx,%edi和%esi。
int32_t
syscall(uint32_t syscallno, uint32_t a1, uint32_t a2, uint32_t a3, uint32_t a4, uint32_t a5)
修改trap_dispatch():
static void
trap_dispatch(struct Trapframe *tf)
{
	//省略了在Exercise5&6中出现过的部分
	if(tf->tf_trapno == T_SYSCALL){
        //将参数传入调用syscall,并将返回结果存放在%eax中返回给用户。
	    tf->tf_regs.reg_eax = syscall(tf->tf_regs.reg_eax, tf->tf_regs.reg_edx, tf->tf_regs.reg_ecx, tf->tf_regs.reg_ebx, tf->tf_regs.reg_edi, tf->tf_regs.reg_esi);
	    return;
	}
}
3、syscall()(kern/syscall.c)
阅读lib/syscall.c后,可以发现在sys_cputs,sys_cgetc,sys_env_destroy,sys_getenvid函数中都调用了syscall函数,并且这些函数在kern/syscall.c中也出现了。
对照来看lib/syscall.c和kern/syscall.c中同名函数实现的差异:
//in lib/syscall.c
int
sys_env_destroy(envid_t envid)
{
	return syscall(SYS_env_destroy, 1, envid, 0, 0, 0, 0);
}
//in kern/syscall.c
static int
sys_env_destroy(envid_t envid)
{
	int r;
	struct Env *e;

	if ((r = envid2env(envid, &e, 1)) < 0)
		return r;
	if (e == curenv)
		cprintf("[%08x] exiting gracefully\n", curenv->env_id);
	else
		cprintf("[%08x] destroying %08x\n", curenv->env_id, e->env_id);
	env_destroy(e);
	return 0;
}
可以看到在lib/syscall.c中直接通过调用syscall实现函数,但是在kern/syscall.c中调用了cprintf()完成输出。但是找到调用顺序:cprintf()→vcprintf()→sys_cputs()【这里A→B代表A调用了B】,可以发现实际上kern/syscall.c中的函数也是通过调用lib/syscall.c中的syscall。所以在kern/syscall.c的syscall()中可以通过调用文件中的其他函数达到目的。
然后按照代码中的提示:调用与syscallno参数对应的函数,完成syscall()。
// Dispatches to the correct kernel function, passing the arguments.
int32_t
syscall(uint32_t syscallno, uint32_t a1, uint32_t a2, uint32_t a3, uint32_t a4, uint32_t a5)
{
	// Call the function corresponding to the 'syscallno' parameter.
	// Return any appropriate return value.
	// LAB 3: Your code here.

	switch (syscallno) {
	case SYS_cputs:
		sys_cputs((const char *)a1, a2); //sys_cputs是void,没有返回值,且第一个参数类型是const char *
		return 0;
	case SYS_cgetc:
		return sys_cgetc(); //参数类型是void
	case SYS_getenvid:
		return sys_getenvid(); //参数类型是void
	case SYS_env_destroy:
		return sys_env_destroy((envid_t)a1); //参数类型是envid_t
	default:
		return -E_INVAL;
	}
}
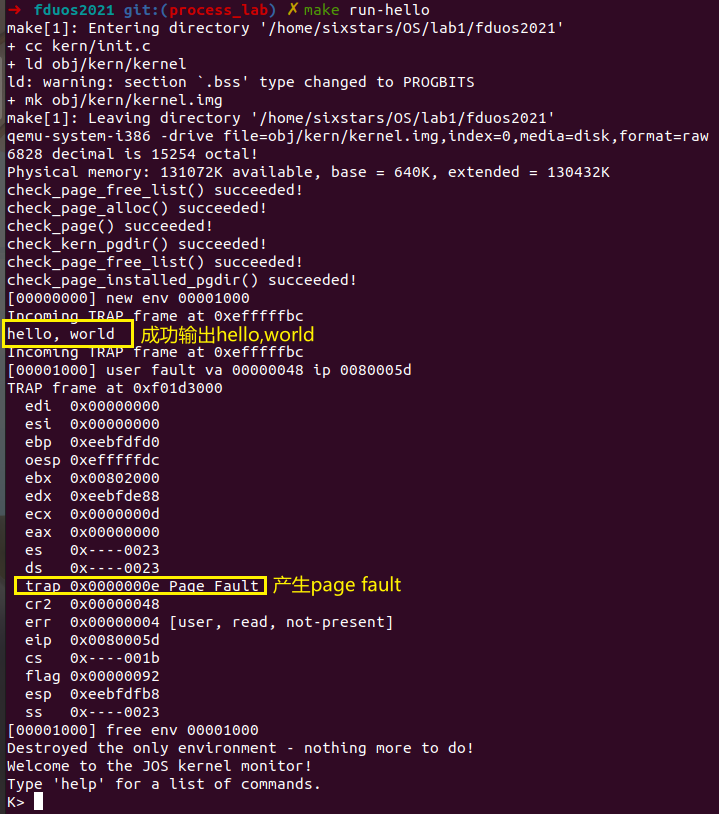
运行截图
make garde:

make run-hello:成功输出hello,world,并在用户模式下产生了缺页错误。
Exercise 8
-用户程序真正开始运行的地方是在lib/entry.S,文件中会调用lib/libmain.c 中的 libmain() 函数。需要修改 libmain() ,使得能够初始化全局指针thisenv,让它指向当前用户环境的 Env 结构体struct Env(在envs[]数组中)。提示:可以查看inc/env.h以及使用sys_getenvid()。
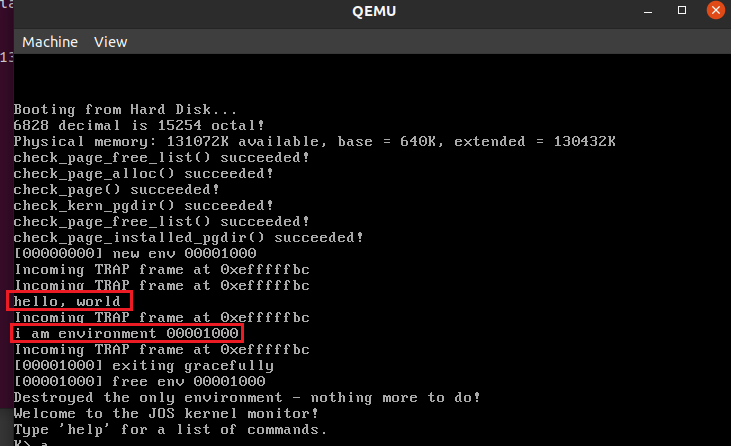
-然后libmain调用umain,而umain恰好是 user/hello.c 中被调用的函数。在Exercise 7中,hello.c程序在打印“hello, world” 后会报出Page Fault异常,因为它试图访问thisenv->env_id,但是我们还没有初始化thisenv。当正确初始化thisenv后,就不会报错了。
要使thisenv 指向将当前正在执行的进程,即要通过程序获得当前正在运行的用户环境的env_id , 以及这个用户环境所对应的 Env 结构体的指针。
env_id可以通过调用lib/syscall.c中的sys_getenvid() 函数获得。
然后根据提示去看inc/env.h,发现了这样一段注释:
typedef int32_t envid_t;

// An environment ID 'envid_t' has three parts:
//
// +1+---------------21-----------------+--------10--------+
// |0|          Uniqueifier             |   Environment    |
// | |                                  |      Index       |
// +------------------------------------+------------------+
//                                       \--- ENVX(eid) --/
//
// The environment index ENVX(eid) equals the environment's index in the
// 'envs[]' array.  The uniqueifier distinguishes environments that were
// created at different times, but share the same environment index.
//
// All real environments are greater than 0 (so the sign bit is zero).
// envid_ts less than 0 signify errors.  The envid_t == 0 is special, and
// stands for the current environment.

#define LOG2NENV		10

#define NENV			(1 << LOG2NENV)

#define ENVX(envid)		((envid) & (NENV - 1))
envid_t被分为三个部分:最高位(第31位)固定为0;中间第10~30位(21bit)是标识符,标志用户环境;最低第0~9位(10bit)代表当前用户环境的Env结构体在'envs[]数组的索引。并且可以通过ENVX(eid)宏获取envid_t的低10bit,即获取到了这个用户环境所对应的 Env 结构体的指针。
void
libmain(int argc, char **argv)
{
	// set thisenv to point at our Env structure in envs[].
	// LAB 3: Your code here.
	thisenv = &envs[ENVX(sys_getenvid())];

	// save the name of the program so that panic() can use it
	if (argc > 0)
		binaryname = argv[0];

	// call user main routine
	umain(argc, argv);

	// exit gracefully
	exit();
}
运行截图
make garde:

make run-hello:成功运行user/hello.c
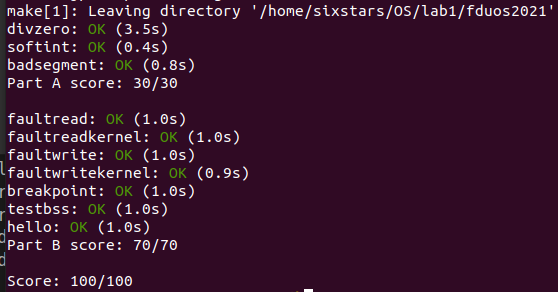
Exercise 1~8全部运行成功截图
优化trapentry.S & trap.c
优化kern/trapentry.S和kern/trap.c中的代码,通过重构减少 idt_init()中重复出现的代码,使其同样的代码写一遍就好。
这个优化应该就是Exercise 4中的Challenge部分,阅读网页上的提示:在trapentry.S和trap.c都有着大量重复代码,改变这些,并修改trapentry.S中的宏使得可以自动生成一张表格供trap.c使用。注意可以通过使用指令 .text 和 .data在汇编器中设置代码和数据之间进行切换。
消除冗余代码可以学习xv6中的trap.c的写法:
// Interrupt descriptor table (shared by all CPUs).
struct gatedesc idt[256];
extern uint vectors[];  // in vectors.S: array of 256 entry pointers

void
tvinit(void)
{
	int i;

	for(i = 0; i < 256; i++)
		SETGATE(idt[i], 0, SEG_KCODE<<3, vectors[i], 0);
	SETGATE(idt[T_SYSCALL], 1, SEG_KCODE<<3, vectors[T_SYSCALL], DPL_USER);

	initlock(&tickslock, "time");
}
对比之前Exercise 4中的做法:把每一句宏SETGATE(idt[T_DIVIDE],0,GD_KT,divide_handler,0);都列出来,xv6中是把中断处理函数放进一个vectors[]进行管理。
根据注释,在vectors.S中发现,这里声明了全局函数alltraps,定义了全局变量vectorx,每一个vectorx先push error code,再push序号,最后跳转到alltraps。最后把这些vectorx组合成一个vector table。
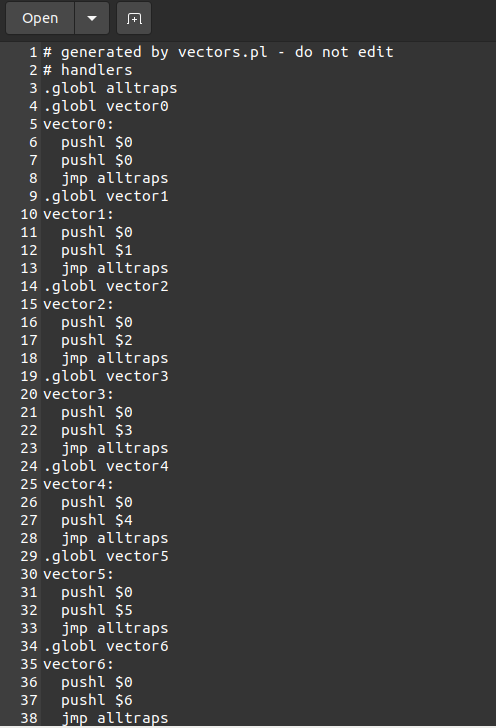
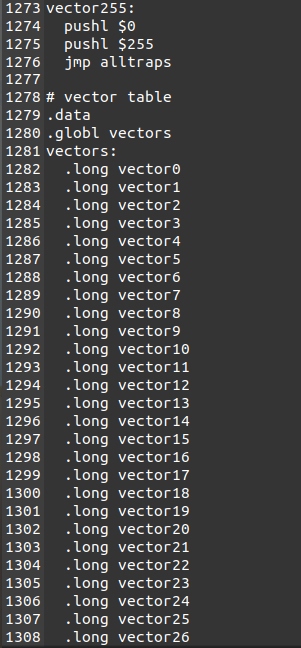
可以参考这样的做法,但是由于trapentry.S中的两个宏:TRAPHANDLER 和 TRAPHANDLER_NOEC,作用就是会把传入的异常号入栈再跳转到__alltraps中。所以不用像xv6那样手动写push。但是由于有的需要push error code有的不用,可以仿照TRAPHANDLER 和 TRAPHANDLER_NOEC写一个增加条件判断的通用宏OPT_HANDLER(根据之前的error code summary的表格,只有异常号为8,10,11,12,13,14,17的需要push error code,其他都push $0)。
trapentry.S:
/*模仿TRAPHANDLER和TRAPHANDLER_NOEC*/
#define OPT_HANDLER(name, num)	\
	.data;	\
		.long name;		\
	.text;  \
		.globl name;	\
   		.type name, @function;	\
   		.align 2;		\
		name:	\
    	.if !(num == 8 || (num >= 10 && num <= 14) || num == 17 ); /*只有异常号为8,10,11,12,13,14,17的需要`push error code`,其他都`push $0`*/  \
    	pushl $0;   \
   		.endif;     \
 		pushl $(num);							\
  		jmp _alltraps  /*跳转到_alltraps*/

/*模仿xv6写vector table*/
.data
	.globl vectors
vectors:
	OPT_HANDLER(handler0, 0)
    OPT_HANDLER(handler1, 1)
    OPT_HANDLER(handler2, 2)
    OPT_HANDLER(handler3, 3)
    OPT_HANDLER(handler4, 4)
    OPT_HANDLER(handler5, 5)
    OPT_HANDLER(handler6, 6)
    OPT_HANDLER(handler7, 7)
    OPT_HANDLER(handler8, 8)
    OPT_HANDLER(handler9, 9)
    OPT_HANDLER(handler10, 10)
    OPT_HANDLER(handler11, 11)
    OPT_HANDLER(handler12, 12)
    OPT_HANDLER(handler13, 13)
    OPT_HANDLER(handler14, 14)
    OPT_HANDLER(handler15, 15)
    OPT_HANDLER(handler16, 16)
    OPT_HANDLER(handler17, 17)
    OPT_HANDLER(handler18, 18)
    OPT_HANDLER(handler19, 19)
    OPT_HANDLER(handler20, 20)
    OPT_HANDLER(handler21, 21)
    OPT_HANDLER(handler22, 22)
    OPT_HANDLER(handler23, 23)
    OPT_HANDLER(handler24, 24)
    OPT_HANDLER(handler25, 25)
    OPT_HANDLER(handler26, 26)
    OPT_HANDLER(handler27, 27)
    OPT_HANDLER(handler28, 28)
    OPT_HANDLER(handler29, 29)
    OPT_HANDLER(handler30, 30)
    OPT_HANDLER(handler31, 31)
    OPT_HANDLER(handler32, 32)
    OPT_HANDLER(handler33, 33)
    OPT_HANDLER(handler34, 34)
    OPT_HANDLER(handler35, 35)
    OPT_HANDLER(handler36, 36)
    OPT_HANDLER(handler37, 37)
    OPT_HANDLER(handler38, 38)
    OPT_HANDLER(handler39, 39)
    OPT_HANDLER(handler40, 40)
    OPT_HANDLER(handler41, 41)
    OPT_HANDLER(handler42, 42)
    OPT_HANDLER(handler43, 43)
    OPT_HANDLER(handler44, 44)
    OPT_HANDLER(handler45, 45)
    OPT_HANDLER(handler46, 46)
    OPT_HANDLER(handler47, 47)
    OPT_HANDLER(handler48, 48) /*根据trap.h中异常号的define,其实只定义了0~19,再加上48是system call的异常号,但是由于在trapc中需要调用vectors[48]所以写了0~48个OPT_HANDLER*/
trap.c:模仿xv6,用循环减少重复代码。
void trap_init(void)
{
	extern struct Segdesc gdt[];
	extern uint32_t vectors[];

	// LAB 3: Your code here.
	for(int i = 0; i < 20; ++i) //只定义了异常号0~19
		SETGATE(idt[i], 0, GD_KT, vectors[i], 0);

    //由于breakpoint和system call要设置DPL=3,单独列出来
	SETGATE(idt[T_BRKPT], 0, GD_KT, vectors[T_BRKPT], 3);
	SETGATE(idt[T_SYSCALL], 0, GD_KT, vectors[T_SYSCALL], 3);


	// Per-CPU setup
	trap_init_percpu();
}
优化前后对比截图

可以发现优化后运行时间明显缩短(尤其是divzero测试),效率提升。
回答:这样做在这一系统中的目的?
减少重复代码,也就是减少了代码的冗余,增加了程序的可扩展性和维护性;增加了代码的可读性,更容易理解和测试,也方便修改;提升了性能。
B. 问题回答
1、回答 exercise4,exercise6 后面的四个问题。
Exercise4:
Q1:What is the purpose of having an individual handler function for each exception/interrupt? (i.e., if all exceptions/interrupts were delivered to the same handler, what feature that exists in the current implementation could not be provided?)
A1:因为不同异常/中断的处理方式与结果都不相同,所以需要不同的处理函数进行处理。并且这么做会push不同的error code入栈,方便进行区分,有利于代码的进一步处理。
而且这样也保证了用户程序不会对内核产生破坏,因为我们可以定义handler是否可以被用户程序触发。
Q2:Did you have to do anything to make the ` user/softintprogram behave correctly? The grade script expects it to produce a general protection fault (trap 13), but softint's code says int $14. *Why* should this produce interrupt vector 13? What happens if the kernel actually allows softint's int $14` instruction to invoke the kernel’s page fault handler (which is interrupt vector 14)?
A2:不需要做什么事。
虽然softint在汇编中强行生成了int $14异常号,但是trap 14 在 IDT 内描述符的 DPL = 0 ,即不可以在用户态显式触发。此时系统正在运行在用户态下,CPL = 3 ,权限不足,特权级为3的程序不能直接调用特权级为0的程序,会引发General Protection Exception,即用trap 13来处理这个非法操作。
如果内核允许softint的int $14执行,产生了缺页异常,那么操作系统会根据触发异常的指令去判断其访问的内存位置,但这个缺页中断的引起是不正常的 ,因而操作系统没办法处理这个异常。(而且如果真的允许的话,用户就可以通过通过恶意制造异常来控制内核了)
Exercise6:
Q3:The break point test case will either generate a break point exception or a general protection fault depending on how you initialized the break point entry in the IDT (i.e., your call to SETGATE from trap_init). Why? How do you need to set it up in order to get the breakpoint exception to work as specified above and what incorrect setup would cause it to trigger a general protection fault?
A3:在通过SETGATE宏设置 IDT 表中Breakpoint Exception的表项时,如果DPL=3,则会触发Breakpoint Exception,如果DPL=0,则会触发General Protection Exception。
DPL代表描述符的优先级。当前执行的程序能够跳转到该描述符所指向的程序那里继续执行的前提是:要求MAX(CPL,RPL)≤DPL,否则就会出现优先级低的代码试图访问优先级高的代码的非法操作,会触发General Protection Exception(同上一问)。
当DPL=0时,由于测试程序运行于用户态下,CPL = 3 ,在执行系统级别的int $3指令时,权限不足,产生General Protection Exception。
但是若改为DPL=3,权限足够,就会产生Breakpoint Exception。
Q4:What do you think is the point of these mechanisms, particularly in light of what the user/softint test program does?
A4:softint通过内联汇编显式调用int指令,只有DPL=3的异常能在用户环境下进行处理。这些机制保护了操作系统内核,隔离用户代码与内核代码,使得用户环境和内核环境能够相互独立,同时用户环境能够得到内核指令支持。
2、请详细说出系统是如何实现从用户态到内核态的转换,什么时候切换,以及详细说出此系统的中断处理流程 。
在操作系统中,实现从用户态到内核态的转换有3种方式:系统调用、异常和外围设备的中断。
系统调用是用户态进程通过系统调用申请使用操作系统提供的服务程序完成工作,主动切换到内核态(其核心机制还是使用了操作系统为用户特别开放的一个中断来实现)。
异常是当CPU在执行运行在用户态下的程序时,发生了某些事先不可知的异常,这时会由当前运行进程切换到处理此异常的内核相关程序中,也就切换到了内核态。
外围设备的中断是当外围设备完成用户请求的操作后,会向CPU发出相应的中断信号,这时CPU会暂停执行下一条即将要执行的指令转而去执行与中断信号对应的处理程序,如果先前执行的指令是用户态下的程序,那么这个转换的过程自然也就发生了由用户态到内核态的切换。
由于以上三种其实都和中断相关,如果系统要能处理中断和异常就需要初始化trap,设置对应的中断/异常码的回调,使得中断发生的时候,可以根据已经注册的信息转移到相应的中断处理函数。所以在trap_init() 中通过SETGATE宏注册了不同类型的中断对应的处理函数。另外,还在trapentry.S中声明了中断处理函数,TRAPHANDLER 定义了一个全局可见的中断处理,压入一个中断/异常号到特定的堆栈中。所有的中断首先会在这里先将现在运行的程序的信息压入堆栈,然后调用trap()。
此系统的中断处理流程 :
每个中断/异常对应一个中断向量,当操作系统执行int指令时候,发生了堆栈的切换:堆栈从用户空间的堆栈切换到TSS中SS0和 ESP0所指向的内核堆栈,然后内核将产生中断的用户的重要的信息压入堆栈(包括SS,ESP,EFLAGS,CS和EIP),然后将中断号(tf_err)和这个中断号在IDT表中的偏移(tf_trapno)压入堆栈,再将剩下的信息(按照trapframe中的格式)压入堆栈(包括 ds,es ,tf_regs)。然后将内核对应的.data 段的分别赋值给 ds 和 es 寄存器,切换到内核.data 段,将 esp 压入内核堆栈。调用trap() 函数,trap() 函数根据分配中断/异常号对应的处理程序进行处理。
trap()中会调用trap_dispatch(tf),如果trap_dispatch(tf)顺利返回,则执行env_run(curenv),最终调用env_pop_tf(tf),通过其中的iret指令恢复tf中保存的寄存器值,继续执行。
3、IDT 和 GDT 存储的信息分别是什么?系统是如何初始化它们的?
-
IDT
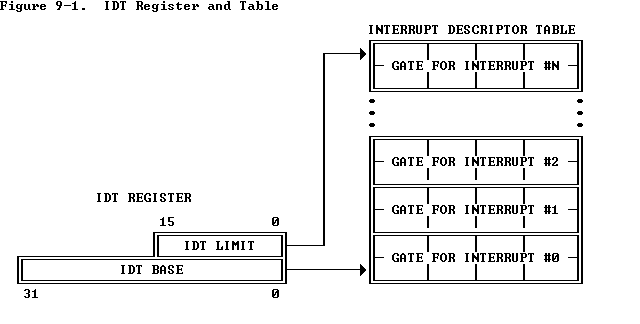
IDT(Interrupt Descriptor Table,中断描述符表),作用是将每个中断或异常标识符与服务于相关事件的指令的描述符相关联,即保存中断号以及中断之后调用函数的接口。
IDT以8字节描述符的数组的形式存在于内存的任意位置。处理器通过 IDT 寄存器(IDTR)定位 IDT,有汇编指令指令 LIDT 和 SIDT 操作 IDTR。IDT的第一个条目可能包含一个描述符。为了形成IDT的索引,处理器将中断或异常标识符乘以8。因为只有256个标识符,所以IDT不必包含超过256个描述符,它可以包含少于256个条目,只有实际使用的中断标识符才需要条目。
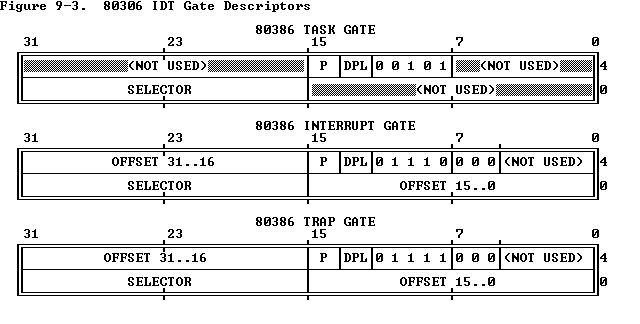
IDT 可以包含以下三种描述符:Task gates、Interrupt gates 和 Trap gates,里面的内容主要是 offset, DPL等等,可以根据这些获得中断处理函数 cs 和 eip 的值从而跳转到对应的中断处理函数。
-
GDT
GDT(Global Descriptor Table,全局描述符表),作用是存放某个运行在内存中的程序的分段信息。并且GDT全局可见,即每一个运行在内存中的程序都能访问这个表。
程序所在的段的段基址保存在段描述符中。段描述符有64位,包含段基址、限长、访问权限信息。
对于32位或64位的系统,如果直接通过一个64-bit段描述符来引用一个段时,就必须使用一个64-bit长的段寄存器装入这个段描述符。但是段寄存器仍然被规定为16-bit(为了向后兼容)。为了解决这一问题,需要把这些长度为64-bit的段描述符放入一个数组中,而将段寄存器中的值作为下标索引来间接引用(事实上,是将段寄存器中的高13-bit的内容作为索引),这个全局的数组就是GDT。GDT包含了系统使用的以及全局的代码段、数据段、堆栈段和特殊数据段描述符。
-
初始化IDT和GDT
初始化IDT:在kern/trap.c中通过struct Gatedesc idt[256] = { { 0 } }定义了中断描述符数组,然后在trap_init()中借助SETGATE宏完成对中断描述符表IDT的初始化。

初始化GDT:在kern/env.c中完成,之后会在env_init_percpu中加载GDT和段描述符。
// Global descriptor table.
//
// Set up global descriptor table (GDT) with separate segments for
// kernel mode and user mode.  Segments serve many purposes on the x86.
// We don't use any of their memory-mapping capabilities, but we need
// them to switch privilege levels.
//
// The kernel and user segments are identical except for the DPL.
// To load the SS register, the CPL must equal the DPL.  Thus,
// we must duplicate the segments for the user and the kernel.
//
// In particular, the last argument to the SEG macro used in the
// definition of gdt specifies the Descriptor Privilege Level (DPL)
// of that descriptor: 0 for kernel and 3 for user.
//
struct Segdesc gdt[] =
	{
		// 0x0 - unused (always faults -- for trapping NULL far pointers)
		SEG_NULL,

		// 0x8 - kernel code segment
		[GD_KT >> 3] = SEG(STA_X | STA_R, 0x0, 0xffffffff, 0),

		// 0x10 - kernel data segment
		[GD_KD >> 3] = SEG(STA_W, 0x0, 0xffffffff, 0),

		// 0x18 - user code segment
		[GD_UT >> 3] = SEG(STA_X | STA_R, 0x0, 0xffffffff, 3),

		// 0x20 - user data segment
		[GD_UD >> 3] = SEG(STA_W, 0x0, 0xffffffff, 3),

		// 0x28 - tss, initialized in trap_init_percpu()
		[GD_TSS0 >> 3] = SEG_NULL};
4、_alltraps 的具体作用是什么?它做的事情在后面哪里用到了 ?
_alltraps的目的是正确地向trap()函数传参,过程是:
- 数据压栈,使得栈的结构看上去像
struct Trapframe - 将
GD_KD加载到%ds和%es寄存器 - 用
pushl %esp将一个指向 Trapframe 的指针作为一个参数传递给trap () call trap()调用函数
 .global _alltraps
_alltraps:
	pushl %ds
	pushl %es
	pushal
	movw $GD_KD, %ax
	movw %ax, %ds
	movw %ax, %es
	pushl %esp
	call trap
根据异常和中断介绍的内容,当中断产生时,处理器已经自动把%ss寄存器到tf_eip的内容压入栈,还有tf_ds, tf_es, tf_regs需要处理。pushl %ds,pushl %es,pushal对应的就是把%ds,%es和所有寄存器压栈,顺序也和Trapframe中声明的顺序一致。之后再把将GD_KD的值赋值给寄存器%ds,%es。用pushl %esp将一个指向 Trapframe 的指针作为一个参数传递给trap ()并调用。
                     +--------------------+
                     | 0x00000 | old SS   |
                     |      old ESP       |
                     |     old EFLAGS     |
                     | 0x00000 | old CS   |
                     |      old EIP       |
                     +--------------------+	 <---- 以上在陷入发生时由硬件完成
                     |        err     	  |
                     |      trapno        |
                     +--------------------+  <----以上由TRAPHANDLER宏完成
                     |        ds          |
                     |        es          |
                     |       regs         |
                     |     old esp        |
                     +--------------------+ <----以上由_alltraps完成
                     |     ret addr       |
                     |     old ebp        |
                     +--------------------+ <----以上call调用完成
每次在用宏TRAPHANDLER 和 TRAPHANDLER_NOEC时都有跳转到_alltraps。
#define TRAPHANDLER(name, num)						\
	.globl name;		/* define global symbol for 'name' */	\
	.type name, @function;	/* symbol type is function */		\
	.align 2;		/* align function definition */		\
	name:			/* function starts here */		\
	pushl $(num);							\
	jmp _alltraps

#define TRAPHANDLER_NOEC(name, num)					\
	.globl name;							\
	.type name, @function;						\
	.align 2;							\
	name:								\
	pushl $0;							\
	pushl $(num);							\
	jmp _alltraps
5、用户环境是什么?此实验使用哪种数据结构来存储这些信息?此数据结构具体形式是什么样子的?
在kern/env.c中可以看到,内核维护了与环境相关的三个主要全局变量:
struct Env *envs = NULL;		  // All environments
struct Env *curenv = NULL;		  // The current env
static struct Env *env_free_list; // Free environment list
								  // (linked by Env->env_link)
一旦JOS系统启动运行,envs指针指向一个保存当前系统中所有环境变量的Env结构体数组。JOS内核最多同时支持NENV个活跃环境,并为每一个可能的环境申请一个Env数据结构,存放在envs数组中。JOS内核会将所有未使用的Env结构体放在env_free_list链表中,以便用户环境的分配和回收。curenv指针指向JOS内核中任意时刻正在执行的环境,在启动期间,第一个环境运行之前,curenv 初始化为 NULL。
` inc/env.h文件中包含了JOS对于用户环境的基本定义,在此实验中内核使用 Env`结构来跟踪每个用户环境。
该数据结构的具体形式:
struct Env {
	struct Trapframe env_tf;	// Saved registers
	struct Env *env_link;		// Next free Env
	envid_t env_id;			// Unique environment identifier
	envid_t env_parent_id;		// env_id of this env's parent
	enum EnvType env_type;		// Indicates special system environments
	unsigned env_status;		// Status of the environment
	uint32_t env_runs;		// Number of times environment has run

	// Address space
	pde_t *env_pgdir;		// Kernel virtual address of page dir
};
以下是各字段的用途:
env_tf:这个结构定义在inc/trap.h,当内核或其他环境执行时,保存当前未执行的环境的寄存器变量。例如当内核从用户态切换到内核态运行时,用户态的重要寄存器将被保存,以便在回到用户态运行时恢复它们。
env_link:指向env_free_list中该环境的下一个未使用的环境。
env_id:kernel储存的用于标识该环境的唯一标识符。在用户的一个环境结束之后,kernel可能会将同样的env重新分配给另一个环境,但是env_id将是不同的。
env_parent_id:存放创建此环境的环境的env_id,可以通过这种方式形成环境的family tree。
env_type:用于标记特殊的环境类型,对于大多数环境,值都是ENV_TYPE_USER。
env_status:环境状态,有以下几种取值:
ENV_FREE:表明该struct Env空闲,应当在env_free_list上ENV_RUNNABLE:表明该struct Env对应的环境就绪,等待被分配到处理器(等待运行)ENV_RUNNING:表明该struct Env对应的环境正在运行ENV_NOT_RUNNABLE:表明该struct Env对应的环境处于活跃状态,但此时无法运行:例如他正在等待来自另一个环境的消息ENV_DYING:表明该struct Env结构体对应的环境是一个僵尸环境,它将在系统下一次进入内核态时被回收
eng_pgdir:保存了环境的页目录的内核虚拟地址。
和Unix进程一样,JOS 环境将“线程”和“地址空间”的概念耦合在一起。线程是由env_tf字段的被保存的寄存器值定义,地址空间是由env_pgdir域指向的页目录和页表定义。如果想让一个环境能够运行,kernel必须要使用保存的寄存器值和合适的地址空间来设置CPU。